Below are the steps that walk you through how to connect to the database via Excel. You can use this to access some of the data and dump those queries into other Excel files or another program. Please note this is read only and you will not be able to write back to our database. If you need additional assistance in understanding the underlying ShopPAK table structures and/or can’t figure it out we may be able to provide that service, but it would come with the standard $150.00 hourly rate from Development as this is not a standard Support or Implementation issue.
Here are the steps:
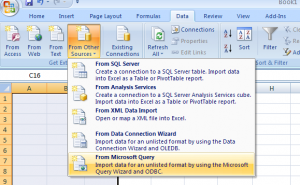
1) In Excel, click the Data tab and choose From Other Sources | From Microsoft Query.
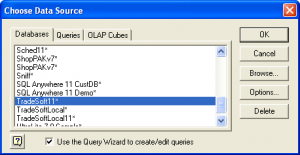
2) Find the TradeSoft11 entry in the Databases tab and click OK.
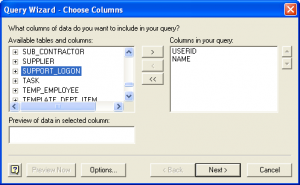
3) Here’s where you’ll choose the table you want to view with this query. Once you find the table you want, click the Arrow in the middle to move the columns over to the right side. If there are some columns you don’t want, select them from the right side and click the 2nd arrow in the middle. Click Next. If you have some specific sorting you want to do or what not, the next few steps in the wizard will walk you through that. Otherwise keep clicking Next till you get to the Finish window.
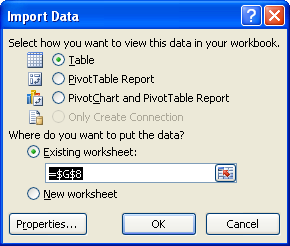
4) It’ll ask you how you want to view this data in the workbook. Choose Table.
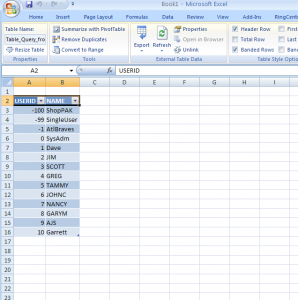
And there you have it, the columns for that table will now appear. Remember that we only support read-only in regards to external connections to the database.
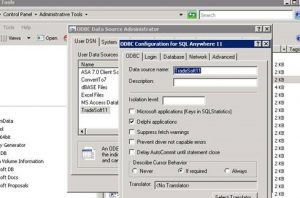
PLEASE NOTE IF YOU ARE USING A 64 BIT VERSION OF OFFICE, YOU WILL NEED TO DOWNLOAD AND UTILIZE THE 64 BIT ODBC DRIVER USING THE BELOW INSTRUCTIONS:
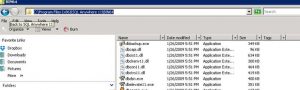
First you’ll need to download the 64bit ODBC Driver to your client machine. (Click the embedded link) Extract the zip file to C:\Program Files (x86)\SQL Anywhere11.
Once you’ve extracted it, you should see the newly created BIN64 directory (note: double-check the inside of that directory to make sure it didn’t extract it as C:\Program Files (x86)\SQL Anywhere11BIN64\BIN64 as I’ve seen some users run into similar behavior when extracting directories).

After verifying the extraction completed successfully, you’ll then bring up Command Prompt, copy/paste in the following command, and run it. Depending on your setup, you may need to start up Command Prompt with the Run As Admin option. Close Command Prompt when finished.
regsvr32 “C:\Program Files (x86)\SQL Anywhere 11\BIN64\dbodbc11.dll”
Now you should be able to navigate to the 64 bit ODBC entry in your Data Source.