×

Progress Billing / Schedule of Values

 
The eight sub tab, “Progress Billing / Schedule of Values”, generates and tracks multiple progress billings for the job.  It also produces an initial Schedule of Values.  ShopPAK not only calculates the next progress billing amounts, it generates standard AIA Progress Billing “Application for Payment” documents and maintains billing history including held retainage.
 
 
Progress Billing / Schedule of Values
1

Original Contract Sum

1. Original Contract Sum
ShopPAK initially populates this field with the job sell price when you first convert a ProjectPAK estimate over to ShopPAK.  From that point on, you must manually keep this price up to date if the overall contract prices change.  Normally this isn’t an issue, since most additions or subtractions to the job that affect sell price come from change orders, not editing the original work orders that comprise the original contract.  If you add change orders, ShopPAK automatically recalculates the sell price of the job, and it adds new change orders to the “Change Orders” grid.  If you alter sell price in any other way, however, make sure you update the “Orig. Contract Sum” on the progress billing header so progress billing application sell price will be correct.
2

Contract Date

2. Contract Date
Date of the contract associated with the job.
3

Contract For

3. Contract For
High level summary of what the job entails.
4

Owner Name and Address

4. Owner Name and Address
ShopPAK prints the customer name and address on the progress billing application.  Indicate whether it should use the job’s “Bill To” or “Ship To” address when printing.
5

Project Numbers

5. Project Numbers
Enter the customer’s project number(s) for the job.
6

Architect

6. Architect
Enter the architect’s name.
7

Construction Manager

7. Construction Manager
Enter the construction manager's name (GC contact).
8

Internal Notes

8. Internal Notes
These notes don't print on any AIA Progress Billing documents.  Use the memo for any internal purpose, for example, list your billing contact's emails.
9

Change Orders

9. Change Orders
This is a read-only grid maintained by ShopPAK.  As change orders are added to the job, either by converting them over from ProjectPAK or by adding them manually, ShopPAK automatically updates the “Change Order” area accordingly.
10

Refreshing Change Orders

10. Refreshing Change Orders
Click Refresh to update the Change Order grid to reflect any additional Change Orders that have been added to the job since the Progress Billing was initially created.
11

Add to Progress Billing Grid

11. Add to Progress Billing Grid
Select the change orders you wish to create application items for then press the button.
12

Creating a New Progress Billing or Schedule of Values

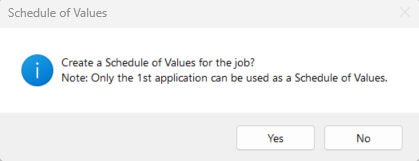
12. Creating a New Progress Billing or Schedule of Values
To create a new progress billing, click the “New” button. The first time you click “New” for a given job, ShopPAK displays the following message:
 
 
If you want to send your customer an initial Schedule of Values, click Yes. ShopPAK always identifies this occurrence of your billings accordingly -> Schedule of Values.
 
 
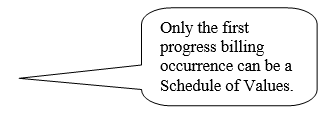
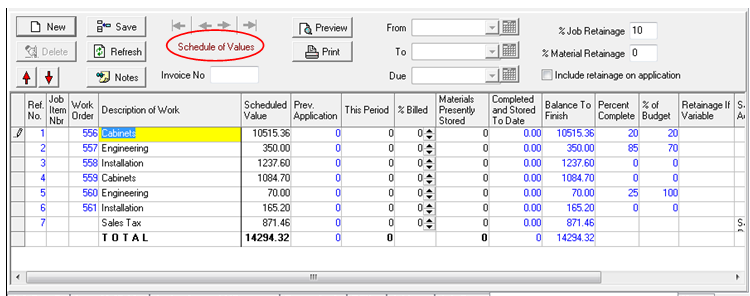
The Schedule of Values doesn’t have a From, To, or Due date.  Moreover, it will never have an invoice number.  Never update ‘This Period’ or ‘% Billed’ on the Schedule of Values. 
To generate the Schedule of Values, click either the Print or Preview buttons:
 
 
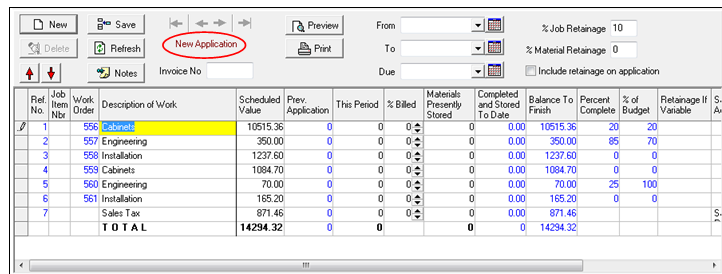
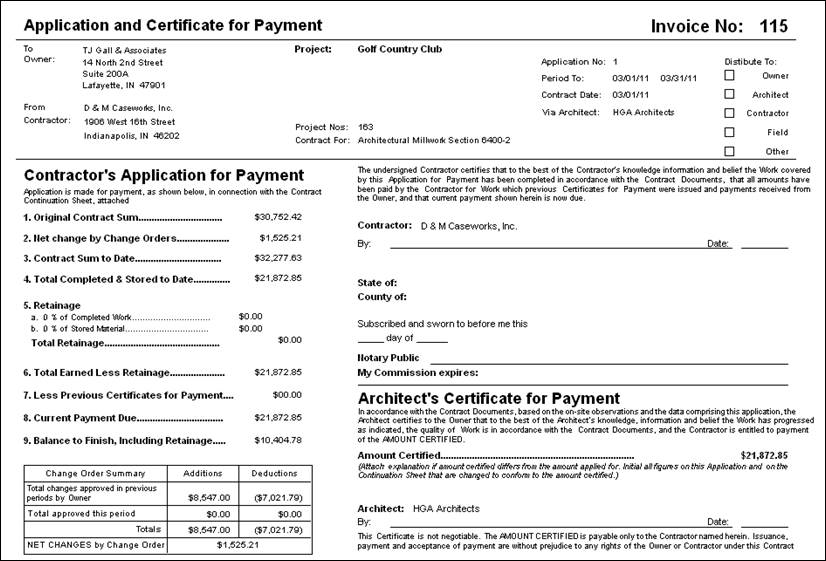
If you didn’t elect to create a Schedule of Values when your first clicked  “New”, or the next time you click the “New” button, ShopPAK displays -> New Application.  This tells you that this progress billing instance is going to be an actual application for payment. 
 
 
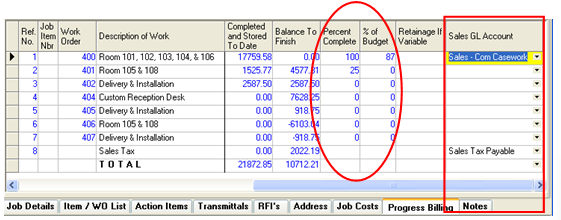
Initial Application Items
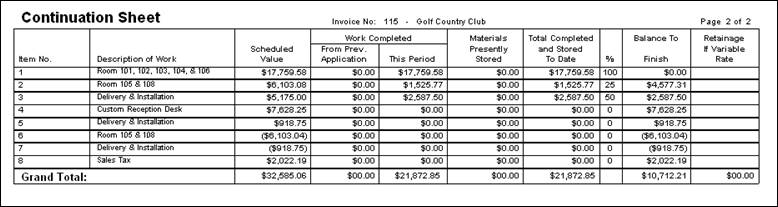
If you have any Job Items or Work Orders that have been flagged for inclusion on a progress billing application, ShopPAK adds them as application items along with their scheduled value.
 
Sales Tax
If you are collecting sales tax, ShopPAK automatically calculates and adds “Sales Tax” as the last application item.
 
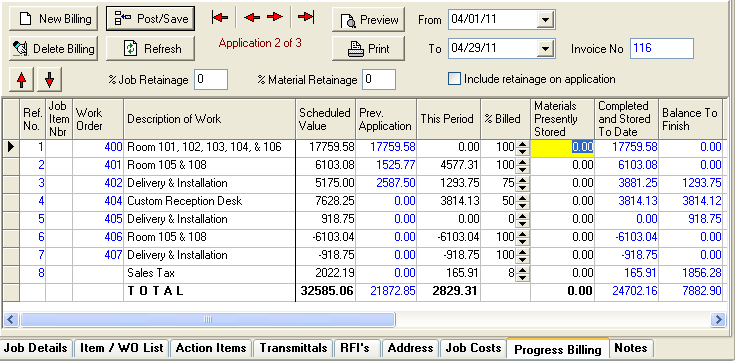
Determing the New Progress Billing Amounts
For each application item that has ‘billable’ labor and/or material, adjust either the “This Period” amount or the “% Billed”.
 
This Period
If you prefer entering a dollar amount, simply enter the dollar amount into “This Period” and click Enter or tab out of the cell.  ShopPAK automatically adjusts the application item’s “% billed”, “Completed and Stored to Date” amount, and “Balance To Finish” amount.  It also updates the sales tax and total rows accordingly.
 
% Billed
If you prefer to work in percentages, simply enter the percentage that should be billed into “% Billed” and click enter or tab out of the cell.  ShopPAK automatically adjusts the application item’s “This Period” amount, “Completed and Stored to Date” amount, and “Balance To Finish” amount.  It also updates the sales tax and total rows accordingly.
 
Percent Complete / Percent of Budget
If the application item is based on a work order or job item (as they are in our example), ShopPAK includes both the “Percent Complete” and “Percent of Budget” percentages for the work order / job item.  Use these percentages to help you determine the correct “Percent Billed” percentage.  The “Percent Billed” should be close to the progress tracking percentages, however, due to the fact that you are projecting a relative completion percentage and there may be issues with collecting payment from the GC, you’ll often enter “Percent Billed” percentages that are greater than either of ShopPAK’s progress tracking percentages.
 
Sales GL Account
If the application item is based on a work order or job item (as they are in our example), and the work order or job item has a “Sales GL Account”, ShopPAK automatically fills in the “Sales GL Account”.  If you export the invoice to an accounting package, the sales GL account is usually required.  If a sales GL account is not present, you can add it manually by selecting the correct GL account code from the pick list.
 
Line Item Notes
You can also add an internal 'informational' note to a given line item by typing the note into the application item's notes cell.  These notes don't print anywhere.  They are used as needed by the person creating the AIA progress billings.
13

Save button

13. Save button
Clicking the “Save” button edits the information, and if necessary fields are present, creates a new progress billing application.  It assigns the next sequential invoice number to the progress billing application.
14

Reviewing Historic Progress Billings

14. Reviewing Historic Progress Billings
 Use the progress billing navigation buttons to review prior billings:
 
 
As you click through progress billings, ShopPAK updates the progress billing grid with information from the particular progress billing you have selected and are currently viewing.
15

% Job Retainage

15. % Job Retainage
ShopPAK uses the default job retainage percentage you’ve entered into the billing options area.  Adjust as needed for the current job.
16

Deleting a Progress Billing Application For Payment

16. Deleting a Progress Billing Application For Payment
1.     Using the navigation buttons, find the application you want to delete.
 
2.     Click the “Delete Billing” button.  If this is the most current application, ShopPAK displays a confirmation dialog box.  Click “Yes” to delete the progress billing application.  Click “No” to cancel the deletion request.
    
However, if you attempt to delete an application that has more recent applications, ShopPAK displays the following dialog box and disallows the deletion.
 
    
17

Up and Down Arrows

17.  Up and Down Arrows
If you want to change the order of an application item, select that item and use the “Up” or “Down” arrows to move them.
18

Refreshing Progress Billing Items From Job Tree

18. Refreshing Progress Billing Items From Job Tree
The first progress billing item list you create dictates the progress billing item list on subsequent progress billings.  This keeps application for payments consistent across multiple billing periods.  If you want a new progress billing to reflect Job Tree changes, do the following:
 
1.     Click the “New Billing” button to create a new progress billing application.  ShopPAK sets up the new application item list and values based on prior application for payments.
 
2.     Click the “Refresh” button.  This alters the application item list based on the current state of the Job Tree.
19

Notes button

19. Notes button
If you want to add free form notes to the application for payment request, click the Notes button and add billing notes.  Notes print underneath the Payment Sheet continuation sheet.  If notes exist for the billing request, ShopPAK paints the Notes button yellow.
20

Invoice Number

20. Invoice Number
This is a read-only field.  ShopPAK supplies the next invoice number when you “Post / Save” a progress billing application.
21

Previewing a Progress Billing Application For Payment

21. Previewing a Progress Billing Application For Payment
To preview the progress billing, click the “Preview” button.  This displays the Progress Billing Paper Select dialog box:
 
 
The first and fourth choices print the entire application, including the application ‘form’ verbiage, on plain paper.  The other choices are used when you are printing on pre-printed AIA Progress Billing forms.  Experiment with the available choices to find the one that works best at your company.
 
Click the OK button to preview the AIA progress billing form.
  
First Page of the AIA Progress Billing Form……………..
 
 
 Second Page of the AIA Progress Billing Form……………..
 
22

Printing a Progress Billing Application For Payment

22. Printing a Progress Billing Application For Payment
To print the progress billing, click the “Print” button.  This displays the Progress Billing Paper Select dialog box:
 
 
The first and fourth choices print the entire application, including the application ‘form’ verbiage, on plain paper.  The other choices are used when you are printing on pre-printed AIA Progress Billing forms.  Experiment with the available choices to find the one that works best at your company.
 
Click the OK button to print the AIA progress billing form.
 
 
First Page of the AIA Progress Billing Form……………..
 
  
Second Page of the AIA Progress Billing Form……………..
 
23

From and To Dates

23. From and To Dates
Make sure you identify the beginning and ending dates that constitute the progress billing period.  Typically this will be the first and last days of a month.
24

Due

24. Due
ShopPAK automatically fills in Due date if you’ve supplied the ‘number of days’ to add to the billing end date.  ‘Number of Days’ is entered in ProjectPAK on the customer’s business record.
25

Include retainage on application check

25. Include retainage on application check
Tells ShopPAK whether or not to include past retainage on the current application for payment.  This is usually done on the last application for payment request.
26

% Material Retainage

26. % Material Retainage
ShopPAK uses the default material retainage percentage you’ve entered into the billing options area.  Adjust as needed for the current job.