
Job Costing
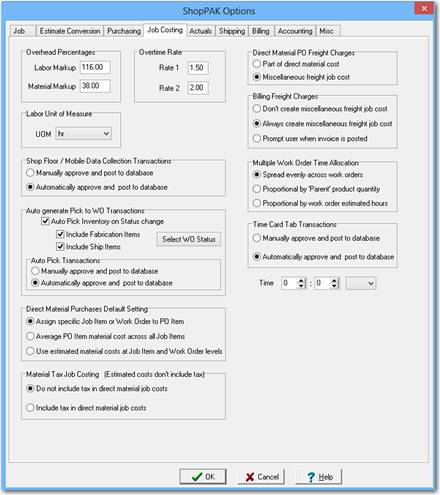
Overhead Percentages
Default labor and material overhead markup percentages used in determining developed costs. Developed Costs are the combination of Actual Cost + Overhead Amount. (enter 42% as 42).
“Labor Markup” is used as the default setting for the “Overhead Markup Percent” field on the “Employee” dialog box.
“Material Markup” is used as the default setting for the “Overhead %” field on the “Inventory Details” form and the PO Item grid.
Overtime Rate
Enter the overtime factors used for calculating overtime compensation.
Labor Unit of Measure
Select the default UOM for Labor requirements.
Shop Floor Data Collection Transactions
Select the default approval approach for labor and material transactions coming in from PCDC Workstations or TriCoder units.
Manually approve and post to database
When the “Manually Approve” parameter is active, all PCDC and TriCoder transactions will remain in an “un-Approved” status. This option allows for verification of transactions prior to applying the transaction cost to the Job. Transactions will need to be “Approved” on the Time or Material Card form before the costs will be applied. Please refer to “Time Cards” or “Material Cards” for details on manually approving transactions.
Automatically approve and post to database
When the “Auto Approve” parameter is active, all valid PCDC and TriCoder transactions will be automatically updated to a status of “Approved”. Associated costs are immediately applied to the Job. ShopPAK allows for modifications to “Approved” transactions on the Time or Material Card Form. Previously Approved transactions can be “re-Approved” to update the Job with the appropriate cost change. Please refer to “Time Cards” or “Material Cards” for details on modifying transactions.
Auto generate Pick to WO Transactions
Auto Pick automates the process of generating “Pick” inventory transactions. The “Pick” material transactions are triggered by a change in Work Order status. Only Inventory Items on the “Material” grid will have Pick transactions automatically generated when the Auto Pick routine is executed.
Inventory Items have an “Inventory Code” in the inventory column. When the Auto Pick routine runs, it creates material “Pick” transactions based on parameters set with this option.
For more information on auto pick generation, see “Inventory Form” for details on this powerful feature.
Once checked, the Auto Pick process is enabled and several additional options must be defined.
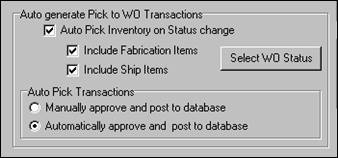
The Auto-Pick process differentiates between two material types: Fabrication materials and/or Ship materials. See “Chapter 8 – Work Order Form”, page 33, for more information on these two material types.
Click on the “Select WO Status” button to identify which work order status values trigger automatic inventory pick transaction generation.
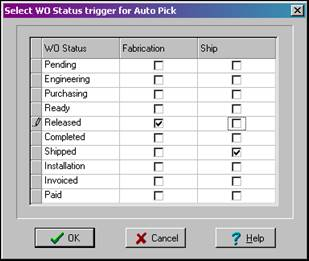
In the example above, inventory picks (for materials marked as fabrication items) will be automatically generated when work order status is changed to ‘Released’. Inventory Items marked as ship item will wait until the work order has changed to a ‘Shipped’ status before “Pick” transactions get generated.
Choose how you want to approve and post transactions to the database. Two choices are available. Either manually approve and post transactions via the Materials Tab, or have ShopPAK automatically approve and post to the database.

If Auto Approve is selected, only successful Auto Pick transactions will apply costs, adjust Inventory counts and be tagged as “Approved” on the “Material Card” tab. If a problem is detected during processing…..the transaction will be visible on the “Material Card” tab in an “Un-Approved” status. Users need to resolve problem and then manually approve any rejected transaction(s).
-
TIP: Common causes for transaction rejection include:
-
Insufficient OH stock available to support the transaction Qty
-
Multiple locations for the Inventory Item
-
Invalid Location for the Inventory Item
-
User changing the WO Status has insufficient security privileges
-
Employee Profile considerations
With Auto Approve enabled, the User logged in when the WO Status is changed to the defined Work Order trigger status need to have “Approve actuals” security privileges for “Material Card” transactions.
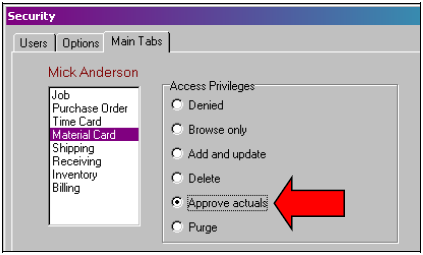
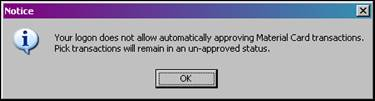
In the event that the User does not have adequate security privileges, “Pick” transactions will still be created, but remain in an “un-Approved” status. Essentially, ShopPAK processes the transactions as though the “Manually Approve” parameter had been selected instead.
If you select “Manually Approve” transactions, all Pick transactions remain in an “Un-Approved” status. This option allows a user to verify transactions prior to applying the material cost to the Job and decrementing inventory counts.

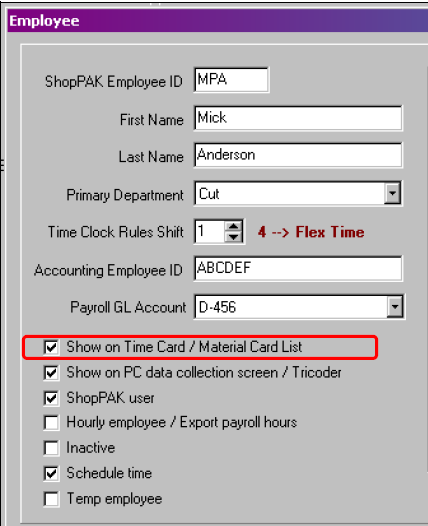
A user changing a Work Order status that triggers pick transactions needs to have their Employee record “Shown on Material Card List” checked. ShopPAK still generates pick transactions, however a ‘warning’ message is displayed notifying the User that his/her Employee record requires attention before these transactions will be visible/accessible on the Material Card tab.
Note: See the section on Employee Profile set-up options earlier in this Chapter for more information on setting up employee records.
|
Direct Material Purchases Default Setting
Assign specific Job Item or Work Order to PO Item
The user identifies a specific Job Item or Work Order when they assign a PO Line Item to the job. All of the material cost assigned to the Job Item / Work Order will be applied to the Job Item / Work Order’s “Direct Material Purchase” actual cost accumulator. Naturally, the Job Item / Work Order’s actual material cost is also reflected in the overall Job’s actual material cost accumulator.
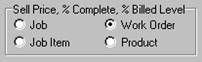
Note: When adding Job assignments to a direct purchase PO Item, ShopPAK will check the “Sell Price / Percent Complete” global setting to determine if the user has to select at the Job Item or Work Order level. If the global default is set to supply sell price and percent complete at the Job or the Job Item level, the user can choose either a Job Item or Work Order when doing a PO Item Job assignment. However, if managing sell price and percent complete at the Work Order or Product levels, the user must choose a PO Item assignment at the Work Order level.
 |
Average PO Item material cost across all Job Items
When it doesn’t make sense to assign a material purchase to a specific Job Item because the material is needed for several Job Items, you can have ShopPAK average the cost across all Job Items. During purchasing, the user assigns a PO Item to the Job, and ShopPAK automatically apportions the material cost evenly across all of the Job Items under the job.
Use Estimated material costs at Job Item and Work Order levels
Another alternative when it doesn’t make sense to attribute a PO Item’s material cost to just one Job Item/Work Order is to use each Job Item or Work Order material cost estimate as the actual material amount.
Before using this approach, make sure you are confident that your material estimates are going to be close to actual material purchases. The Job’s Work Order form has a sub-tab called “Materials”. If you convert an estimate that breaks out estimated materials, the “Materials” tab will automatically be populated with estimated materials. If you don’t break out materials in your estimate, you’ll need to populate the “Materials” tab when you finish setting up the ShopPAK job.
Material Tax Job Costing (Estimated costs don't include tax)
Do not include tax in direct material job costs
If a purchase order has tax, the tax amount is not included in direct material cost.
Include tax in direct material job costs
If a purchase order has tax, that tax will be included in the direct material cost.
Direct Material PO Freight Charges
Select the default Job cost “bucket” for vendor freight charges on PO Items with a type of “Job”.
Part of direct material cost
This option combines freight charges into the material cost. This cumulative total is available on the “Job Costs” sub tab under the ‘Material Purchases’ cost accumulator.

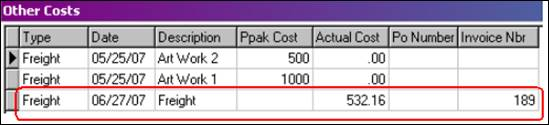
Miscellaneous freight job cost
Separates the freight cost component into its own cost accumulator à Miscellaneous Cost / Freight. On the affected Job Item, click the “Misc Job Cost”  button to see the freight costs.

See “Chapter 7 – Job Item Form”, page 7, for detailed information on Job Item Miscellaneous costs.
Billing Freight Charges
Select the default approach for recording Billing freight charges.
Don’t create miscellaneous freight job cost
Selecting this option will prevent the creation of “Miscellaneous/Other Cost” records for freight charges when an Invoice is posted.
Always create miscellaneous freight job cost
Selecting this option will trigger a breakout of Invoice freight costs and itemize them as a “Miscellaneous/Other Cost” at the Job Item Level. Reference to the Invoice Number generating the charge will be recorded.
Prompt user when invoice is posted
Selecting this option will trigger a message box during the Invoice posting process.
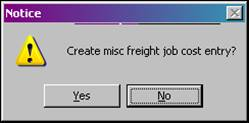
If the user selects “Yes” ShopPAK will break out the Invoice freight costs and itemize them as a “Miscellaneous/Other Cost” at the Job Item Level. Reference to the Invoice Number generating the charge will be recorded.
Multiple Work Order Time Allocation
This option tells ShopPAK how you want time apportioned across several work orders when an employee logs on to multiple work orders as opposed to just one work order. This is only available when using ShopPAK’s optional Shop Floor Data Collection module.
Spread evenly across work orders
If a user works three hours on three multiple work orders, ShopPAK simply divides the total hours by the number of work orders and allocates time accordingly. In this example, each work order would receive 1 hour of employee time.
Proportional by “Parent” product quantity
This approach uses the Products under a work order to determine the relative ‘weight’ of each work order. For each work order, ShopPAK counts the quantity of ‘Parent’ level products and blank level products (a product that is neither a ‘child’ or a ‘parent’). This gives us a relative weight for each work order.
Example
A user logs on to 2 work orders à 2234 and 3533
Work Order 2234 has two non-child product rows. One has a quantity of 5 and the other 3.
Work Order 3533 has one non-child ‘Product’ row. Its quantity is 2.
So the total quantity of the combined work orders is 10 and the relative weight of work order 2234 is 8/10 and work order 3533 is 2/10.
If the user works 4 hours on the combined batch of work orders (2234, 3533), ShopPAK allocated the following time to each work order:
2234 à 4 hrs * 8/10 = 3.2 hours
3533 à 4 hrs * 2/10 = .8 hours
The assumption is that work order 2234 has 4 times the product quantity, it should receive 4 times the hours spent working the combined work orders. Work order 3533 on the other hand, has much fewer quantities in products and should only consume a fraction of the work order batch as illustrated above.
Note: The above option is a good choice as long as users dole out and batch ‘like’ work orders. This means that work orders generally have the same type of products being fabricated or machined, and thus, product quantity is a good candidate for ‘sizing’ work orders and distributing time.
|
Proportional by work order estimated hours
This approach uses the work order level ‘Estimated Hours’ to determine the relative ‘weight’ of each work order.
Example
A user logs on to 2 work orders 2234 and 3533
Work Order 2234 has 10 estimated hours.
Work Order 3533 has 3 estimated hours.
So the total estimated hours for both work orders is 13 and the relative weight of work order 2234 is 10/13 and work order 3533 is 3/13.
If the user works 8 hours on the combined batch of work orders (2234, 3533), ShopPAK allocated the following time to each work order:
2234 -> 8 hrs * 10/13 = 6.15 hours
3533 -> 8 hrs * 3/13 = 1.85 hours
Note: The above option is a good choice as long as users provide fairly accurate estimated hours.
|
Time Card Transactions
Tells ShopPAK how you want to handle approving labor time card transactions. The automated directive (Automatically approve and post to database) option is only available for users who have purchased PC Shop Floor Data Collection since the automated batch update of manually entered time card transactions is implemented via the PC Shop Floor Data Collection controller.
Manually approve and post to database
When the “Manually Approve” parameter is active, all Time Card labor transactions remain in an “un-Approved” status until a person with ‘approval’ authority reviews and approves the employee time card(s). Note: Transactions need to be “Approved” on the Time Card Form before labor costs and hours are visible on the job cost screens and reports. Refer to “Chapter 14 – Time Card Form” for details on “Approving” labor transactions.
Automatically approve and post to database
When the “Auto Approve” parameter is active, all valid manually entered job cost labor transactions are automatically approved and applied to applicable jobs, job items, and work orders.
TIP: ShopPAK allows for modifications to “Approved” transactions on the Time Card Form. Previously Approved transactions can be “re-Approved” to update the Job with the appropriate cost change. Please refer to “Chapter 14 – Time Card Form” for details on modifying labor transactions.
|
Auto Approve Batch Time
Select the time for batch approval of Time Card entries, both manually entered and those coming in from PCDC and TriCoder Units. This feature is a function of the PCDC Controller.