
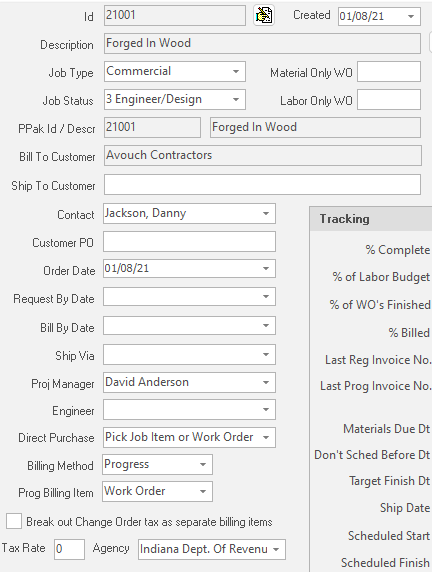
Job Details
The first sub tab, “Job Details”, contains descriptive and control information about the job, important dates, and tracking percentages. Required fields include: Job Id, Job Description, Bill To Customer, Job Status, and Job Type.
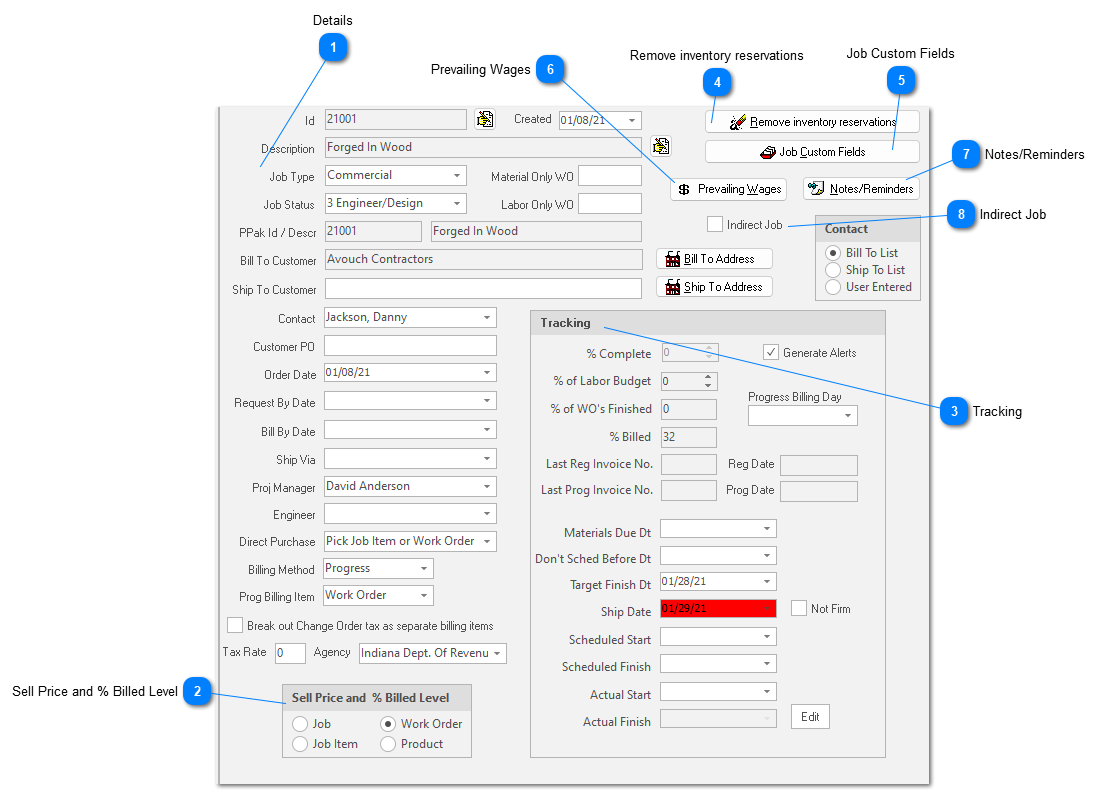
Sell Price and % Billed Level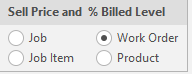 Choose which level of the job you want to drive sell price and billing at. For each new job, ShopPAK uses the ShopPAK Options default value to set this control. However, if you want to manage a particular job differently, choose the right level for that job. For most customers, we recommend maintaining sell price at the work order level. See “Setup and Options” for more information.
|
Tracking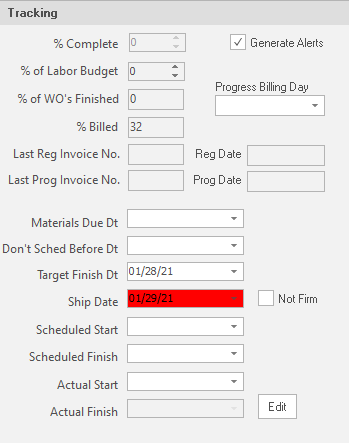 Percent Complete
User entered percent complete. You can update percent complete at the job level, however, it is usually more accurate to maintain ‘Percent Complete’ at a lower level in the job tree (let’s say at the Job Item or Work Order level), and provided you’ve set up percent complete maintenance at the same level, ShopPAK ‘bubbles up’ the lower level’s percent complete and calculates ‘Percent Complete’ at the job level. The calculation is based on the lower level’s sell price relative to the overall job’s sell price.
Generate Alerts
Tells ShopPAK if it should generate alerts for the job.
Percent of Labor Budget
ShopPAK automatically calculates percent of labor budget at either the work order or job item levels and bubbles up to the job level. Depending on how you’ve set up your ShopPAK options, ShopPAK calculates percent of labor budget either by dividing actual labor hours by estimated labor hours, or dividing actual labor cost by estimated labor cost. This is a great metric because it is automatic, and it gives project managers a good sense as to where they’re at relative to estimated labor cost or hours.
Percent of Work Orders That Are Finished
ShopPAK automatically calculates percent of work orders that are finished. In order to use this tracking ratio, make sure you choose work order status considered completed in ShopPAK Options.
Progress Billing Day
Choose the day of the month that you plan on submitting progress billing application for payments. The alerts system uses the supplied day to generate a reminder alert ̶ provided you've set up a progress billing day alert via ShopPAK Alerts.
Percent Billed
ShopPAK automatically updates this percentage based on the amount of money billed (including both progress billings and regular invoicing) relative to the job’s sell price.
Last Regular Invoice Number
ShopPAK automatically fills in the last ‘regular’ invoice number billed for this job.
Last Regular Invoice Date
ShopPAK automatically fills in the date of the last ‘regular’ invoice.
Last Progress Billing Invoice Number
ShopPAK automatically fills in the last ‘progress billing’ invoice number billed for this job.
Last Progress Billing Invoice Date
ShopPAK automatically fills in the date of the last ‘progress billing’ invoice.
Material Due Date
Overall material due date for the entire job. This date indicates when material needs to be delivered in order to make the scheduled ship date. When a user enters a material due date at the job level, ShopPAK automatically fills all lower level Job Item, Work Order, and Material due dates with the same date, unless the user had previously typed a specific material due date into the lower level Job Item, Work Order, or Material due date control.
Target Finish Date
Overall target finish date for the entire job. This date indicates when the job needs to be finished before it is considered late. ‘Target Finish Date’ is primarily used by the ShopPAK Scheduler as it determines if a scheduled finish date is ‘late’ or ‘on time’. If the 'Target Finish Date' is greater than or equal to the 'Scheduled Finish' date, the job is considered to be on time. However, if the ‘Target Finish Date’ is earlier than the 'Scheduled Finish Date', the job is considered ‘late’ and is marked accordingly. When a user enters a target finish date at the job level, ShopPAK automatically fills all lower level Job Item, Work Order, and Department target finish dates with the same date, unless the user had previously typed a specific target finish date into the lower level Job Item, Work Order, or Department target finish date control.
Ship Date
Date the job is to be shipped. When a user enters a ship date at the job level, ShopPAK automatically fills all lower level Job Item or Work Order ship dates with the same date, unless the user had previously typed a specific ship date into the lower level Job Item or Work Order ship date control. ShopPAK automatically highlights ship date to be on time, late, in jeopordy of being late, etc. based on your date tracking color choices located via the Define | Date Tracking Colors menu item. We cover setting up date tracking colors in the milestone section found later on in this chapter.
Ship Date Not Firm
Indicates whether or not the ship date is firm or not firm. Place a check into the checkbox if the ship date is still questionable. Scoreboard uses this setting to paint a ship date as firm or not firm.
Scheduled Start Date
Date the job is scheduled to begin. ShopPAK automatically highlights scheduled start date to be on time, late, in jeopordy of being late, etc. based on your date tracking color choices located via the Define | Date Tracking Colors menu item. We cover setting up date tracking colors in the milestone section found later on in this chapter.
Scheduled Finish Date
Date the job is scheduled to finish. ShopPAK automatically highlights scheduled finish date to be on time, late, in jeopordy of being late, etc. based on your date tracking color choices located via the Define | Date Tracking Colors menu item. We cover setting up date tracking colors in the milestone section found later on in this chapter.
Actual Start Date
Actual date the job started. Automatically filled in when the very labor transaction is applied to the job.
Actual Finish Date
Actual date the job was completed. Note, this field is often disabled. Press Edit button to edit date.
|
Remove inventory reservations
Clicking the button displays the "Remove Inventory Reservations" button.
You have two options:
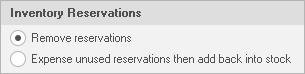 Remove reservations
This option can be used regardless of your inventory asset valuation method. It tells ShopPAK to delete all unused inventory reservations and return them to generally available stock.
Expense unused reservations then add back into stock
This option is available if you use LIFO or FIFO as your inventory asset valuation method. It is designed specifically for companies that purchase job specific materials, but make them inventory items to give them greater control over when material is expensed against a job. If any material remains in inventory after the job is finished, this option 1) automatically expenses the remaining materials against the job, and 2) returns them back into general stock, typically at a cost of zero.
Click Run to start the process. ShopPAK asks if you want to continue. If so click Yes.
 ShopPAK processes the request and then displays the count of approved pick transactions, as well as, unapproved pick transactions.
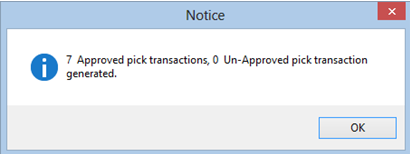 Next it actually shows you the details of the auto pick transactions that were auto generated….
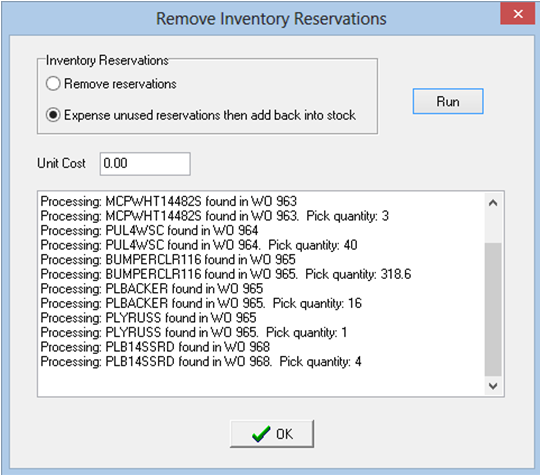
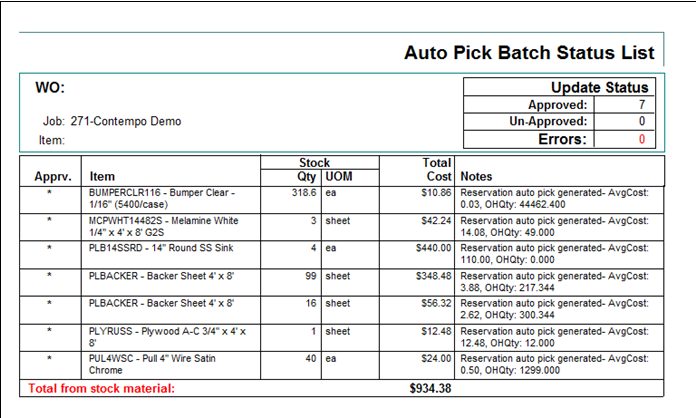 Last it returns to the Remove Inventory Reservations dialog box and fills in the status area with a detailed list of the unused reservations that have been expensed against the job.
 | ||||
Job Custom FieldsThis button displays the Job Custom Fields dialog box. Use this dialog to fill in common custom values that are relevant to all work orders under the job. ShopPAK propagates the information from the Job level throughout all the work orders under the job, saving time when all or most work orders require the exact information.
|
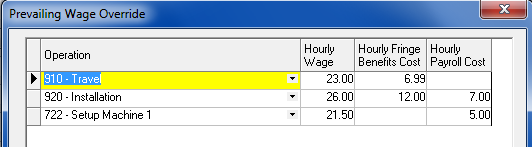
Prevailing WagesThe Prevailing Wage button displays the prevailing wage dialog box. Use it to identify any special wage overrides caused by prevailing wage differentials for the job. If you define operation wage overrides for a job, ShopPAK automatically uses the prevailing wage override rate instead of regular employee wage records. Only those operations identified via the prevailing wage dialog are overridden.
If a job has one or more prevailing wage overrides, ShopPAK colors the button yellow --
| ||
Notes/RemindersBrings up the ProjectPAK Project "Notes and Reminders" dialog box. You'll see all of the notes and reminders entered from ShopPAK, as well as, any entered from ShopPAK. We give access to the ProjectPAK notes and reminders function in ShopPAK because it is a powerful project management tool that benefits both applications.
|
Indirect JobIf the ShopPAK job is a normal job, leave this checkbox blank. However, if this is an internal administrative job to collect indirect costs, place a check in the checkbox. This is important, because this is how we separate normal ‘direct’ jobs from administrative ‘indirect’ jobs when generating reports or opening jobs.
|