
Job
Initial Values
Choose default settings for “Job Status”, “Job Type”, “Job Item Type”, and “Work Order Type”. These values are automatically placed into their corresponding form fields when you create a new Job, Job Item, or Work Order.
TIP Be careful choosing default values that are only appropriate some of the time. If a field is left blank when the form is created, in other words, you don’t choose a default value, it will be pretty obvious on the form that the field needs a value. If you use a default setting, however, and the value is not appropriate for the Job, Job Item, or Work Order you’re creating, it won’t be as obvious that the value is wrong.
|
Job ID
You can have ShopPAK provide Job IDs automatically, or you can type them in yourself. If you want ShopPAK to handle your Job IDs, type in the Job ID (all numeric) that you want to start with.
Job Contact
ShopPAK will provide a pick list of employees based on either Bill-To or Ship-To company employees for referencing the primary customer representative. ‘User Entered’ will allow you to simply type a freeform name if a Contact record has not been created in ProjectPAK.

Starting Work Order Number
Type the number that you want ShopPAK to use as the next work order generated. From that point, ShopPAK provides the next sequential number for each work order created.
Work Order Status Considered Complete
Choose the work order status that corresponds with a completed work order in your shop. This drives the Job, Job Item, and Work order tracking ratio à Percent of Work Orders Completed.
New Work Order Material Rows
Mark as ‘Ready’ For PO Builder
If you want newly added materials to be visible in PO Builder, place a check here. Note, the PO Builder flag can be toggled anytime from the Work Order à Materials tab.
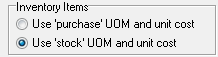
Inventory Items
Inventory items can have different ‘purchasing’ and ‘stock’ unit of measures and unit costs. Tell ShopPAK which UOM/Cost to use as default when calculating extended cost of a newly added material that is based on a ShopPAK inventory item.
New Work Order Product / Label Rows
Print Labels
Place a check here if you typically want ShopPAK to generate product labels. When you create a new product, either through Conversion or manually, the form will automatically place a check in the “Print Label” field of the Product Details tab. “Label Qty” tells ShopPAK the default number of labels you typically want printed per product.
If you typically don’t want product labels, leave these fields blank.
Print on work order
Place a check here if you typically want ShopPAK to print product information on work orders. When you create a new product, either through Conversion or manually, ShopPAK automatically places a check in the “Show on Work Order” field of the Product Details tab. “Show on Work Order” tells ShopPAK the product should be included on the Work Order ‘Products Area’ of the work order document.
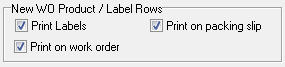
Print on packing slip
Place a check here if you typically want ShopPAK to include itemized product information on packing slips / ship tickets. When you create a new product, either through Conversion or manually, ShopPAK uses the default setting to set the corresponding “Show on Ship Ticket” indicator on the Products grid.
Job Item / Work Order GL Accounts
Various ShopPAK tools, primarily in the area of Accounting, depend on GL Account Code assignments to process or capture information. Some GL Accounting reports, for example, will ignore any Work Order/Job Item cost if it has not been assigned a GL Code. Some ShopPAK Export routines require GL Codes when preparing files for Import into 3rd party packages. Selecting this option tells ShopPAK to make sure the user has entered necessary GL Account codes on the Work Order and Job Item forms. Leaving it blank tells ShopPAK not to require GL Account Codes.
Post Shipping Department
Tells ShopPAK which department immediately follows shipping product so they can be ‘forward’ scheduled from ship date. If you have one or more departments that logically follow shipping product, select the department that immediately follows ship date. This directive is used when scheduling work orders. For more information see “Chapter 8 – Work Order Form”, pages 25 – 28 for further details.
Automatically update work order percent complete from…
Place a check in checkbox if you want ShopPAK to automatically bubble up percent complete changes from low level labor actuals transactions up to the work order level. If you select this option, choose how you want to calculate work order percent complete. Choosing 'labor actuals' will find the ratio between estimated and actual labor hours. Choosing 'completed product scans' will look at the percentage of built products divided by the total quantity of products defined under the work order.
Work Order User Defined Field Labels
There are 10 user-defined fields you can create for work orders. For every custom field you create, type the label that identifies the custom field’s purpose. These labels will display on the Work Order form, as well as, be printed on generated work orders provided you’ve asked them to be included on generated work orders.
Work Order Status Mass Change
On the Jobs form, there is a control located on the speed bar button area used to mass change work order status. If it is enabled, you click the checkmark, which enables the list of work order status values. Next select the work order status you want to mass change. ShopPAK changes ALL work order status values accordingly for the selected Job or Job Item.
Jobs Tab  (in this example, the control is disabled)
The control gives users a very fast way of updating a Job or Job Item’s work orders with one mouse click. However, it must be used with care. If you want users to have this option, click ‘Enable’. If you think this option is too dangerous and somebody might mistakenly change several work order status values to the wrong value……. click the ‘Disable’ control.
Percent Complete / Actual Finish Date Changes
Tells ShopPAK the job tree level (Job, Job Item, Work Order, Department, Operation) that you wish to change percent complete and actual finish date. When you select a level, ShopPAK disables the percent complete and actual finish date controls at all higher levels. Instead, ShopPAK automatically keeps these higher tree levels in sync with changes made at the lower level of the job tree.
Default Sell Price and Percent Billed Maintenance Level
Set the default Sell Price and % Billed level for new Jobs. Maintenance level should be consistent with how you need ShopPAK to behave on a job. For example, if you typically invoice jobs at the work order level, you should choose Work order from the drop down combo box. Note, you can override your default choice for a particular job if you wish.

Sell Price can only be modified at the selected Maintenance Level. For example, when set to "Work Order Level", you can't alter sell price at the job or job item levels -- sell price will be disabled. Note, changes to work order sell price will automatically aggregate and roll-up into the parent job item and job levels. IMPORTANT….activities such as Invoicing or Direct Material Purchasing, should be consistent with the Maintenance Level of a job.
TIP Changing % Complete at the Work Order level only triggers a roll-up if the parent Item’s Maintenance Level is set to Work Order or Product. If you experience inconsistency with % Complete between a parent and child object(s), check the Maintenance Level to be sure it is properly set.
|
For most ShopPAK users, we recommend setting “Sell Price, % Complete, % Billed” to -> Work Order.
Tax – New Items Taxable
Placing a check in the ‘New items taxable’ checkbox turns on the ‘Tax Calculation’ control that documents if you are calculating sales tax or use tax.
Job Item, Work Order and Product objects created manually will default to this setting. Job objects created by the ProjectPAK Estimate Conversion Utility will honor ProjectPAK estimate settings concerning tax. For example, if the ProjectPAK estimate includes taxable items, the appropriate ‘Taxable’ box for the object will be checked, regardless of the ShopPAK default setting. The ‘Taxable’ indicator is available on Job Item, Work Order and Product levels.
Tax Calculation
Identifies if the tax is a sales tax or a use tax.
WO Billable Checkbox
Tells ShopPAK if it should mark new work orders ‘Billable’, ‘Not Billable’, or prompt the user to fill in the billable checkbox appropriately the first time a work order is created or edited. Various ShopPAK tools, (e.g. GL Accounting reports), are dependent on whether a work order is billable or not. Thus, this setting is important. In most circumstances, Work Orders are generally considered billable. The exception to this rule could be Re-work or internal analysis work orders set up to track specific events, employees, operations or departments.
Material / Labor Edits
Select the level that you normally maintain material and labor at. Most ShopPAK users work at the work order level since it usually saves time. But if you need to make specific material and/or labor changes to a particular product, you should consider working at the product level.
This option controls default behavior when creating new Work Orders, as well as, when converting ProjectPAK estimates into ShopPAK Work Orders.
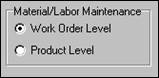
If need be, the Conversion Utility allows you to override ShopPAK defaults on a conversion by conversion basis.