
Details
CategoryCategory is mandatory. Setting up different inventory categories is helpful if you want to see reports that list and value different types of inventory you stock. See “Setup and Options” for details on creating inventory category values.
|


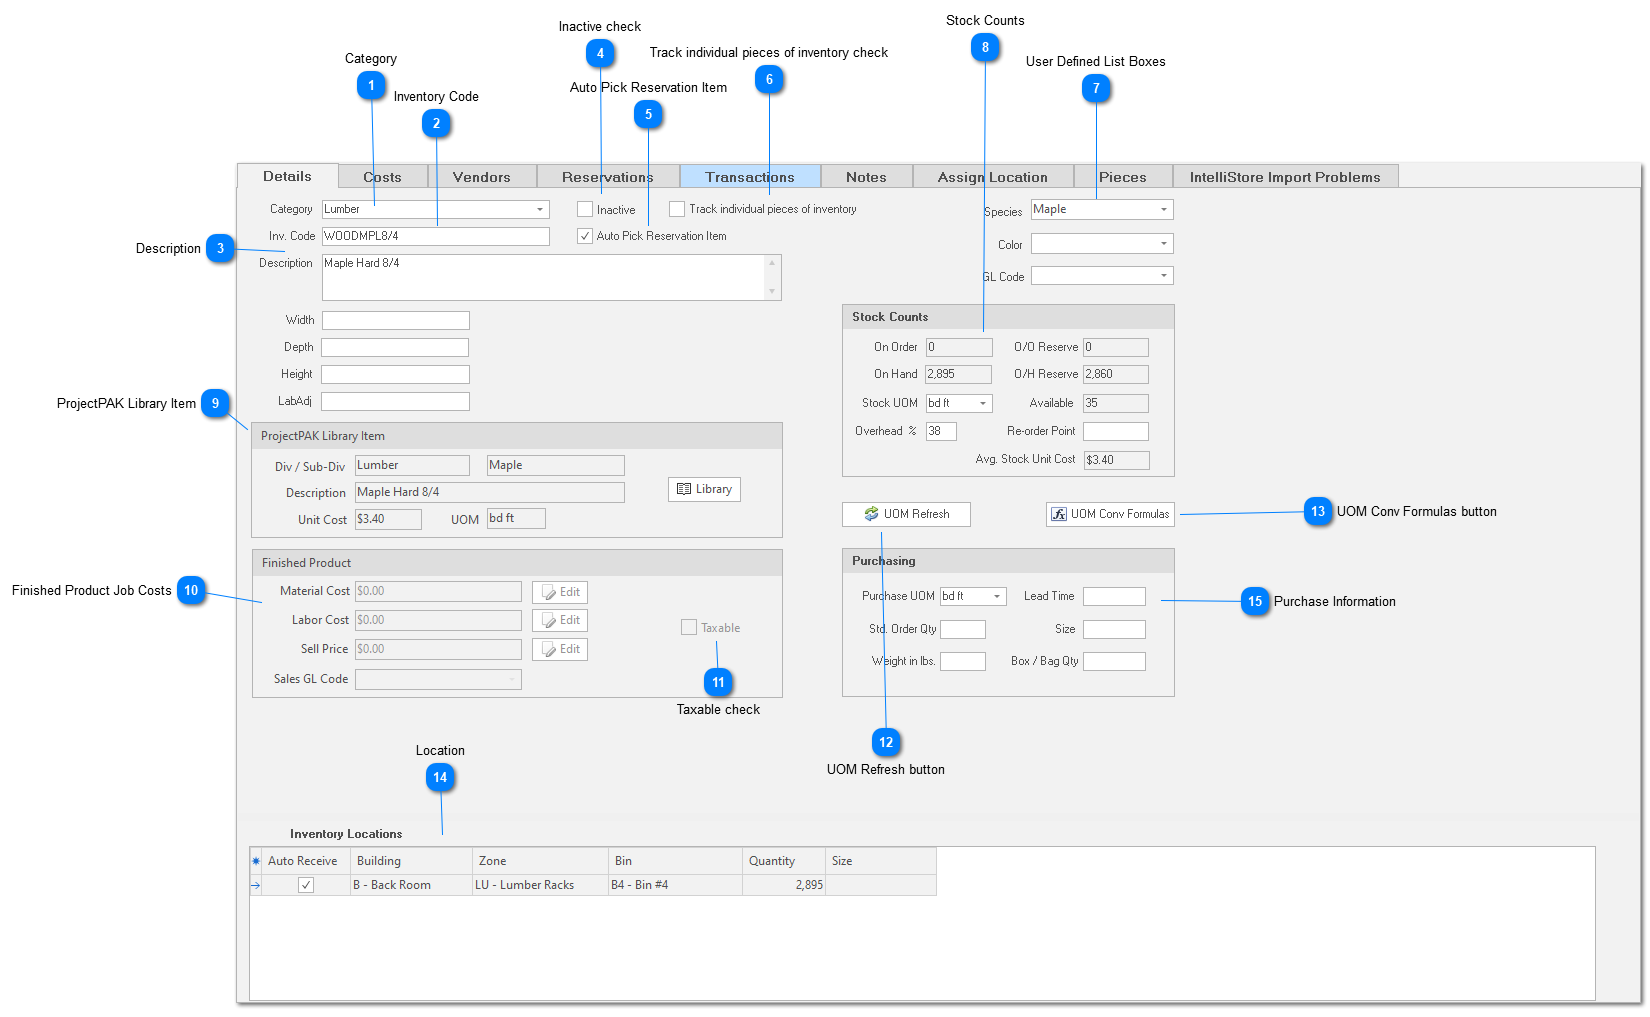
User Defined List Boxes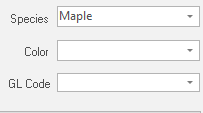 In the upper right corner of the Inventory form, you’ll find the user defined list boxes. You can define two list box names, and for each list box, you can define the values that drop down. Use these list boxes to further define the inventory item attributes (e.g. color, species, etc.).
|
Stock Counts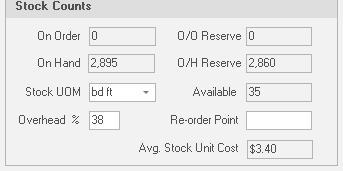 Contains various inventory item counts. All fields are protected. ShopPAK updates the ‘Quantity’ fields based on inventory-oriented events such as posting a purchase order, receiving a shipment, approving material usage cards, creating an ‘Adjustment’ transaction, etc.
On Order
Quantity of outstanding purchase orders that have been posted to the system, but not yet received. This quantity contains the total of both ‘Reserved’ PO Items and ‘Stock’ PO Items.
O/O (On Order) Reserved
Quantity of outstanding purchase orders with ‘Reserved’ line items that have been posted to the system, but not yet received. To determine non-reserved quantity, subtract the reserved quantity from the ‘On Order’ quantity.
On Hand
Quantity currently in stock. This quantity contains the total of both ‘Reserved’ and non-reserved inventory.
O/H (On Hand) Reserved
Quantity of ‘Reserved’ stock. Reserved inventory is inventory that is earmarked for particular job(s).
Stock UOM
Available
The difference between ‘On Hand’ and ‘On Hand Reserved’. This quantity is used to determine what is available for general use.
Overhead %
The overhead percentage is used during job costing to address the percentage of burden that you assign to materials. If you wish, you can change the percentage on different inventory items, if you have determined that different types of inventory reflect different overhead markups. For new inventory items, the default material overhead percentage appears in the field. See “Setup and Options” for instructions on setting default materials overhead percentage.
Re-order Point
The threshold inventory quantity that signals it is time to re-order the inventory item.
Avg. Stock Unit Cost
When creating a new inventory item, the ‘Avg. Stock Unit Cost’ is painted red. This is the only time you’re allowed to manually edit average unit cost. It defaults to the associated ProjectPAK library item’s unit cost. If you changed the purchasing and/or stock UOM, make sure you change the unit cost accordingly. Once the inventory item is created, ShopPAK protects this fields and calculates the average cost based on the inventory valuation method you’re using, as well as, the quantity on hand.
|
ProjectPAK Library Item A ShopPAK inventory item must be associated with a ProjectPAK library item. If you don’t have a corresponding ProjectPAK library item to associate a new ShopPAK inventory item with, you must first create the library item.
We tie ShopPAK inventory items back to a ProjectPAK library item for several reasons:
|
Finished Product Job Costs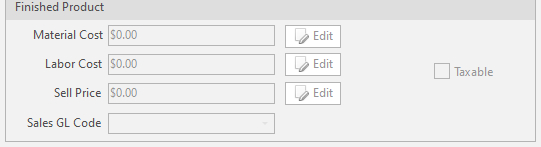 If the inventory category you’ve chosen for an inventory item is for “finished goods”, you’ll enter the material and labor costs required to produce one unit of inventory, as well as, the selling price of one unit of inventory. If you create shipping tickets by dragging finished goods to the ship ticket grid, and then invoice from the shipping ticket, also supply the applicable ‘Sales GL Account so ShopPAK can properly export invoices to your accounting package.
When a finished good is shipped out of inventory, the “Shipping” tab automatically applies the finished good’s material and labor costs against the target Job and Job Item’s labor and material cost accumulators.
If the inventory item is not for a finished good, these fields are protected . Details on working with finished goods and semi-finished goods in ShopPAK is defined further on in this chapter.
|
UOM Conv Formulas buttonShopPAK gives you the option of purchasing with one UOM, and stock using another UOM. For example, you might purchase a pallet of material, but stock the material by the ‘each’. If your ‘Purchase’ UOM differs from your ‘Stock’ UOM, you need to provide a conversion formula so ShopPAK can calculate ‘Stock’ quantity and cost when shipments are received.
Conversion Button
To assign a conversion formula, click the “Conv” button. This displays the “Inventory UOM Conversion Formulas” dialog box.
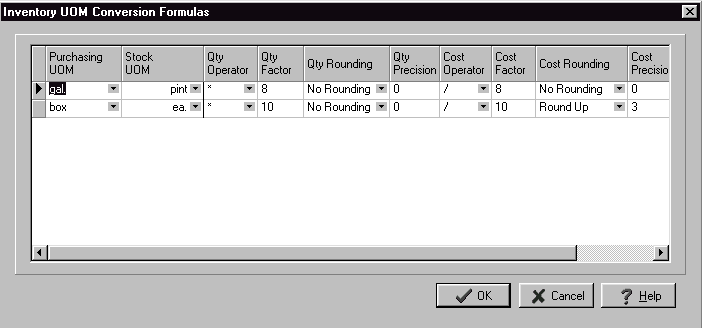 Select the row that contains the formula you want to use for the inventory item and click OK.
The UOM Conversion formula dialog box works much like the ProjectPAK / ShopPAK UOM conversion grid. See “ProjectPAK Estimate Conversion” for instructions on creating new formulas.
|
Location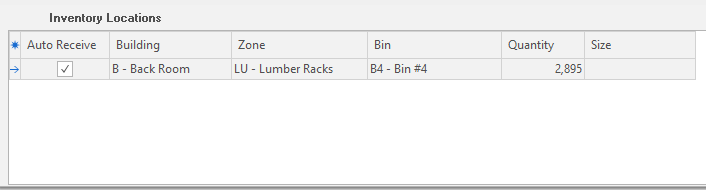 An inventory item can be stored at multiple locations throughout your shop. ShopPAK maintains inventory counts at each physical location, for each inventory item stored at that location. If you store inventory stock at multiple locations in your shop, employees must identify not only the inventory item code, but the exact location they ‘pulled’ stock from. This is the only way ShopPAK can maintain accurate inventory counts. However, if you always store an inventory item at just one location, employees only need to identify the inventory item they ‘pulled’ from stock. (If it’s located at only one physical location, ShopPAK knows to adjust the quantity of the one location under the inventory item).
When you create a new inventory item, you must identify at least one inventory location. See “Setup and Options” for instructions on creating inventory location values. You won’t be able to add a new inventory item unless you’ve got your inventory location values created.
Auto Receive Location
A handy feature in ShopPAK is the ‘Auto Receive Location’ option. If you always store an inventory item in the same physical location when you receive a shipment that contains that inventory item, ShopPAK can automatically adjust the location’s ‘On Hand’ quantity accordingly. This saves you from manually choosing the correct location upon receipt of a shipment that contains inventory items.
However, you may not have the luxury of always storing newly received shipments for a particular inventory item in the same physical location. If this is the case, you can’t use ‘Auto Receive Location’. Instead, you’ll need to use the “Assign Location” tab to specify where the inventory item should be placed. The “Assign Location” tab is discussed on page 21 in this chapter.
Adding an Inventory Item Location
1. Right mouse click the “Location” grid and select “Add ”. This displays the “Inventory Location” dialog box.
 2. You must choose a ‘Building’ from the drop down list. Zone and Bin are optional.
3. The default ‘Auto Receive Location’ value is on. Adjust if necessary.
4. When you add the first location for a new inventory item that you’re creating, the ‘Quantity’ tag is painted red. This is the only time that you’re allowed to edit location quantity. Type the initial quantity that you have, at this location, for this inventory item.
5. Optionally enter the size of the inventory item that is kept at this location.
Modifying an Inventory Item Location
1. Select the Inventory Item location you wish to modify by clicking it.
2. Right mouse click the “Location” grid and select “Modify”. This displays the “Inventory Location” dialog box. Make necessary changes.
Deleting an Inventory Item Location
1. Select the Inventory Item location you want to remove by clicking it.
2. Right mouse click the “Location” grid and select “Remove”. This displays a warning message. Click “Yes” to delete the inventory item location from the database. Click “No” to cancel the deletion.
Transferring Quantity from One Location to Another
From time to time, you’ll need to transfer inventory stored at one location to another location. To transfer material:
1. Select the Inventory Item location you want to move all or some of its quantity from by clicking it.
2. Right mouse click the “Location” grid and select “Transfer”. This displays the “Transfer Between Locations” dialog box.
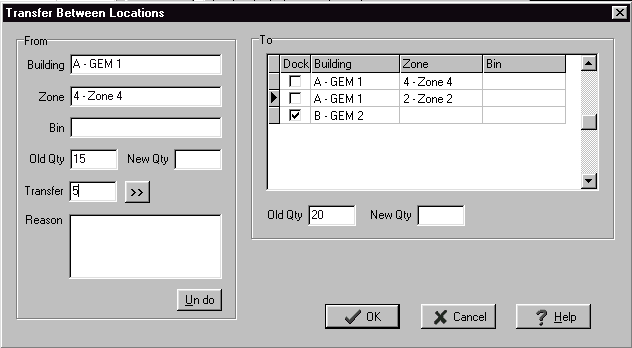 3. In the “From” group box, enter the quantity you want to transfer into the “Transfer” edit box. In the example above, we are transferring 5 units.
4. In the “To” group box, choose the location you want to transfer inventory into. In the example above, we are transfering into “Zone 2” (The second location in the list)
5. Click the Transfer button
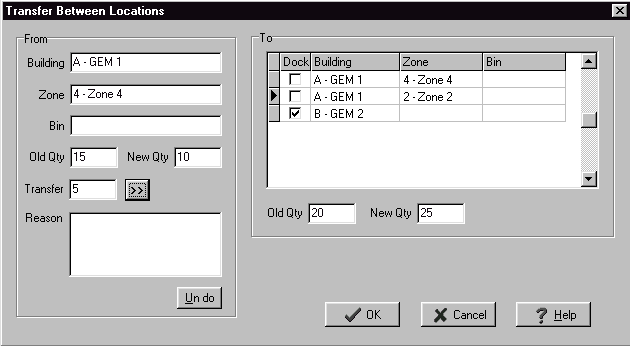 In the “From” group box, you’ll see the new quantity – 10 units. In the “To” group box, you’ll see the “Old Qty” and “New Qty”. The new quantity reflects the units that were transferred to it.
6. Click OK to post the transfer.
Adjusting Location Quantity
If you need to adjust available inventory because the physical inventory count differs from ShopPAK’s counts, do an ‘Adjustment’. An adjustment creates a transaction that records who made the adjustment, the date it occurred, and the type of adjustment made.
1. Select the Inventory Item location you want to adjust by clicking it.
2. Right mouse click the “Location” grid and select “Adjustment”. This displays the “Inventory Adjustment” dialog box.
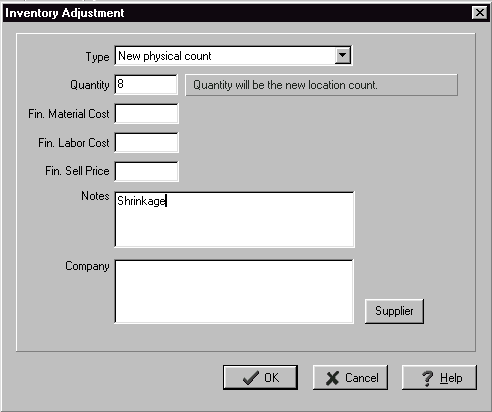 3. Select the adjustment type:
4. Enter the new quantity.
5. If the inventory item is a ‘finished goods’ type of inventory item, you can adjust the Finished Goods material cost , labor cost, or selling price if appropriate.
6. If you want to append a note to the adjustment transaction, add a comment in the “Notes” memo box.
7. If you returned defective stock to a supplier, click the “Supplier” button to identify the vendor.
8. Click OK.
| ||||
Purchase Information Purchase UOM (Unit of Measure)
The unit of measure used to purchase the inventory item. When creating a new inventory item, this defaults to the ProjectPAK library item’s UOM. Make sure you check the UOM to make sure it is appropriate for the inventory item.
Lead Time
The amount of time is usually takes between giving a purchase order to a supplier and receiving shipment.
Standard Order Quantity
The quantity you typically purchase when placing an order for the inventory item.
Size
Typical size of the inventory item.
Weight
Weight of one unit of the inventory item.
Box / Bag Quantity
Number of units contained in a given inventory item.
|