
ProjectPAK Estimate Conversion
ProjectPAK automatically creates a first cut ShopPAK job or adds change orders to an existing ShopPAK job from an estimate. It extracts relevant information from an estimate and creates a ShopPAK Job, one or more Job Items, and one or more Work Orders. Depending on your conversion instructions, and the level of detail in your estimate, ProjectPAK creates product records, department scheduling records, labor operations, and material requests. If you have ‘SubCon’ or ‘Buy’ rows in your estimate, ProjectPAK can also create ShopPAK sub-contractor and regular purchase orders.
Estimate Conversion Default Instructions
You can set up default instructions that speed the process of converting estimates into jobs and improve the consistency of ShopPAK job creation. Default settings are easily overridden at conversion time if an estimate needs to be converted differently than normal.
TIP: Before setting the conversion default options, you need a good understanding of ProjectPAK estimate line types and estimate structure. You also need to understand the ShopPAK job tree hierarchy as explained in Job Tree Hierarchy.
|
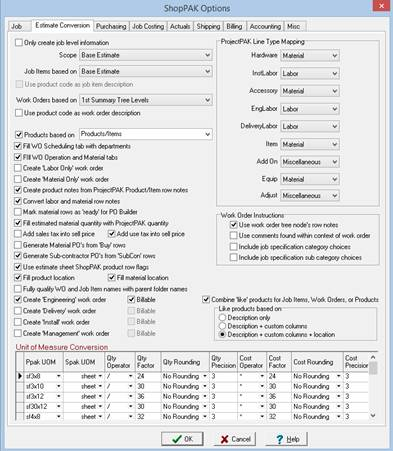
To set up your default estimate conversion instructions, choose Define | ShopPAK Options | Estimate Conversion Tab from the ShopPAK main menu. This displays the default Estimate Conversion instructions form:
Only Create Job Level Information
Tells the conversion utility to only create job level information. Choosing this option disables most of the other conversion options since they are not needed if you only want to bring over job level estimate / project information.
Use this option if you want to quickly create a ShopPAK job so you can manually add Job Items and Work Orders underneath the newly created job. For example, you want to capture project management or engineering time before bringing over the bulk of the ProjectPAK estimate. You would just bring over the high level job information and then create a Job Item / Work Order called Project Management and another Job Item / Work Order called Engineering / Drafting.
TIP: ShopPAK doesn’t give you the ability to copy template Job Items or Work Orders into a job. ProjectPAK, however, gives you the option of creating template assemblies. If you want to always have ‘internal’ Job Items / Work Orders for project management, engineering / drafting, or purchasing, we recommend setting these up in ProjectPAK as template assemblies, copying them into every estimate, and then converting these over to ShopPAK as part of regular estimate conversion.
|
Scope
Tells the conversion utility what node(s) of the estimate tree to use when creating a ShopPAK job.
|
Scope Selection
|
Explanation
|
|
Entire Estimate
|
Creates a job based on all nodes of the tree – base bid, alternates, & all change orders. Note: Only includes alternates and change orders with a status of Approved.
|
|
Base Estimate
|
Creates a job based solely on the base bid node – no change orders are processed. Includes all alternates nodes that have a status of Approved.
|
|
All Change Orders
|
Creates a job based on all change orders with a status of Approved.
|
|
Selected Folders
|
Creates a job based on the selected nodes of the tree. Note: Only includes alternates and change orders with a status of Accepted.
|
Job Item Based On
Tells the conversion utility how to combine estimate rows into a particular Job Item. A Job Item’s sell price, estimated labor cost, and estimated material cost are calculated by adding together all of the estimate rows that make up the ShopPAK Job Item.
Job Item choices depend on the current Scope selection. Based on the Scope selection, ShopPAK re-populates the Job Item list box with the list of valid values that are available for the selected scope. First choose the Scope you want to use as the default, then select the Job Item creation approach you want as your default.
Several conversion options are available:
Job Item Selection Explanation
|
Entire Estimate
|
Creates one job item for the entire job. The ProjectPAK Project description becomes the name of the job item. Every line item from the estimate that is within the estimate is used to calculate Job Item sell price, estimated material, and estimated labor.
|
|
Base Estimate /
Change Order
|
Creates one job item for the Base Bid and one job item for each change order. The description of the base bid and each change order becomes the name of the job item. Every line item from the estimate that maps to the Base Bid or Change Order is used to calculate Job Item sell price, estimated material, and estimated labor within the generated job item.
|
|
Base Estimate
|
Creates one job item for the Base Estimate. The ProjectPAK Project description becomes the name of the Base Bid tree node. Every line item from the estimate that is within the Base Bid node is used to calculate Job Item sell price, estimated material, and estimated labor.
|
|
Summary Tree Levels
|
Creates one job item for each summary tree level in the estimate. The summary node description becomes the name of the job item. Every estimate row that makes up the summary node is used to calculate Job Item sell price, estimated material, and estimated labor.
|
|
Products/Items
|
Creates one job item for each product and item row in the estimate. The product or item description becomes the name of the job item. Every estimate row that makes up the product is used to calculate Job Item sell price, estimated material, and estimated labor.
|
|
Work Group 1-5 Values
|
The conversion utility allows you to base a Job Item on any of the 5 ProjectPAK work group columns. You’ll see the work group names listed in the Job Item Creation pick list with the letters WG prefixed to them. Select the work group that you want to base job item creation upon.
Creates one job item for each unique work group value within the selected work group name in the estimate. The work group value name becomes the name of the job item. Every estimate row that is tagged with a particular work group value is used to calculate Job Item sell price, estimated material, and estimated labor.
Note: You only need to assign a work group value to an End Group or End Sub Group row. The conversion utility automatically includes any row that makes up an End Group or End Sub Group even if it isn’t explicitly assigned the work group value.
|
Use Product Code As Job Item Description
This option is only available when you have Job Item selection of Products/Items. Tells the conversion utility to use the product code as the job item description.
Work Order Based On
Tells the conversion utility which estimate rows make up a particular Work Order. A Work Order’s sell price, estimated labor and material are calculated by adding together all of the estimate rows that make up (are mapped to) the ShopPAK Work Order.
Instructs the conversion utility how to combine estimate rows into a particular Work Order. A Work Order’s sell price, estimated labor cost, and estimated material cost are calculated by adding together all of the estimate rows that make up the ShopPAK Work Order.
Work Order choices depend on the current Job Item selection. Based on the selected Job Item value, ShopPAK re-populates the work order list box with the list of valid values that are available for the selected Job Item value. First choose the Job Item creation approach you want to use as the default, then select the Work Order creation approach you want as your default.
Work Order Selection Explanation
|
Entire Estimate
|
Creates one work order for the entire job. The ProjectPAK project description becomes the name of the work order. Every row in the estimate that is used to calculate work order sell price, estimated material, and estimated labor.
|
|
Base Estimate /
Change Order
|
Creates one work order for the Base Bid and one work order for each change order. The description of the base bid and each change order becomes the name of the work order. Every line item from the estimate that maps to the Base Bid or Change Order is used to calculate work order sell price, estimated material, and estimated labor within the generated work order.
|
|
Job Item Summary Level
|
This choice is only available when you have Job Item selection of a summary tree level. Creates one work order under the job item. The Job Item summary node description becomes the name of the work order. Every line item from the estimate that is within the Job Item summary node is used to calculate the work order’s estimated material and labor.
|
|
Summary Tree Levels
|
This choice is available when you have Job Item selection of a base estimate or a summary tree level. Creates one work order for each summary level under each job item. The summary node description becomes the name of the work order. Every estimate row that makes up the summary node is used to calculate the work order’s estimated material and labor.
|
|
Products/Items
|
This choice is always available regardless of your Job Item selection. Creates one work order for each product under each job item. The product or item description becomes the name of the work order. Every estimate row that makes up the product is used to calculate the work order’s estimated material and labor.
|
|
Work Group Name
|
This choice is always available regardless of your Job Item selection. Creates one work order for each associated work group value under each job item. The work group value description becomes the name of the work order. Every estimate row that is tagged with the work group value is used to calculate the work order’s estimated material and labor.
Note: You only need to assign a work group value to an Product or SubAssembly row. The conversion utility automatically includes any row that makes up an End Group or End Sub Group even if it isn’t explicitly assigned the work group value.
|
Use Product Code As Work Order Description
This option is only available when you have Work Order selection of Products/Items. Tells the conversion utility to use the product code as the work order description.
TIP: Automatically creating a ShopPAK job hierarchy (Job, Job Item, and Work Order) that correctly reflects the ProjectPAK estimate organization is only possible if you are consistent in how you build the estimate. For example, if you base Job Items on 1st Summary Tree Levels and Work Orders within Job Item on 2nd Summary Tree Levels, you need to consistently use summary nodes throughout the entire estimate.
|
Product Creation
If you estimate at the ‘Product’ level, the estimate conversion utility can automatically create product level information in the job tree. Placing a check in Products based on enables the pick list control adjacent to it. Choose what constitutes a ShopPAK product object in ProjectPAK:
Products/Items
Each Product and Item row becomes a product under a work order.
Products/Items /SubAssemblies
Each Product, Item, and SubAssembly row becomes a product under a work order. Product rows are flagged as ‘Parent’ products and SubAssembly rows are flagged as ‘Child’ sub-assembly products.
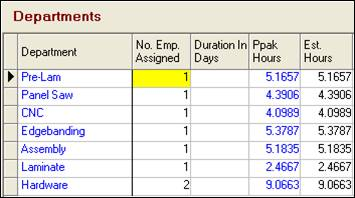
Fill WO Scheduling Tab With Departments
Tells the conversion utility to create departmental labor information under the work order. This is highly recommended if you estimate labor so budgeted target hours are available in ShopPAK. This improves job cost reporting and analysis since you’ll see estimated labor versus actual labor. Also, the ShopPAK Scheduler needs estimated hours by department before it can schedule a work order.
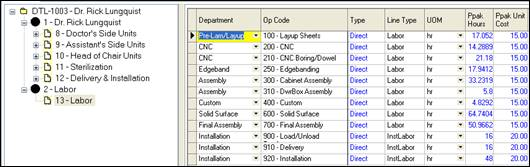
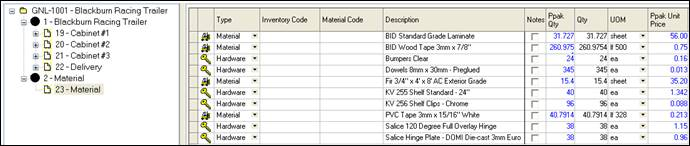
Fill WO Operation and Materials tab
Tells the conversion utility to create estimated material and labor rows on the Materials and Operations sub-tabs for Work Orders and/or Products. The labor and material records contain estimated values and additional estimated information. It is recommended that you check this option to gain the full benefit of ShopPAK for job costing, tracking, and purchasing.
Create Labor Only Work Order
If checked, all labor operations for the job will be combined under a specially created work order called “Labor”. This work order will contain ALL of the estimated labor operations and department scheduling information for the job. Use this option if you don’t care about tracking, scheduling, or job costing labor at an individual work order level, but instead, want to track, schedule, and do job costing for the entire job. This makes sense if you release all the work orders under the job at the same time, or you tend to process a lot of small jobs.
Create Material Only Work Order
If checked, all material requirements for the job will be combined under a specially created work order called “Material”. This work order will contain ALL of the estimated material for the job. Use this option if you don’t need to detail your ‘bill of materials’ and/or material requisition sheet by the individual work order, but instead, you’ll do purchasing and material status tracking for the entire job as one batch.
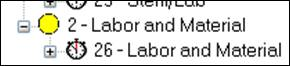
Note: If both “Labor Only” and “Material Only” options are checked, ShopPAK will combine Labor and Material under the same work order called “Labor and Material”.
 |
Create Product Notes From ProjectPAK Product/Item Row Notes
Tells the conversion utility to copy the notes from any Product estimate row that has row notes. The conversion utility copies the product’s row notes to the appropriate product notes located on the work order Products sub-tab.
Convert Labor and Material Row Notes
Tells the conversion utility to copy labor and material estimate row notes across to ShopPAK. The notes are placed into the detailed operation and material rows located under a work order. You need to have “Fill Operation and Material Tabs” checked in order to use this option. If your estimate row notes contain production information, we recommend checking this option.
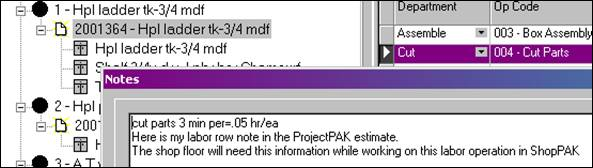
For example, here is a ProjectPAK labor row note.
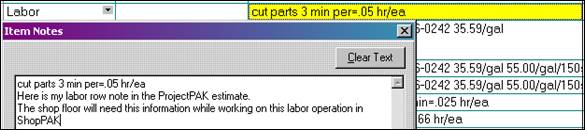
With this option checked, the conversion utility copies the note over to the corresponding ShopPAK operation row created during estimate conversion.
Mark Material Rows as Ready for PO Builder
Tells the conversion utility to place a check in the “PO Builder Flag” checkbox of every material row copied over to ShopPAK. This makes all newly converted work order materials available for purchasing in the PO Builder window.
Only use this option if you have a very strong Bill-of-Materials in ProjectPAK for each product you estimate. Typically, this is only the case when using pre-defined product assemblies and you use ProjectPAK to create “Order Confirmations”, as opposed to, estimate highly custom “One Off” products. In this case, it would be premature to do purchasing immediately after converting an estimate into a first-cut ShopPAK job. Instead, materials would need to be further refined through engineering and detailing, before presenting them to PO Builder.
Fill Estimated Material Quantity with ProjectPAK Quantity
Tells the conversion utility to transfer estimated ProjectPAK material quantity to the ShopPAK estimated material quantity located on the work order material grid. If your estimated materials typically reflect actual material needs, it makes sense to check the checkbox. However, if you often have to make significant changes to material quantity, it may be better to have ShopPAK zero out estimate material quantity so you can easily see which materials you’ve updated. Note: ProjectPAK estimated quantity still is present in the ProjectPAK estimated column.
Add Sales Tax to Sell Price
Tells the conversion utility to add applicable estimate sales tax into the overall sell price of an item. Do this if you want to base gross margins on (estimated sell price + sales tax) minus cost. If you want to base gross margins on sell price minus cost, don’t place a check in this option.
Add Use Tax into Sell Price
If checked, tells the conversion utility to add applicable estimate material use tax to ShopPAK Job Item and overall Job Sell Price. If not checked, the estimate pre-use tax sell price is brought over to ShopPAK.
Generate Material POs from Buy Rows
Tells the conversion utility to create purchase orders for all of the ‘Buy’ line items in the estimate sheet. In order to be considered, the ‘Buy’ line item must have a quantity, cost, UOM and Vendor assignment. The conversion utility creates one purchase order per each unique Vendor. If you need to determine line item suppliers at estimate time because you’re dealing with specialty items, we recommend communicating this information to ShopPAK by adding the appropriate ‘Buy’ line items to the estimate sheet and using this option. This saves time when it comes time to purchase the specialty materials.
The down side, however, is you won’t get the material status feedback on the work order material’s grid that you would if you simply send estimated materials over to the work order material grid and use PO Builder to create purchase orders.
Generate POs from SubCon rows
Tells the conversion utility to create a ‘sub-contractor’ purchase order for every estimate row with a line type of ‘Sibson’. The ‘Sibson’ row must have a vendor attached to it in order to work. When converting an estimate that has Sub-Contractor Purchase Order candidates, the conversion utility requires that a UOM and Vendor assignment exist on the estimate sheet row, or it bypasses these rows from the conversion. An error message is displayed in this situation.
Use Estimate Sheet ShopPAK Product Row Flags
Three ShopPAK Product attributes can be driven by ProjectPAK:
-
Product Label - Print product label(s) for the product
-
WO Item - Include when printing product information on a work order
-
Ship Item - Include when dragging products on to a ship ticket
If you primarily estimate jobs from library items or pre-built assemblies, then it makes good sense to use this conversion option to automatically set product attributes in ShopPAK, thus improving consistency and saving time. Even if you don’t use library items or pre-built product assemblies, the estimator could set these flags in the estimate sheet prior to conversion.
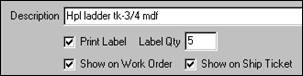
In the example below, notice how the conversion utility honors estimate sheet instructions regarding product attributes. (Note: Product rows constitute ‘Products’ in our conversion instructions) ‘Print Label’, ‘Show on Work Order’, and ‘Show on Ship Ticket’ checkboxes all flow through to ShopPAK based on estimate sheet instructions:
ProjectPAK Estimate Worksheet
ShopPAK Product Form Attributes:
Automatically Marking Loose Hardware and Materials as ‘Shipping’ Items
You can use product attributes on both ‘Product’ oriented rows in ProjectPAK (e.g. End Group and End Sub Group), as well as, material and hardware items. When you assign ‘Product’ instructions to a material or hardware item, the conversion utility copies material / hardware to both the Work Order ‘Material’ grid and the ‘Products’ grid. This is exactly what you want if a material / hardware item is considered a ‘shipping’ item as opposed to a ‘fabrication’ item. In the example below, an estimate hardware item that needs to be included on the Shipping Ticket as a loose hardware item is flagged as being a ‘Ship Item’.
ProjectPAK Estimate Worksheet
The conversion utility creates both a ShopPAK material row and product row for the item.
ShopPAK Work Order Material Grid
ShopPAK Product Grid -- ready to be dragged to a Ship Ticket
Fill Product Location
Tells the estimate conversion utility to copy an estimate row’s location to product location when extracting product information from the estimate worksheet.
Fill Material Location
Tells the estimate conversion utility to copy an estimate row’s location to material location when extracting material information from the estimate worksheet.
Fully Qualify Work Order and Job Item Name With Parent Folder Names
Tells the estimate conversion utility to use parent summary tree node names to fully qualify generated job item and work order names. This is handy when you base job items and/or work orders on embedded summary tree nodes.
For example, the ProjectPAK estimate tree below has broken down Room 200 into Casework and Countertop.
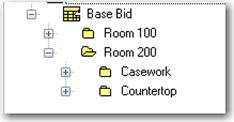
If you base work orders on the 2nd Summary Node level (which would be the Casework and Countertop summary nodes), and you didn’t ask the conversion utility to qualify the work order names, it would create two work orders -> “Casework” and “Countertop”.
However, if you have the conversion utility qualify the names, then it will generate more descriptive work order names:
Room 200 : Casework
Room 200 : Countertop
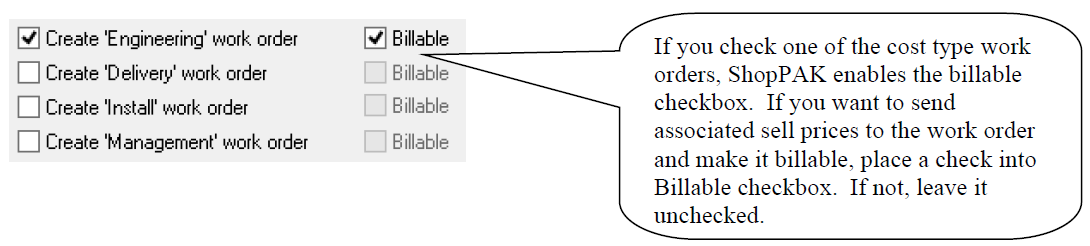
Create Engineering, Delivery, Install, or Project Management Work Order
Tells the estimate conversion utility to scan the entire estimate and pull all engineering, delivery, install and/or management estimated labor operations into their own separate work order. ProjectPAK uses Engineering, Delivery, Install, and Management cost type to identify corresponding items. If you want to take advantage of this conversion option, make sure all of your engineering, delivery, install, and management labor rows have the correct Cost Type.
ProjectPAK Line Type Mapping
The estimate conversion utility knows how to process an estimate line type of Material or Labor Operation. These types of line items are straight forward and naturally map to corresponding ShopPAK cost types. However, some ProjectPAK line types are ambiguous. For these line types, you must map the ProjectPAK line type to their corresponding ShopPAK line type.

In the example above, the ProjectPAK user defined line item type ‘Hardware’ is mapped as a ShopPAK ‘Material’ item. Similarly, the user defined line item type ‘InstLabor’ is mapped as a ShopPAK ‘Labor’ item.
If you never use a ProjectPAK line item type in your estimates, then you should mark it as a “Bypass” item.
Work Order Instructions
You have 4 ways of filling a work order’s instructions memo box. If you pick multiple sources, the conversion utility will fill instructions from all areas you choose that have text.
Use work order tree node’s row notes
If you base work orders on Product, Item, and/or SubAssembly rows, then this option copies the corresponding estimate worksheet row’s notes into the generated work order’s instructions.
Use comments found within context of work order
Any comments found within the scope of what constitutes the generated work order are used to fill in the work order’s instructions. The conversion utility pulls the instruction text from the comment’s worksheet description column.
Include job specification category choices
Generates work order instructions from job spec category specification choices.
Include job specification category choices
Generates work order instructions from job spec category specification choices.
Combine Like Products For Job Items, Work Orders, or Products
The conversion utility combines identical Work Orders and Products, aggregating quantity as it does so, as it copies information from ProjectPAK over to applicable areas of ShopPAK. This eliminates ‘duplicate’ products in ShopPAK, and in general, makes it easier for users since they don’t have to manually ‘combine’ like products together. Information such as description, assembly Id and cost aid ShopPAK in determining if two items are identical. Placing a check in this option tells the conversion utility to also consider the values in the ProjectPAK custom columns when checking if there are duplicate work orders or products. This allows the conversion utility to be even more selective when combining ‘like’ products together and aggregating quantity.
Unit Of Measure Conversion
If you estimate in one unit of measure (UOM), but you need to purchase or do job costing in another UOM, the conversion utility can automatically make UOM quantity and cost conversions based on UOM conversion formulas.
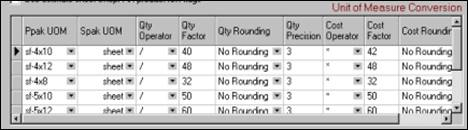
The conversion utility automatically converts ProjectPAK estimate unit of measurements (UOMs) into their associated ShopPAK UOMs. For example, an estimate might have material line items that are estimated by the ‘Square Foot’. However, once the estimate is converted into a ShopPAK job, you prefer the UOM be changed to ‘Sheet’. The conversion utility checks each estimate line item’s UOM against the conversion table’s ProjectPAK UOMs. If it finds a match during the conversion process, the conversion utility will run the associated conversion formula and calculate the new ShopPAK UOM quantity and price.
Creating a new UOM formula
Click the grid with your right mouse button. Select “New” from the pop up menu. This creates a new row in the grid. Enter the new formula conversion information directly into the grid.
Deleting a UOM formula
Select the row you want to delete by clicking it with your mouse. Click the selected row with your right mouse button. Select “Delete” from the pop up menu. ShopPAK asks you if you want to delete the conversion formula. Click “Yes” to proceed. Click “No” to cancel.
Conversion Formula Syntax
Basically, you need to identify the ProjectPAK UOM you want converted into a ShopPAK UOM. The formula then determines the ShopPAK quantity and cost by using the arithmetic operator and factors you provide. For example, let’s say you want to convert a square foot UOM into a single sheet UOM. 1 Sheet equals 32 square feet (4’ x 8’). The formula for doing this conversion is presented below:
PPAK SPAK Qty Qty Qty Qty Cost Cost Cost
UOM UOM Operator Factor Rounding Precision Operator Factor Rounding
sf-4X8 sheet / 32 no 3 * 32 No
ProjectPAK UOMs must be unique in order to find the correct UOM conversion formula. For example, if you needed to differentiate between sheet stock of 4’ X 8’ and sheet stock of 4’ X 10’, then you need to use two different square foot UOM’s in ProjectPAK: sf-4X8 and sf-4X10.
To determine quantity, the above formula divides the number of ProjectPAK square feet by 32 which gives the number of sheets. The cost side of the conversion formula is always opposite of the quantity side. In this example, we multiply the ProjectPAK cost by 32 to come up with the price of a single sheet of material.
Converting an Estimate to a ShopPAK Job
If you have the ShopPAK security privilege of converting estimates over to ShopPAK, you’ll see the Send To ShopPAK tab at the bottom of the ProjectPAK Estimate tab.
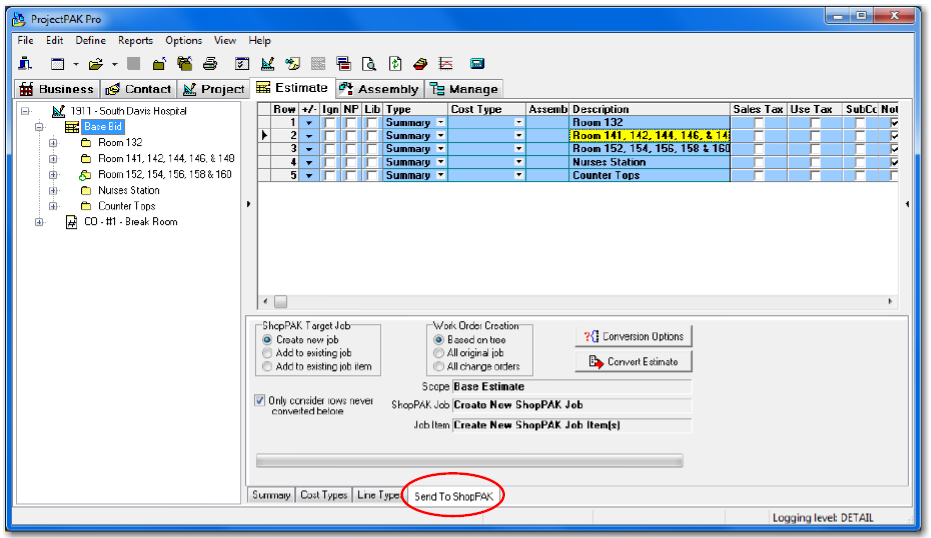
ShopPAK Target Job
You have three choices when sending estimate information to ShopPAK:
Create New Job
Creates a brand new ShopPAK job from the currently selected estimate. ProjectPAK uses the ProjectPAK Project Id when it creates the new ShopPAK Job ID, or it creates a new numeric Id based on the next available ShopPAK Job Id. This decision depends on how you’ve set up your ShopPAK Options.
In ShopPAK, select Define | ShopPAK Options from the main menu. This displays the ShopPAK Options dialog box. On the “Jobs” tab you’ll see the following control:
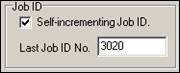
If you want ProjectPAK to create a unique ShopPAK Id, place a check in “Self-incrementing Job Id” and give the starting Job Id number that you want to begin with.
If you want the ShopPAK Job Id to match the corresponding ProjectPAK Project Id, do not place a check in the checkbox. (Note: The above setup only needs to be done once).
Add to Existing Job
Adds new Job Items and/or Work Orders to an existing job. When you click this radio button, ProjectPAK displays the “Open Jobs” dialog box so you can choose the ShopPAK job you want to add additional Job Items and Work Orders.
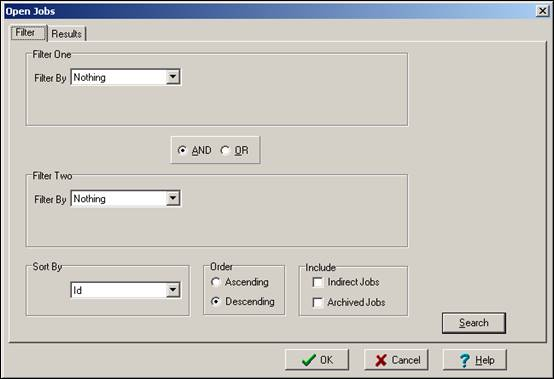
Use this option when you want to add ProjectPAK change orders, adds, and deducts to an existing ShopPAK Job. The other situation this comes in handy is when you want to send only those phases of the ProjectPAK estimate that you want to work on and release in the near term. (As you’ll see, you can send the entire estimate over to ShopPAK, or you can send a subset of estimate line items over to ShopPAK).
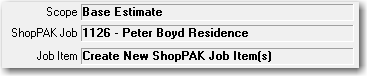
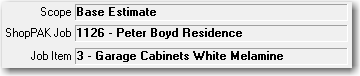
Once you identify the ShopPAK job that you want to append information to, ProjectPAK updates the ShopPAK Job and Job Item display areas:
Add to Existing Job Item
Adds new Work Orders to an existing ShopPAK Job Items. When you click this radio button, ProjectPAK displays the “Open Jobs” dialog box so you can choose the ShopPAK job you want to add additional Work Orders. When you choose the target ShopPAK job, ProjectPAK displays the Job List dialog box that displays the ShopPAK job’s Job Items.
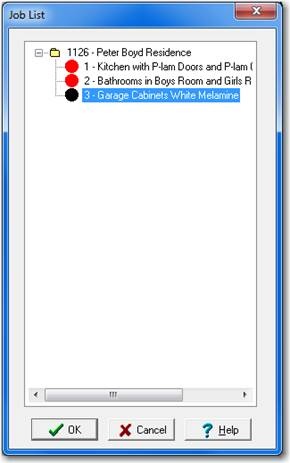
Select the Job Item you want to add new Work Orders to and click OK.
Once you identify the ShopPAK Job Item you want to append information to, ProjectPAK updates the ShopPAK Job and Job Item display areas:
Work Order Creation
A ShopPAK Work Order is either defined as an original Work Order or as a Change Order. You have three choices when generating ShopPAK work orders:
Based on Tree
ProjectPAK uses the tree to determine if a new work order is flagged as original or as a change order. If the work order is generated from information coming from an estimate Change Order tree node, then ProjectPAK flags the Work Order as a Change Order. However, if the work order is based on a non-Change Order tree node, it is flagged as an original Work Order.
All Original Job
Regardless of what tree node the Work Order is based upon, ProjectPAK flags the Work Order as an original work order.
All Change Orders
Regardless of what tree node the Work Order is based upon, ProjectPAK flags the Work Order as a Change Order.
Estimate Row Conversion
ProjectPAK records the date that a worksheet row was sent to ShopPAK in the Spak Conv Date column.

Usually, you only want to convert an estimate row over to ShopPAK once. Placing a check into the following checkbox guarantees that ProjectPAK skip rows previously converted to ShopPAK.
However, if you need to re-convert an estimate, or part of an estimate, you can uncheck the checkbox and ProjectPAK sends all rows currently marked for conversion to ShopPAK.
Estimate Conversion Options
When you first click the Send To ShopPAK tab, ProjectPAK reads your default ShopPAK conversion options. If you need to override your default settings, or if you want to preview how your converted estimate will look in ShopPAK, click the Conversion Options button  . This displays the Estimate Conversion Options dialog box.
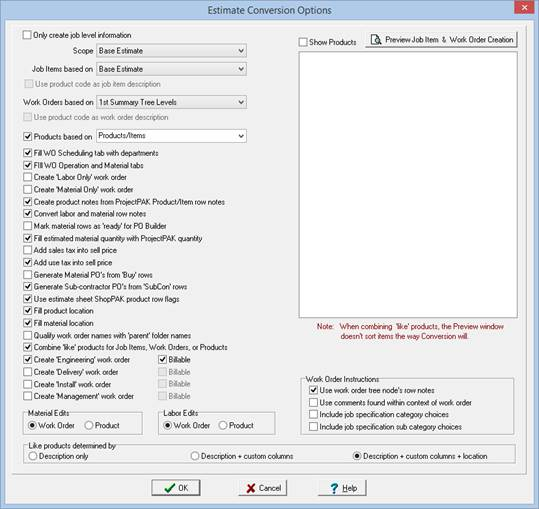
As you can see, the dialog box looks very similar to the ShopPAK Options dialog box we covered earlier in the chapter. Use the dialog box to override your default settings if you need to convert your estimate differently than you normally do.
A powerful tool is previewing how the generated ShopPAK tree will look based on the current conversion settings. Click the Preview Job Item & Work Order Creation button. ProjectPAK generates a test ShopPAK job tree based on your current settings:
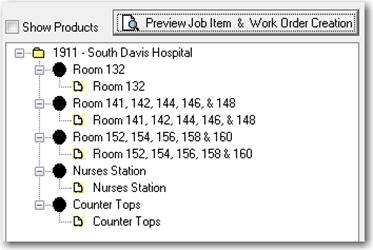
If you change the criteria for generating Job Items and/or Work Orders and click the preview window, ProjectPAK shows you the new ShopPAK job tree that will be generated:
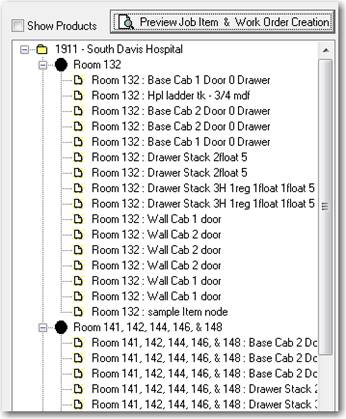
Note: If you want to see products under a generated work order, place a check into the Show Products checkbox.
Scope
A very important conversion option is Scope. Scope tells ProjectPAK which tree nodes to consider when converting the estimate over to ShopPAK.
There are 4 choices:
Entire Estimate
The entire estimate is considered including any Change Orders that have a status of approved.
Base Estimate
Only tree nodes under the Base Bid are considered for conversion.
All Change Orders
Only tree nodes under approved Change Orders are considered for conversion.
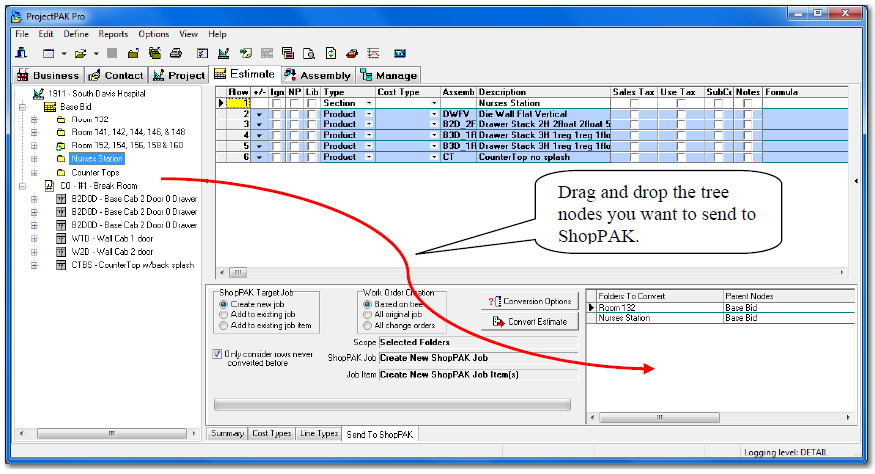
Selected Folders
Only selected Summary tree nodes are converted. If you choose Selected Folders, you must identify the tree nodes that you want to convert by dragging them over to the Folders To Convert grid.
Starting Estimate Conversion
Once you’ve selected all of your conversion directives, you are ready to start the conversion. Press the Convert Estimate button  .
.
ProjectPAK keeps you informed of progress via a progress gauge. When it finishes conversion, ProjectPAK displays a status message above the progress gauge.

At this point, you can open the target job in ShopPAK to see newly created Job Items and/or Work Orders.