Job Tree Hierarchy
Job Objects
ShopPAK handles many functions for the custom manufacturer and job shop. Most of these functions revolve around a job. Since ‘Job’ plays a critical role in learning ShopPAK, this chapter provides an introduction on constructing Jobs in ShopPAK and how to interact with the job tree hierarchy – located on the Jobs tab.
A ShopPAK Job is built using four hierarchical objects: Job, Job Item, Work Order and Product. Each object has a corresponding record on the database that holds information about the object.
Job
The Job object represents the overall Job. Important data includes Job ID, Job Description, Job Status, Customer, Milestones, Scheduling Dates, Percent Complete, and Job Cost information, etc.
Job Item
Under the job is the Job Item object. It breaks the overall Job into manageable chunks of work. If need be, each Job Item can be managed as if it were its own separate Job. Important data includes Status information, Milestone and Scheduling Dates, Percent Complete, and Job Cost information.
An often-used approach when defining Job Items is to create one Job Item for each Location (e.g. Room 101, Room 202, etc.) or Phase that make up the overall job. However, a Job Item can be anything you wish it to be. For example, a Job Item could be a category of like product, a particular product, or a functional grouping of work such as Measurement, Purchasing, Fabrication, etc.
Work Order
Under a Job Item is the Work Order. Work Order is the core object in ShopPAK. Every Job Item has at least one work order, but you can create as many work orders under a Job Item as needed. A Work Order communicates instructions to production workers, but its main function is to be a traveler that sits on top of shop drawings and provides a reference number for production employees to log job cost time against. A Work Order can simply give a high-level summary of the work that needs to be done, or it can specify all of the labor operations and required materials necessary to complete a particular Job step or unit of work.
Product
Under a Work Order are one or more products. If a user selects a product from the job tree, the product details are shown. Although most ShopPAK users tend to manage material needs and labor routings at the work order level, we give users the option of managing material and labor at the Product level.
When managing material and/or labor at the product level, ShopPAK automatically keeps the Work Order level material and labor grids synchronized with changes made at the Product level -- including changes to Product quantity, changes to labor and material quantity or item, and labor and material row insertions / deletions.
Job Tree Setup/Organizing Your Job Structure
When you define a ShopPAK Job, you arrange the Job objects into a hierarchy that corresponds to the characteristics of the Job and how you want to manage it.
How you structure your job, in other words, how you determine the number of job items and work orders underneath a given job, depend on many factors: size of the batch, common materials and/or processes, internal and/or external schedules, shop capacity, work flow, ability to get shop drawings and submittals approved, etc. etc. Generally, we recommend users structure their jobs by 1st) optimizing fabrication, and 2nd), on grouping actual job costs that makes analyzing discrepancies between estimated and actual costs easy and straightforward. Since we collect costs at the work order level, this is the lowest level that you can analyze costs. Some work orders might have one product, other work orders can have dozens of ‘like’ products.
You’ll always have 1 Job at the top of the hierarchy. Under the Job, you’ll have one or more Job Items, and under each Job Item, you’ll have one or more Work Orders. Each Work Order can have one or more Products.
In the example below (taken from the ShopPAK Job Form window), we show one way of organizing a small casework and counter top Job.
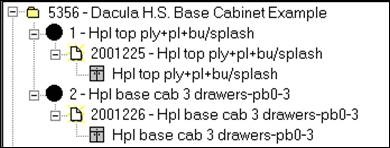
At the top of the tree is the Job -- 5356 - Dacula H.S. Base Cabinet Example. The Job consists of two Job Items:
-
Counter Top with splash
-
Base Cabinet
The above structure will work regardless of whether you’re building 1 base cabinet and counter top, or a hundred base cabinets and counter tops.
In the image above, each Job Item has one pending Work Order. An icon represents each Work Order status. The parent Job Item Icon color is directly related to the status of the Work Orders under it.
Job Item Icon Color Work Order Icon
Black Pending
Black Engineering 
Black Purchasing 
Silver Ready 
Green Released 
Yellow Completed 
Red Shipped 
Blue Installation 
Aqua Invoiced 
Purple Paid 
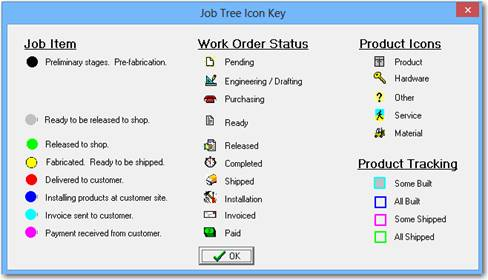
Note: A legend of Job Tree icons and descriptions are available in ShopPAK under the Jobs popup menu. Right mouse click the job tree and select “Job Tree Icon Descriptions” from the popup menu.
|
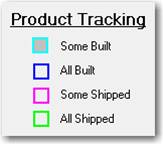
Similarly, Product objects have icons that identify product type, if they’ve been built, and shipping status. In the image below, you can tell a lot about Job status simply by looking at the icons in the expanded Job tree.

|
Product Icons
Product
Hardware
Other
Service
Material
|
 |
|
|
|
The Job Item level icon will display a combination of colors when more than one work order exists underneath it, and the work orders have different status values:
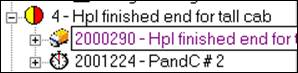
In the image above, the Job Item icon indicates it is the parent of both a ‘Shipped’ Work Order and a ‘Completed’ Work Order .
When only 1 Work Order is defined for a Job Item, the Work Order follows the Job Item all the way through the fabrication process. Production employees report their time and material usage using the Work Order number. This way, cost information is automatically applied to the correct Job Item and Job.
If your reporting needs require a more detailed break down of work, we can define additional Work Orders under a Job Item. In the chapter that explains Work Order definition and use, you’ll see that Work Orders can be as detailed, or as broad, as necessary.
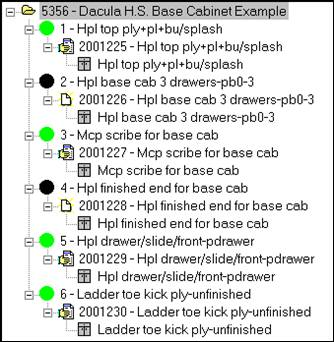
Let’s look at another way of organizing our casework / counter top Job. For this Job we broke the base cabinet portion of the Job into 6 distinct Job Items:
-
Hpl top ply+pl+bu/splash
-
Hpl base cab 3 drawers-pb0-3
-
Mcp scribe for base cab
-
Hpl finished end for base cab
-
Hpl drawer/slide/front-pdrawer
-
Ladder toe kick ply-unfinished
We left the counter top as a single Job Item. You’ll also notice that most of the Work Orders are in a Released status, denoted by the icon. A Released status implies the Work Order has been released to the shop floor and is currently being fabricated.
Below is an example of how you might handle Change Orders and Rework. By differentiating original Work Orders from subsequent additions and/or changes, we are better able to analyze costs and profitability between the original contract work and the additions we received later from the customer. Creating distinct Rework Work Orders can assist in identifying problem areas that require additional attention.
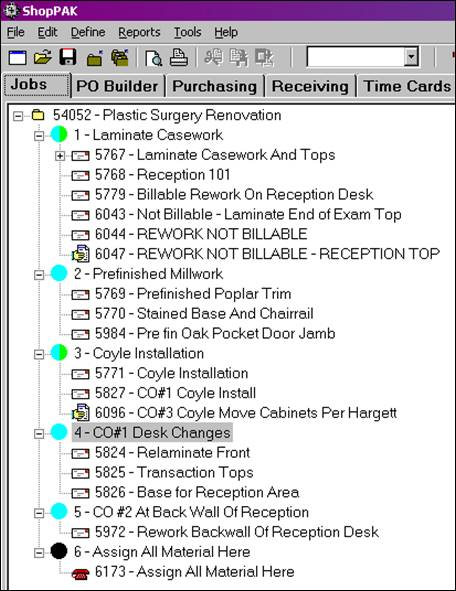
The first Job Item – includes 2 Work Orders that were required as non-billable Rework.
Job Items 4 and 5 break out Work Orders that were added after the original contract as dictated by customer changes.
If you prefer to keep all direct material purchases grouped together, the last Job Item – ‘Assign All Material Here’ – illustrates this technique. Your buyers can assign all Purchase Orders written against this Job to this Item/Work Order.
Note: By applying costs directly to the specific Work Order or Job Item generating the material or labor requirement, you are better able to analyze estimated costs vs. actual profitability at a detailed level.
|
The next example shows a way of organizing a large Job that requires staging into separate manufacturing runs and installations.
For Job 15146 below, the hospital has four floors, each floor requiring identical casework and counter tops. From a job costing standpoint, we want to see the Job broken out by type of work (base cabinet and counter top), as well as, by floor. In addition to this, we need to stage the work into different manufacturing runs that correspond with staggered delivery dates.
To achieve this, we have created two Job Items: Break Room Cabinets and Break Room Countertop. Under each Job Item, we create 4 Work Orders – each Work Order addressing a particular floor and carrying distinct scheduling information.
Note: Work Orders have various scheduling dates available to assist in sequencing the release of work onto the shop floor and building a work center schedule. The Scheduler also interrogates some of these dates when determining the position of Work Orders in the scheduling priority sequence.
|
Notice that we have released Work Orders 29839, 29840, and 29843 to the shop floor. This indicates that we are currently fabricating these portions of the Job. The other Work Orders are still pending, since we are not ready to work these items.

The ShopPAK Job hierarchy of Job, Job Item, Work Order and Product is a very flexible structure that addresses a variety of situations and types of Jobs. As you use ShopPAK to organize jobs and present them to the shop floor, you will undoubtedly discover additional ways to structure jobs that support how you want to manage, release, and cost jobs.
Job Tree Popup Menu
Right mouse clicking the job tree displays the job tree popup menu:
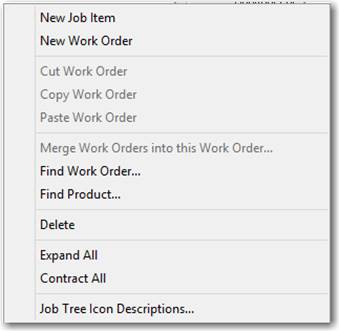
New Job Item
Add a new job item to the job.
New Work Order
Add a new work order to a job item.
Cut, Copy, and Paste Work Orders
Self explanatory.
Merge Work orders into this Work Order
Displays a dialog box of all of the work orders in the job. Select the work orders you wish to merge into the selected 'target' work order.
Find Work Order
Displays a dialog box that you type the work order number you are seeking. ShopPAK will expand the job tree and select the target work order.
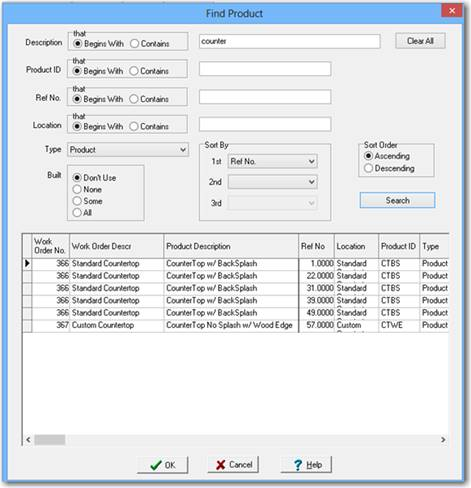
Displays a dialog box that gives you different ways of finding a target product node within the job tree. ShopPAK will expand the tree and select the target product.
Delete
Delete the selected Job Item, Work Order, or Product from the Job tree.
Expand All
Expands every job tree node so it is visible
Contract All
Hides all of the job tree nodes except for the root Job Node.
Job Tree Icon Descriptions
Pops up a key that explains all of the different job tree icons.