
Action Items
Click on the Action Items sub-tab to pull up the window. Action items give ShopPAK users the ability to define and track issues, questions, and tasks specific to the job. To adjust the size of the Action Item grid, move your mouse to the horizontal splitter control, and while holding down your left mouse button, drag up or down to resize the grid.
Add New Action Item
To add a new action item, right mouse click the Action Item grid and select “New” from the pop up menu or push the “Insert” button on your keyboard. Either action adds a new row to the Action Item grid. Enter information directly into the Action Item grid:
Status
The default status is “Open” when you create a new action item. Once an action item has been dealt with, change the status to “Closed”. Although you could delete ‘old’ action items, it is usually a better idea to close them so they can be retrieved if necessary.
Priority
Three priority levels are available : Low, Medium, and High. Marking action items with the correct priority helps you make sure critical issues are dealt with in a timely manner.
Description
Describes action item.
Need By Date
Pinpoints when the action item needs to be resolved by. ShopPAK automatically highlights 'Need by Date' to be on time, late, in jeopordy of being late, etc. based on your date tracking color choices located via the Define | Date Tracking Colors menu item. We cover setting up date tracking colors in the milestone section found later on in this chapter.
Assigned To
Name of the person responsible for the action item. The list contains all employees designated as ‘ShopPAK Users’ in their employee records.
Resolution
Action item answer or resolution.
Job Item
If the action item is for a specific Job Item, as opposed to the entire job, choose the correct Job Item from the list of Job Items.
Work Order
If the action item is for a specific Work Order, as opposed to the entire Job or Job Item, choose the correct work order from the list of work orders.
Create Date
Automatically supplied by ShopPAK when the action item is created.
Finished
Date the action item was completed.
Create By
ShopPAK automatically displays the initials of the person that created the action item.
RFI #
Read Only. If action item is linked to a specific RFI #, ShopPAK displays RFI #.
Copy an Existing Action Item
If you want to quickly add an action item that is similar to an existing action item, select one or more action items you wish to copy and right mouse click the grid. Select 'Copy' from the popup menu. Then position where you want to paste the copied action item or items, right mouse click the grid and select 'Paste'.
Delete an Action Item
To delete an action item, right mouse click the Action Item grid and select “Delete” from the pop up menu. Confirm the delete to remove the action item.
Grid Column Moving
The Action Item grid supports column moving. If you want to change the position of one or more columns, simply select the column you want to move by clicking your left mouse button in the header portion of the column. Selected columns are colored blue. Move your mouse into the column header of the selected column, and holding down your left mouse button, slide the column left or right and release your left mouse button when it is at the new position.
You can select multiple columns so you can move them in one operation. To select several columns, simply press the CTRL (control) key while you click on a column header. This keeps all selected columns highlighted. To move, simply move your mouse to one of the highlighted columns and hold down your left mouse button. Slide the columns to the new position and release your left mouse button.
ShopPAK remembers new column positions between sessions for each user.
Hide / Display Columns
To hide / display columns, right mouse click the Action Item grid and select “Hide / Display Columns” from the pop up menu. This displays the “Hide / Display Columns” dialog box.
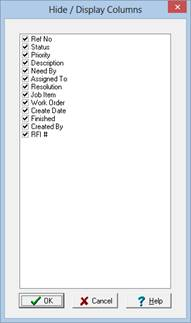
Placing a check in a column tells ShopPAK to display the column. Unchecking a column tells ShopPAK to hide the column.
Restore Default Column Positions
Automatically restores the default column positions in the grid.
Sort Grid
To sort action item rows, right mouse click the Action Item grid and select “Sort Grid” from the pop up menu. This displays the “Sort Grid” dialog box.
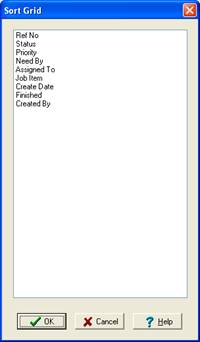
Select the column you wish to sort on and click the OK button. ShopPAK sorts the grid accordingly. Use the “ascending” and “descending” radio buttons to order the sorted column in ascending or descending sequence.