
Time & Attendance
Adding a New Time & Attendance Transaction
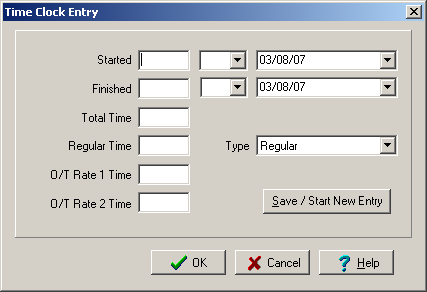
1. Right mouse click the “Time & Attendance” grid. Select “New” from the pop up menu. This displays the “Time Clock Entry” dialog box.
|
Field
|
Purpose
|
|
Started
|
Shows when the employee ‘clocked in’ to work. Time should be entered as hour : minutes (e.g. 7:00). Use a 12 hour clock and don’t forget to identify whether it is AM or PM.
|
|
Finished
|
Shows when the employee ‘clocked out’. Time should be entered as hour : minutes (e.g. 4:30). Use a 12 hour clock and don’t forget to identify whether it is AM or PM.
|
|
Total Time
|
The total time in hours. This field is automatically calculated by ShopPAK if you enter ‘Started’ and ‘Finished’.
|
|
Regular Time
|
Defaults to the ‘Total Time’ amount. Override ‘straight’ time if part or all of the reported time should be categorized as overtime.
|
|
O/T Rate 1 Time
|
Enter the portion of the time that is considered O/T Rate 1 time.
|
|
O/T Rate 2 Time
|
Enter the portion of the time that is considered O/T Rate 2 time.
|
|
Type
|
Identifies the ‘accounting’ code type for regular labor (regular, vacation, sick, etc.)
|
2. Click “OK”. This returns you to the “Time Clock” grid. The new entry is displayed in the grid. The cumulative ‘Time Clock’ totals for the card are updated and now reflect the new ‘Time Clock’ entry.
Press “Save / Start New Entry” if you want to add multiple ‘time and attendance’ entries for the current employee.
Modifying a Time Clock Transaction
1. Select the ‘Time & Attendance’ transaction you want to change by clicking it with your mouse.
2. Right mouse click the grid. Select “Modify” from the pop up menu. This displays the “Time Clock Entry” dialog box. Make changes and click OK.
Deleting a Time Clock Transaction
1. Select the row you wish to remove by clicking it with your mouse.
2. Right mouse click the “Time & Attendance” grid. Select “Delete” from the pop up menu.
3. This displays a warning message. Select “Yes” to delete the time clock transaction. Click “No” to cancel the deletion.
Mass Add
‘Mass Add’ significantly speeds the process of adding a common ‘day off’ for your employees. For example, if you give employee Independence Day (July 4th) off, instead of creating a new ‘Holiday’ entry for each employee, choose ‘Mass Add’, add the number of hours and type of ‘Holiday’ and click OK. ShopPAK automatically creates the same holiday record for all employees in the employee list.
View GPS Location
If the time and attendance transaction was created via ShopPAK Mobile, GPS location may be available to verify the location where the employee created the time and attendance transaction.
1. Select the row you wish to verify GPS location.
2. Right mouse click the “Time & Attendance” grid. Select “View GPS Location” from the popup menu.
3. This launches your web browser and navigates to the Google Maps website where the employee's actual location is marked when they clocked in and clocked out of the transaction.