
Job Card Actuals
Adding a New Job Cost Labor Actuals Transaction
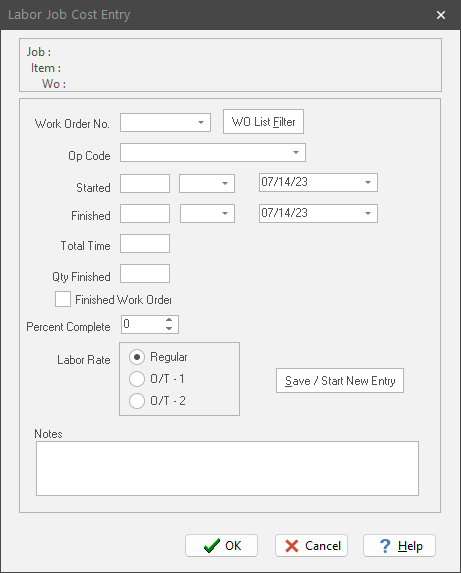
1. Right mouse click the “Job Cost” grid (this is the one with the aqua background). Select “New” from the pop up menu. This displays the “Labor Job Cost Entry” dialog box.
|
Field
|
Purpose
|
|
Job
|
Identifies the work order’s Job (read only).
|
|
Item
|
Identifies the work order’s Job Item (read only).
|
|
Wo
|
Work Order description (read only).
|
|
Work Order Number
|
You must identify the work order the employee worked on. Either pick from the pull down list, or key in the work order number. As you type a number, the next work order that matches is displayed.
|
|
Work Order List Filter
|
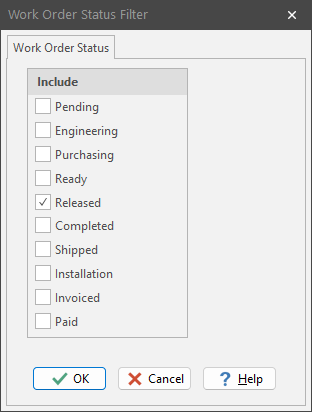
Tells ShopPAK what work orders to include in the list based on work order status. After clicking OK, ShopPAK refreshes the work order list accordingly.
|
|
Field
|
Purpose
|
|
Op Code
|
The operation that the employee performed. Optional.
|
|
Started
|
Shows when the employee started the transaction. Time should be entered as hour : minutes (e.g. 7:00). Use a 12 hour clock and don’t forget to identify whether it is AM or PM.
|
|
Finished
|
Shows when the employee ended the transaction. Time should be entered as hour : minutes (e.g. 4:30). Use a 12 hour clock and don’t forget to identify whether it is AM or PM.
|
|
Total Time
|
The total time in hours. This field is automatically calculated by ShopPAK if you enter ‘Started’ and ‘Finished’.
|
|
Qty Finished
|
The number of units completed. Optional.
|
|
Finished Work Order
|
Indicates if the work order was finished or not. Optional.
|
|
Labor Rate
|
Choose the rate (Regular, O/T - 1, or O/T – 2) that should be used when calculating the dollar amount of the transaction. On the grid, Regular or Straight Time displays as a ‘0’, O/T - 1 displays as ‘1’, and O/T - 2 displays as a ‘2’.
|
|
Notes
|
Free form notes you wish to add to a labor actuals transaction.
|
2. Click “OK”. This returns you to the “Job Cost” grid. The new entry is displayed in the grid. The cumulative ‘Job Cost’ totals for the card are updated and now reflect the new ‘Job Cost’ entry.
Press “Save / Start New Entry” if you want to add multiple job cost entries for the current employee. This is a real time saver when you have a lot of distinct transactions per day for the same employee.
We give users 4 options with how they want to fill their work list and/or identify the “Job Cost” labor transaction. Selecting Define | Work Order List Options from the ShopPAK menu displays the “Work Order List Options” dialog box:

If you choose the first or second choice, ShopPAK behaves as explained above in the section on adding a new job cost labor transaction.
If you choose “Enter work order (no list)”, the “Labor Job Cost Entry” dialog box behaves differently. Instead of a work order pick list, you simply type the work order number into a regular edit box:
If you choose “Fill work order list by job”, ShopPAK changes the dialog box’s behavior as well. Instead of a long list of work orders, you click the “Jobs” button and choose the job that you want to create the transaction for. Once you pick the job, ShopPAK displays a job tree with all of the job’s work orders displayed. Pick the work order you want and ShopPAK writes the work order number back to the “Work Order No.” field.
Modifying a Job Cost Transaction
1. Select the job cost transaction you want to change by clicking it with your mouse.
2. Right mouse click the “Job Cost” grid. Select “Modify” from the pop up menu. This displays the “Labor Job Cost Entry” dialog box. Make changes and click OK.
Deleting a Job Cost Transaction
1. Select the row you wish to remove by clicking it with your mouse.
2. Right mouse click the “Job Cost” grid. Select “Delete” from the pop up menu.
3. This displays a warning message. Select “Yes” to delete the job cost transaction. Click “No” to cancel the deletion.
Open Work Order
A handy feature is automatically opening a transaction’s work order. Click “Open Work Order” on the pop up menu. ShopPAK navigates to the Jobs tab and opens the requested work order.
View GPS Location
If the labor actuals transaction was created via ShopPAK Mobile, GPS location may be available to verify the location where the employee created the labor transaction.
1. Select the row you wish to verify GPS location.
2. Right mouse click the “Job Cost” grid. Select “View GPS Location” from the popup menu.
3. This launches your web browser and navigates to the Google Maps website where the employee's actual location is marked when they logged in and out of the transaction.