
PO Item Grid Pop Up Menu Commands
Right mouse click the ‘PO Items’ grid to display the PO Items grid’s pop up menu:

New
Creates a new PO Item row so you can manually add a new PO Item. Position your cursor on the row where you want the new row created. ShopPAK creates the row underneath the selected row.
Replace
Lets you replace the current PO Item with another material from the ProjectPAK Library or ShopPAK Inventory.
Copy Inventory Items
Creates a new PO Item row(s) based on a ShopPAK Inventory item(s). Position your cursor on the row where you want the new row(s) created. Select one or more inventory items from the Inventory Item Selection dialog box. ShopPAK copies selected inventory items underneath the selected row.
Copy Library Items
Creates a new PO Item row(s) based on a ProjectPAK library item(s). Position your cursor on the row where you want the new row(s) created. Select one or more library items from the Library Item Selection dialog box. ShopPAK copies selected library items underneath the selected row.
Copy Assembly Rows
Creates a new PO Item row(s) based on a ProjectPAK assembly(s). Position your cursor on the row where you want the new row(s) created. Select one or more assemblies from the Assembly Selection dialog box. ShopPAK copies selected assembly row(s) underneath the selected row.
Add Job Item Assignment
If a PO Item is “Job” or “Reserve”, you must assign a Job and/or Job Item to the PO Item.
Whether you assign at the Job, Job Item, or Work Order level, depends on the “Direct Job Purchases” setting of the Job you are going to assign to the PO Item, as well as, the level you’ve set for your default ‘Sell price and percent complete’ level. See the Jobs chapter page 8 for details about choosing a Job’s ‘Direct Job Purchases’ setting. 3 options are available:
Pick Job Item or Work Order
You identify both the Job and the Job Item / Work Order when assigning a PO Line Item to the job. Use this option when you earmark a purchase to a particular Job Item / Work Order. This is the most precise way of costing direct material purchases since you’ll see both estimated and actual costs at the Job Item and Work Order levels.
Average Across All Job Items
You identify only the Job when assigning a PO Line Item to the job, since the purchase is applicable to all of the Job Items under the job. ShopPAK averages the cost evenly to all of the Job Items under the Job.
Use Estimated Material Costs
You identify only the Job when assigning a PO Line Item to the job. When using this option, you’re telling ShopPAK to use a Job Item’s estimated material cost in lieu of the Job Item’s actual material cost. At the Job level, however, the actual material costs incurred will be accumulated in the Job’s direct material cost accumulator. Use this option when it isn’t appropriate to job cost direct material purchases at the Job Item level.
To assign one or more PO Items to a Job or Job Item:
1. Select the PO Item(s) you want to assign to the same Job Item or Job.
TIP: If you’re selecting several rows by clicking them with your mouse, hold down the control key when clicking so previously selected rows remain selected.
|
2. Right mouse click the “PO Items” grid. Select “Add Job Item Assignment” from the pop up menu.
3. This displays the “Open Jobs” dialog box. Select the job that you want to assign the selected PO Item(s) to and click OK.
4. This displays the “Job List” dialog box. You’ll see the Job and all of the Job’s Job Items and Work Orders listed.
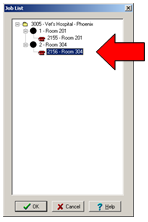
5. Choose the Job, Job Item or Work Order you want to use as the target of the PO Item job assignment. Click OK. If you pick the wrong level, based on the job’s “Direct Job Purchases” setting, don’t worry. ShopPAK checks to make sure you select the right level and warns you if you make a mistake.
6. When you return to the PO Items tab, you’ll see the Job and/or Job Item you selected down in the Job Assignment grid.
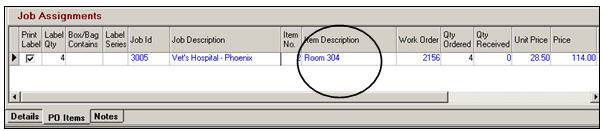
7. Adjust the Job Assignment quantity if necessary. When you add a new job assignment for a PO Item, ShopPAK makes the Job Assignment ‘Qty Ordered’ equal to the PO Item quantity. If you add additional job assignments for the same PO Item, you’ll need to adjust job assignment quantities to split the PO Item quantity over the job assignments.
Auto Creation of Corresponding Work Order Material Grid Row
ShopPAK automatically creates a corresponding work order material grid row when you manually add a new job assignment that references a particular work order. This is a great feature since the work order material grid gives users purchasing and material status information.
Assigning PO Item(s) to the Last Job Assignment
If you assign at the Job Item level, you can select multiple PO Items and make all the assignments at one time, provided the PO Items are ALL going to be assigned to the same Job / Job Item combination.
However, if you need to assign to different Job Items under the same Job, you have to assign one Job Item group at a time.
To speed the process, ShopPAK remembers the last Job you assigned, and places it on the PO Item pop-up menu:
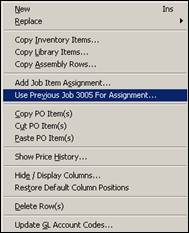
In the example above, the last Job we assigned was ‘3005’.
If you wanted to assign another batch of PO Items to the same Job (3005), but to a different Job Item or Work Order, click this menu option. ShopPAK skips the step of asking you for the Job (since you’re telling it to use Job #3005). Instead, it displays the “Job List” dialog box for Job #15056. The “Job List” dialog box will show all of the Job Items and Work Orders under the requested job.
Copy PO Item Row(s)
You can copy and paste one or more PO Item rows within the PO Item grid or between different Purchase Orders. Select the PO Item(s) you want to copy by clicking the PO Item row buttons (located on the far left of the grid) or by holding down your left mouse button and dragging across several PO Item row buttons. If you want to copy non-contiguous rows, hold down the CTRL button so you don’t lose previous row selections. To paste the rows, see ‘Paste PO Item Row(s)’.
Cut PO Item Row(s)
You can cut and paste one or more PO Item rows within the PO Item grid or between different purchase orders. Select the PO Item(s) you want to cut by clicking the PO Item row buttons (located on the far left of the grid) or by holding down your left mouse button and dragging across several PO Item row buttons. If you want to cut non-contiguous rows, hold down the CTRL button so you don’t lose previous row selections. To paste the rows, see ‘Paste PO Item Row(s)’.
Paste PO Item Row(s)
Pastes either copied or cut PO Item rows underneath the selected PO Item grid row.
Show Price History
To see a price history for a PO Item:
1. Select the PO Item you want to see historical price history for.
2. Right mouse click the “PO Items” grid. Select “Show Price History” from the pop up menu.
3. This displays the “PO Item Price History” dialog box shown on the next page.
TIP: ShopPAK uses the PO Item description when it builds the Price History list. Thus, you need to be consistent with naming your PO Item descriptions. It is highly recommended that you copy from the ProjectPAK Library or ShopPAK Inventory to ensure naming consistency so you get an accurate price history over time.
|
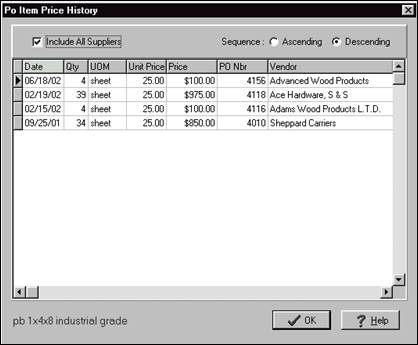
When you first display the dialog box, the “Include All Suppliers” checkbox is blank. When blank, only the transactions for the PO’s vendor are listed.
If you want to see all vendor prices for the PO Item description, check the “Include All Suppliers” checkbox as we’ve done in the example above. This expands the list to include all purchases of the passed PO Item, regardless of who you ordered the item from.
Sequencing the PO Item Price History Grid
A nice feature of using the Price History grid is you can sequence the grid on a number of columns, as well as, sort rows by ascending or descending sequence. The column currently being sequenced has a blue background. To sequence on another column, click the column header with your left mouse button.
Hide / Display Columns
To hide / display columns, right mouse click the PO Items grid and select “Hide / Display Columns” from the pop up menu. This displays the “Hide / Display Columns” dialog box.
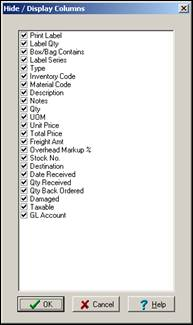
Placing a check in a column tells ShopPAK to display the column. Unchecking a column tells ShopPAK to hide the column.
Restore Default Column Positions
Automatically restores the default column positions in the grid.
Delete Row(s)
Select the PO Item(s) you want to delete by clicking the PO Item row buttons (located on the far left of the grid) or by holding down your left mouse button and dragging across several PO Item row buttons. If you want to delete non-contiguous rows, hold down the CTRL button so you don’t lose previous row selections. Choose “Delete Row(s)” from the menu. ShopPAK warns you if you want to continue with the deletion request. Choose “Yes” to delete the selected rows. Choose “No” to cancel the delete request.
Update GL Account Codes
Select the PO Item(s) you want to update GL Account Code on by clicking the PO Item row buttons (located on the far left of the grid) or by holding down your left mouse button and dragging across several PO Item row buttons. If you want to change non-contiguous rows, hold down the CTRL button so you don’t lose previous row selections. Choose “Update GL Account Codes” from the menu. ShopPAK displays a dialog box where you choose the expense GL Account code you want to copy to all selected PO Item rows. Click OK. ShopPAK updates GL Account Code accordingly.