
Milestones
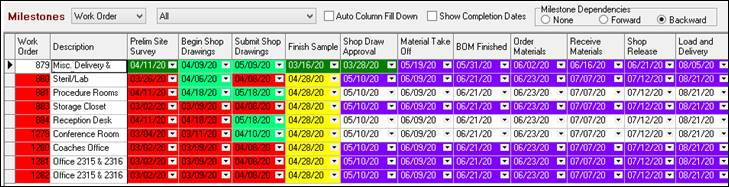
The bottom portion of the form handles milestones. Milestones give ShopPAK users the ability to define and track key project milestones. To adjust the size of the milestone grid, move your mouse to the horizontal splitter control, and while holding down your left mouse button, drag up or down to resize the grid.
Creating Milestone Templates
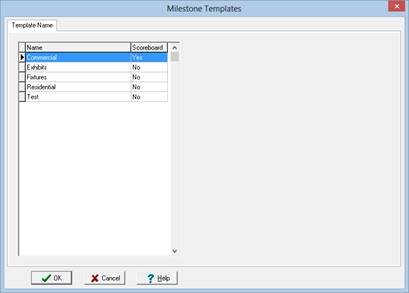
To speed the process of setting up milestones, we encourage you to create and use milestone templates. Select Define | Milestone Template from the menu. This displays the “Milestone Templates” dialog box:
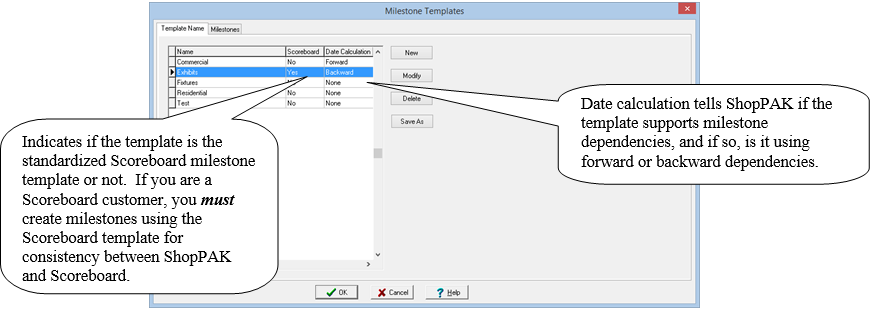
Use “New” to create a new template name. Use “Modify” to change the name of a template. Use “Delete” to delete a template. Use “Save As” to make a copy of an existing template.
Note: Milstones are a key component of Scoreboard, a companion product to ShopPAK. If you are a Scoreboard user, you must standardize milestones usage across all jobs so milestones line up when displaying milestones across several different jobs. The best way to do this is create a milestone template, mark it as the Scoreboard template, and use it exclusively across all jobs in ShopPAK.
|
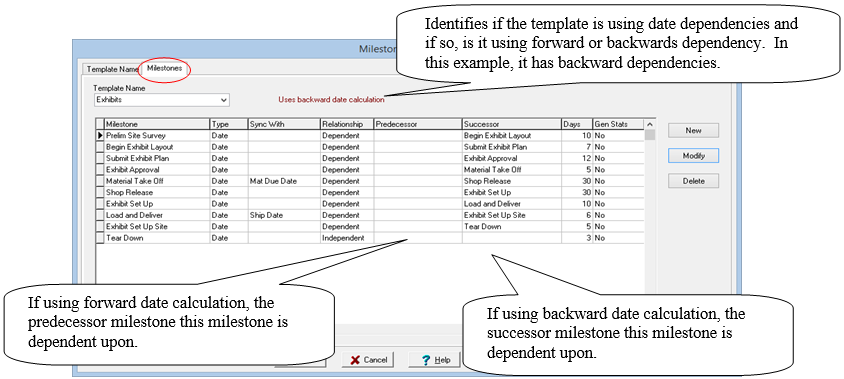
Once you create a template, click the Milestone tab to create the actual milestones that make up the milestone template. Select the template name you want to work with from the “Template Name” pick box. All of the milestones you’ve defined for the template are listed. If it is a new template, the list will be empty.
New
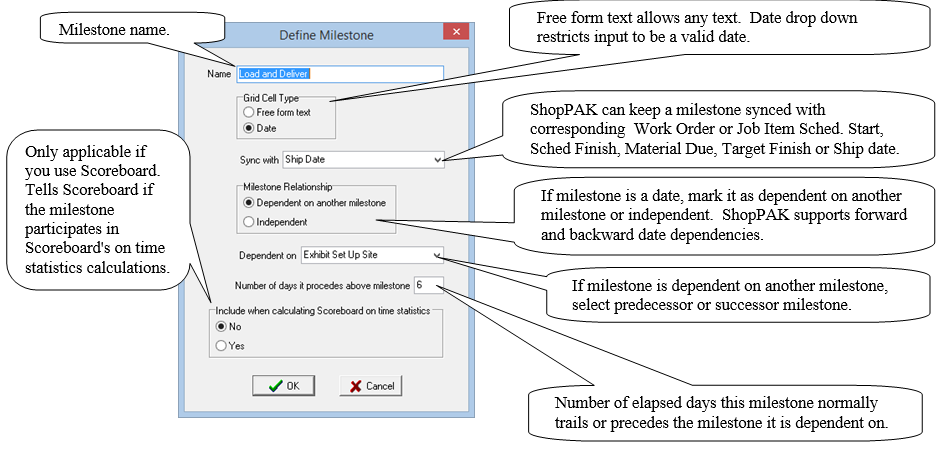
Click the “New” button to add a new milestone. Enter attributes and click OK. ShopPAK adds it to the bottom of the milestone list.
Modify
To modify a milestone name, select it from the list and click “Modify”. Edit the milestone and click the OK button. ShopPAK displays the modified milestone and attributes in the list.
Delete
To remove a milestone, select it from the list and click “Delete”. ShopPAK confirms that you want to delete the milestone. Pick “Yes” to continue the delete operation. Click “No” to cancel.
To change the position of a Milestone, select it and use the  and
and  buttons to move it up or down.
Using Milestone Templates
Once you’ve created one or more milestone templates, you can use them in a job's milestone area by right mouse clicking the Milestone grid, and selecting “Copy Milestone Template” from the pop up menu. This displays the Milestone Templates dialog box.
Select the template you wish to use and click OK. This copies the template milestones into the milestone grid's column label header area:

Milestones are added to the Grid, presented left to right, based on template milestone sequence.
Milestone Rows
Choose if you want to track milestones at the Job Item, Work Order, or Change Order level. Use the row combo box to pick current view. Note: ShopPAK remembers your last selection across sessions.
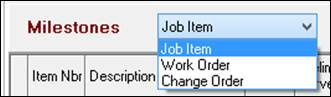
Depending on your choice, you'll see either Job Items, Work Orders, or just Change Orders as rows.
Job Items Work Orders
Excluding Work Orders From the Milestone Grid
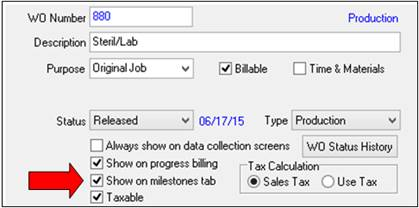
If you track milestones at the work order level, and not all work orders need to be tracked, you can exclude one or more work orders from the milestone grid. This is done on the Work Order Details screen. There's a checkbox called "Show on milestones tab". If you track milestones for the work order, make sure the check box is checked. Else, leave it blank.
Quick Load
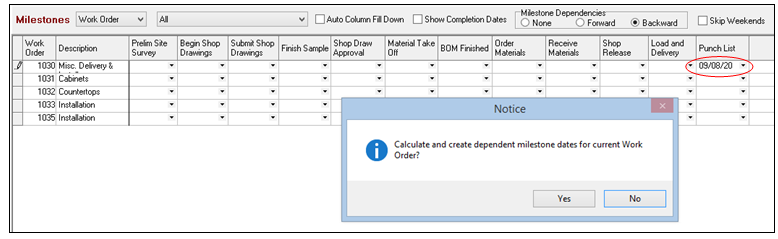
After populating grid from your milestone template, if milestones use front or backwards date dependencies, you can fill the entire grid by entering just one independent milestone.
1. Pick a date on the independent milestone that controls dependent milestone dates and click 'Yes' when the message box appears.
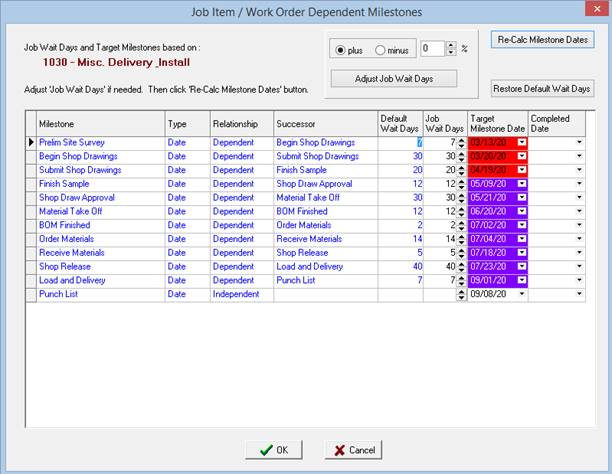
2. The Job Item / Work Order dependent Milestone dialog appears. Adjust the 'Job Wait Days' if necessary, click the "Re-Calc Milestone Dates" button and then press OK.
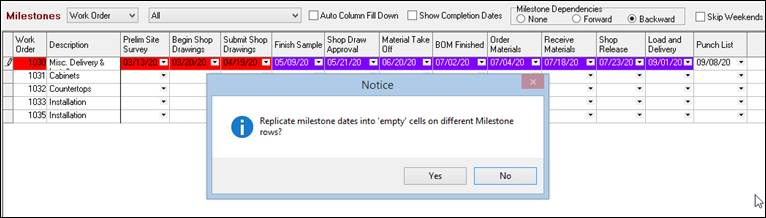
3. Last, press "Yes" when the message box displays asking if you want to fill all of the Milestone grid rows, duplicating dates from the newly added Milestone row.

If you define a milestone as being a date, ShopPAK colors milestone cells based on your choice of tracking color. Tracking color is defined via the Define | Date Tracking Color menu item:

Milestones uses the first 5 status color buttons. Click a status button and choose the color you want to use to depict that particular status. For example, we've chosen the color yellow to flag a date that is approaching its target date and considered in a warning threshold. And speaking of the Warning Threshold status…make sure you choose the number of days you want in the warning threshold calculation:
At Risk to be Late Because of Predecessor
All of the status colors are pretty intutive, with the exception of "At Risk to be Late" (in our case purple). ShopPAK flags dependent milestones with the "At Risk to be Late" color if a predecessor milestone is considered late, and no subsequent milestone between the late predecessor task and the current milestone has made up the difference (in other words, the inbetween milestone is considered on time).
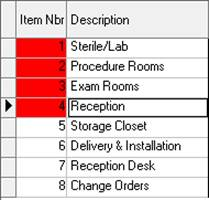
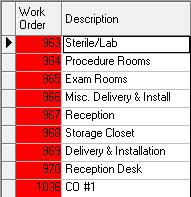
If a Job Item or Work Order has at least one milestone that is considered late, it paints the Job Item or Work Order number with the color you've chosen to represent a late milestone (in our case red).

Changing a Milestone Label
If a milestone label or other attribute isn’t applicable for a job, change it by:
1. Click milestone column header with left mouse button.
2. Click grid with right mouse button and choose “Modify Milestone Label” from the pop up menu. This displays the Milestone dialog box where you can modify the milestone label and/or attributes. Click OK to update milestone grid.
Deleting a Milestone Label
If you don’t need a milestone for the job, remove it by:
1. Click milestone column header with left mouse button.
Note: When deleting multiple labels, hold down your CTRL (control) key so previously selected columns stay highlighted.
|
2. Right mouse click the grid and select “Delete Milestone(s)” from the pop up menu. ShopPAK warns you if you want to continue the deletion. Choose “Yes” to continue the delete operation. Choose “No” to cancel.
Adding a new Milestone Label
1. Highlight a blank milestone column header by clicking the header with your left mouse button.
2. Right mouse click the grid and select “Modify Milestone Label” from the pop up menu. This displays a dialog box where you can add a new milestone label. Click OK and the new milestone label is added to the grid.
-- or --
Right mouse click the grid and select “Create New Milestone” from the pop up menu. This displays a dialog box where you can add a new milestone label. Click OK and the new milestone label is added at the end of the populated milestone labels.
Changing Milestone Column Positions
The Milestone & Submittal grid supports column moving. If you want to change the position of one or more milestones, simply select the milestone(s) you want to move by clicking your left mouse button in the milestone label portion of the column. Selected columns are colored blue. Move your mouse into the milestone label of the selected column, and holding down your left mouse button, slide the milestone left or right and release your left mouse button when it is at the new position.
You can select multiple milestones so you can move them in one operation. To select several milestones, simply press the CTRL (control) key while you click on a milestone label. This keeps all selected milestones highlighted. To move, simply move your mouse to one of the highlighted milestones and hold down your left mouse button. Slide the milestones to the new position and release your left mouse button. ShopPAK remembers new milestone positions between sessions.
TIP: If you use Scoreboard, you shouldn't change milestones in any way from how they are defined in the Milestone Template marked as driving Scoreboard. It is imperative to maintain consistency across all milestones so ShopPAK and Scoreboard are in sync and work properly.
|
Editing Milestones
If a milestone is defined as being free form text, enter whatever verbiage you wish into the milestone cell. If the milestone is defined as being a date, then use the drop down date picker and choose correct milestone 'target' date. Note, if you've set up milestone date dependency, changing a milestone will automatically update its dependent milestones.
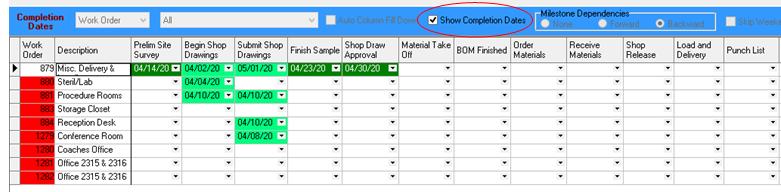
Completion Date
There are two ways to enter or edit milestone completion date.
Click right mouse button and select "Add / Change Completion Date" from the pop up menu.
-- or --
Check "Show Completion Dates" to toggle the grid to show completion dates, then edit completion dates directly on the grid.
If you need to remove a completion date, highlight and delete the date in the cell.
Or right mouse click the cell bringing up the pop up menu and choose "Remove Completion Date" from the pop up menu.
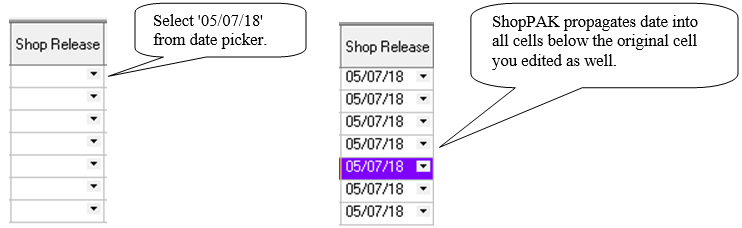
Auto Fill Column With Same Date
If your job is small, it may be that for a given milestone, all Job Items or Work Orders get the same target date. To speed up data entry, you can use the "Auto Fill Column With Same Date" checkbox.
When checked, entering text or choosing a date from the drop down calendar will fill all cells beneath the milestone cell being edited.
For example, with “Auto Fill Column with same date” checked, if you choose a date in the top cell, ShopPAK automatically propagages the same date to all cells below the cell being edited.
Mass Change Milestones
To speed entering and updating milestones, ShopPAK has three powerful mass change functions.
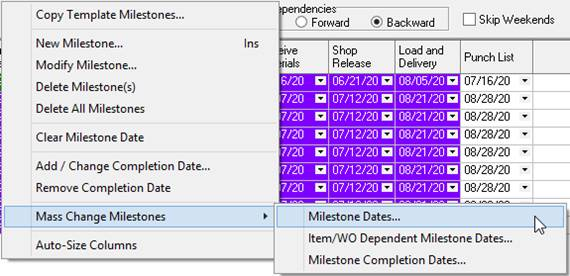
Right mouse click the milestone grid and select "Mass Change Milestones | Milestone Dates" from the pop up menu. This displays the Mass Change Milestone Dates dialog box.
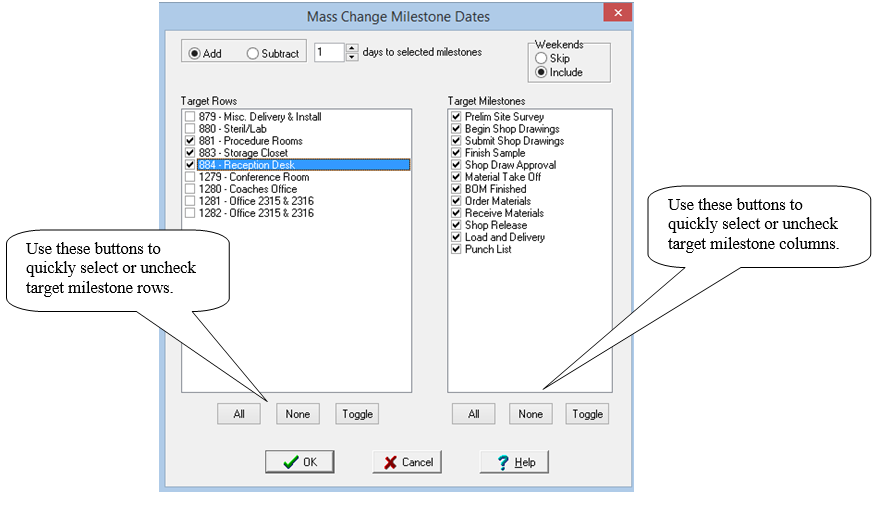
1. Choose whether you want to add or subtract days.
2. Enter number of days you want to add or subtract.
3. Tell ShopPAK if you want to skip or include weekend days when it calculates new dates.
4. Identify the scope of the mass change by selecting the rows (Job Items or Work Orders), and which columns (milestones) you want to target for mass changing dates. In the example above, we are targeting work orders 881, 883, and 884. And we are targeting ALL milestones.
Click OK to recalculate dates. ShopPAK refreshes the milestone grid dates accordingly.
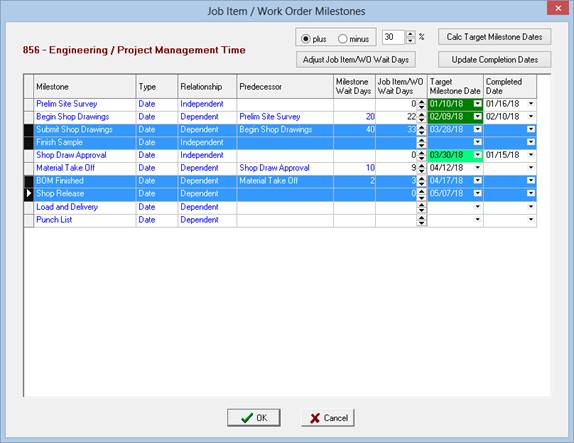
Right mouse click the Job Item or Work Order you want to edit and select "Mass Change Milestones | Item/WO Dependent Milestone Dates" from the pop up menu. This displays the Job Item / Work Order Dependent Milestones dialog box.
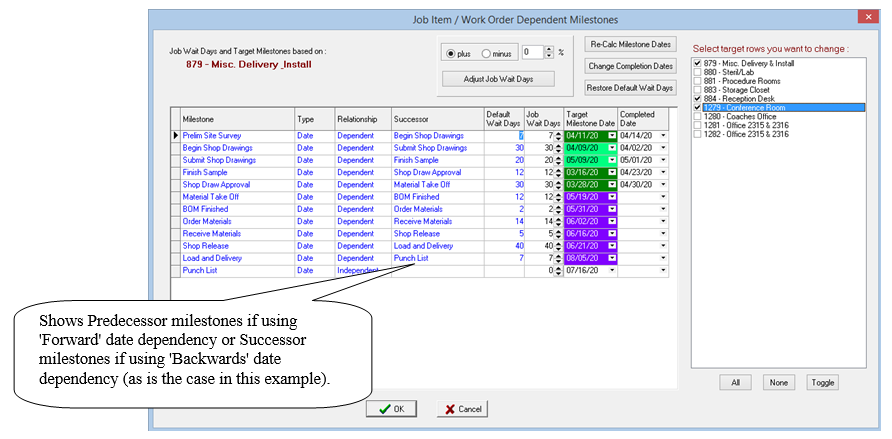
Unlike the milestone grid which only shows the milestone target date, this dialog box lets you see all milestone attributes for the selected work order or job item. Use this dialog box to do 3 things:
1. Edit Job Item/Work order Wait Days, Target Milestone Date, or Completed Date. This is done directly in the above grid. Changes are reflected in the milestone grid when you OK and close dialog box.
2. Automatically calculate target milestone dates for dependent milestones. Dependent milestone dates are calculated based on the milestone date it is dependent upon, and the number of days it typically follows or precedes the associated milestone. Use the Re-Calc Milestone button.
3. Mass change several completion dates via the "Change Completion Date" button.
Re-Calculate Target Milestone Dates
This is a very powerful feature for automatically calculating a dependent milestone date based on an earlier or later milestone date.
When setting up a milestone template, you identify milestone dependencies and the number of days one milestone usually trails or precedes another milestone. In the above example, template information is displayed in blue. These items can't be changed in this dialog box….only in the Template Milestone dialog box. The important columns are Predecessor and Milestone Wait Days. These columns show if a particular milestone is dependent on an earlier milestone, what the predecessor milestone is, and the number of days a dependent milestone typically waits for an earlier milestone to be finished.
In our example below, we're using 'Forward' data calculation and the milestone à Begin Shop Drawings is dependent on its predecessor milestone à Prelim Site Survey. The start of "Begin Shop Drawings" usually trails "Prelim Site Survey" by 20 days. However in our example we use Job Wait Days to increase wait days to 25 for this particular job.

Adjusting Job Item / Work Order Wait Days
Milestone template wait days are set up as an average across all jobs. Before ShopPAK can calculate dependent milestone jobs for a particular job item or work order, you need to update the "Job Item/WO Wait Days" for each dependent milestone for the job item or work order. You have a couple of ways to do this.
You can manually enter the number of days the milestone typically trails its predecessor milestone directly into the grid cell.
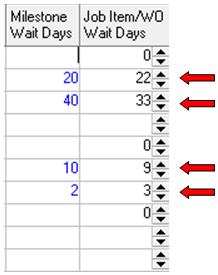
Or you can have ShopPAK it do automatically by clicking the Adjust Job Wait Days button.
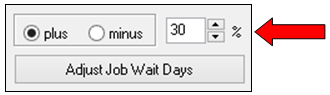
For example, if you think that this particular job item / work order is going to take 30% longer than average (the average being already defined by the milestone template wait days), then you'd click the "plus" radio button and enter 30 into the percent control. Then click à Adjust Job Wait Days button. ShopPAK re-calculates all the Job Item / Work Order Wait days accordingly.
Before clicking the Re-Calc Milestone Date Button, make sure that all independent milestones have target milestone dates. ShopPAK can only calculate dependent milestone dates if the milestone they are dependent upon have a date. In our example there are two independent milestones: "Prelim Site Survey" and "Shop Draw Approval".
Also, on the actual ShopPAK Milestone panel, make sure you have indicated whether ShopPAK should skip weekend days when calculating milestone dates:
Your choice depends upon how you determine dependent milestone wait days. If you think in terms of just typical work days (Monday through Friday), you would place a check into the checkbox. However, if you typically think in calendar days, not caring if weekend days are included, then you will leave the checkbox blank.

You are now ready to have ShopPAK calculate dependent dates. Click Re-Calc Milestone Date button. ShopPAK calculates all dependent days and refreshes the grid. To save these changes to the actual Milestone grid, click the OK button to close the dialog box and refresh the Milestone grid.
You can use this dialog box to add a completion date to a milestone, as well as, mass change completion dates. Compared to the actual milestone grid, updating completion dates is a lot faster because you work directly with a milestone's completion date cell…
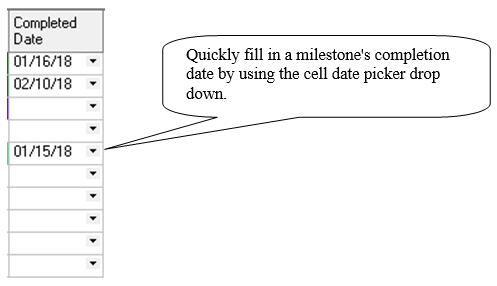
In the actual milestone grid, there are three steps: 1) right mouse click the milestone cell you want to update, 2) choose "Add / Change Completion Date" and 3) pick the date from the Month / Date Picker.
You can also mass change several milestone completion dates as a batch by clicking the Change Completion Dates button.
1) Select the rows you want to update by holding down the CTRL key and clicking the row button of each milestone row you wish to update.
2) Click the Change Completion Dates button.
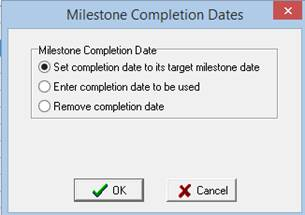
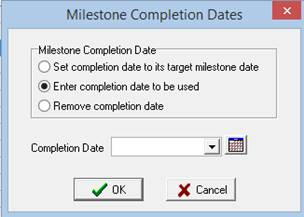
If you want to set the completion date to the milestone target date, click OK. However, if you want to enter a different completion date, click the "Enter completion date to be used" radio button. This displays a Date Picker dialog box. Choose completion date and click OK.
Last, if you want to remove the completion date, choose the 3rd option "Remove completion date" and click OK.
Mass Change Milestone Completion Dates
Right mouse click mileston grid and choose "Mass Change Milestones | Milestone completion Dates" from the pop up menu:

This displays the Mass Change Milestone Completion Dates dialog:
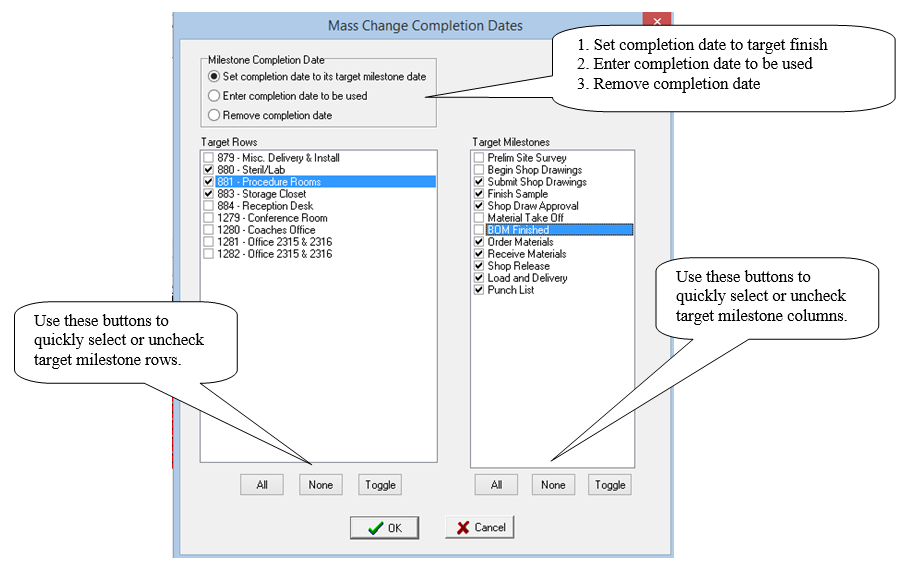
Choose the rows (work orders or job items) you want to update, and choose the milestone columns you want to update.