Schedule Departments...TradeSoft offers an optional scheduling program that is integrated with ShopPAK called the Scheduler. It uses employee calendars, automatic employee assignments, employee skills matrix, departmental precedence, overtime requests, and many other facilities to forecast and schedule work orders. The schedule it produces is resource constrained, in other words, it takes resource availability into account as it assigns the best resource(s) that finish the work order the quickest. It is optimized to schedule a job shop with limited resources against ever changing priorities and units of work.
For more information on the ShopPAK Scheduler, contact the TradeSoft sales office at 800-289-6326.
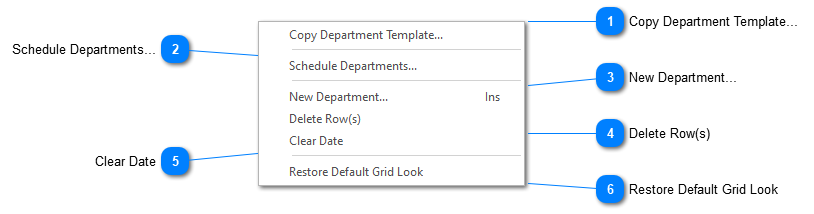
ShopPAK also has a ‘built in’ scheduling capability as well. It isn’t as sophisticated as the Scheduler since it doesn’t take resource availability into consideration, however, it is very easy to use and comes with ShopPAK at no additional cost.
Right mouse click the Scheduling grid and select “Schedule Departments” from the pop up menu. This displays the “Work Order Department Scheduling” dialog box.
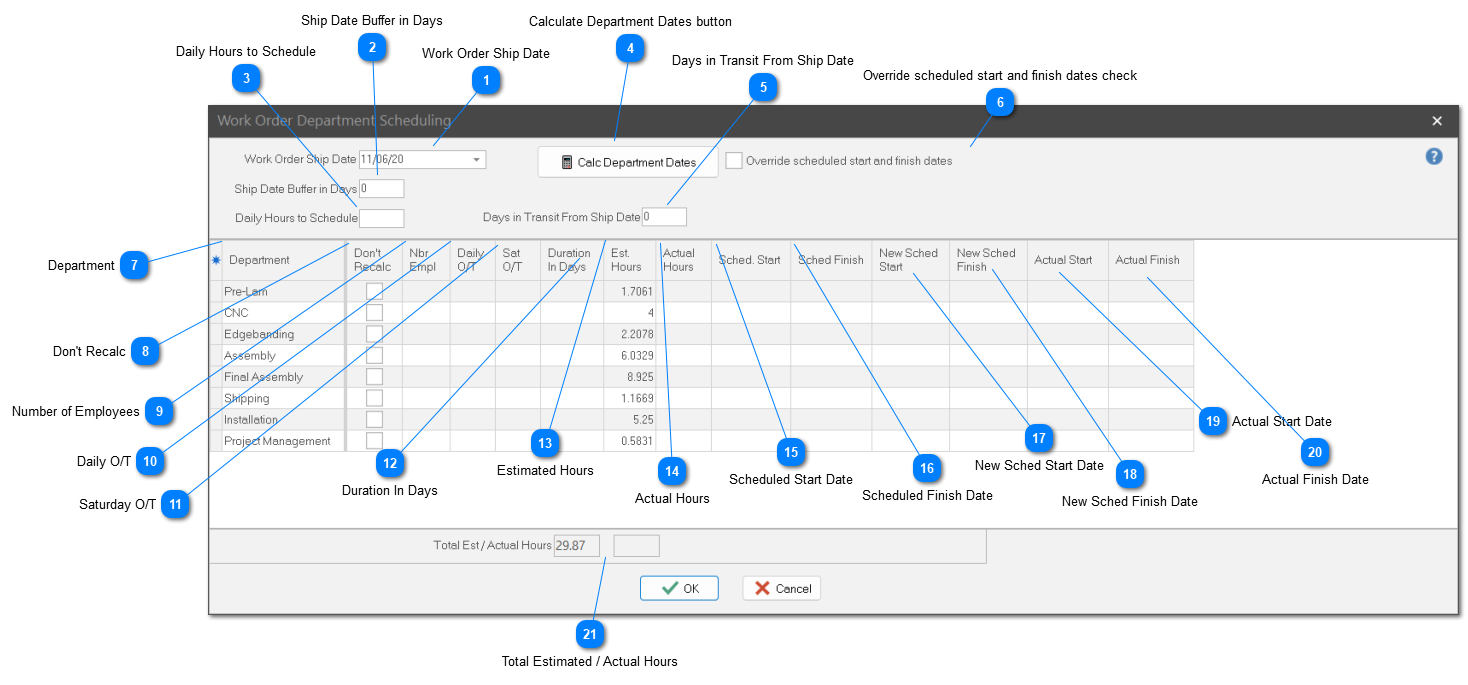
 Work Order Ship DateChoose the date that the work order must ship. If the ship date is already present on the work order “Details” sub tab, it is displayed on the scheduling dialog box. Changing the work order ship date on the scheduling dialog box automatically updates the work order “Details” sub tab.
| |
Ship Date Buffer in DaysNumber of days ‘leeway’ you want to allow before scheduling backwards from the work order ship date. No “Ship Date Buffer in Days” assumes production will end at the end of the prior day’s shift and you’ll be ready to ship the very next morning.
| |
 Daily Hours to ScheduleNumber of hours to schedule per employee per day. Note: Unless overridden, ShopPAK only schedules week days……..skipping weekend days.
| |
 Calculate Department Dates buttonClick the "Calc Department Dates" to run ShopPAK's built-in scheduling program.
| |
 Days in Transit From Ship DateNumber of days to allow for transit before starting to schedule the department(s) that occur post shipping.
| |
 Override scheduled start and finish dates checkPlace a check into the checkbox if you want ShopPAK to override the current department scheduled start and finish dates with new dates calculated when re-running the “Calc Department Dates” button.
We recommend that you don’t place a check into the checkbox until you’re sure that the new scheduling directives, and resulting scheduled start and finish dates, are correct. That’s why ShopPAK has the “New Sched Start and Finish” columns next to the current department scheduled start and finish dates. Looking at the ‘old’ dates and comparing them to the ‘new’ scheduling dates makes it easier to see the effect of changing various scheduling directives.
If you place a check into the checkbox and re-run date calculation, ShopPAK updates department start and finish dates accordingly. Clicking the OK button updates the department grid with the new start and finish dates. Clicking the Cancel button cancels the results of date calculation and the scheduling department grid remains unaffected.
| |
 DepartmentProtected cell. Name of the Department. Departments are listed in ascending department scheduling sequence.
| |
 Don't RecalcIf a department has accrued actual hours or has an actual start date, ShopPAK automatically places a check into the checkbox. Typically, you don’t want to re-calculate start and finish dates for a department that has already started on a work order. ShopPAK uses this checkbox to determine if it should re-calculate start and finish dates for the department or not.
| |
 Number of EmployeesIf left blank, ShopPAK assumes one employee will be working in the department on the work order. Adding employees speeds the time it takes to finish the work order in a given department. For example, if a department needs 16 “Estimated Hours” to finish, and there are 2 employees, and a work day is 8 hours, ShopPAK will schedule the department to take one day.
| |
 Daily O/TNumber of hours to schedule in a given department beyond what is typically available in a normal work day. Note: normal work day is defined in “Daily Hours to Schedule”.
| |
 Saturday O/TNumber of hours to schedule in a given department on Saturday.
| |
 Duration In DaysIf a department requires a fixed amount of time in order to finish its part of a work order, use this cell to enter the number of fixed days. If a value is present in this cell, it takes precedence over “Estimated Hours” and ShopPAK uses “Duration in Days” when it schedules the department.
| |
 Estimated HoursNumber of departmental ‘Effort’ hours required to finish this part of the work order.
| |
 Actual HoursRead only cell. The number of hours that have been logged against the department for the work order.
| |
 Scheduled Start DateThe date the work order is supposed to start in the department. Usually, ShopPAK determines this date when you click the “Calc Department Dates” button. However, we allow you to manually override scheduled start date when necessary.
| |
 Scheduled Finish DateThe date the work order is supposed to finish in the department. Usually, ShopPAK determines this date when you click the “Calc Department Dates” button. However, we allow you to manually override scheduled finish date when necessary.
| |
 New Sched Start DateRead only cell. When you click the “Calc Department Dates” button, ShopPAK calculates the “New Sched Start” cell with the new calculated scheduled start date based on the scheduling directives you currently are using.
| |
 New Sched Finish DateRead only cell. When you click the “Calc Department Dates” button, ShopPAK calculates the “New Sched Finish” cell with the new calculated finish date based on the scheduling directives you currently are using.
| |
 Actual Start DateRead only cell. If the department has an actual start date, ShopPAK displays it.
| |
 Actual Finish DateRead only cell. If the department has an actual finish date, ShopPAK displays it.
| |
 Total Estimated / Actual HoursRead only cell. Displays the total estimated and actual hours.
| |
ShopPAK determines department scheduled start and finish dates by working backwards from the work order’s “Ship Date” (if the department logically precedes the ship date). If a department follows the ship date, ShopPAK schedules the department forward in time.
SETUP
1. Make sure that department sequence as defined in ProjectPAK’s department setup dialog box properly reflects the general sequence of how products are engineered, fabricated, shipped, and installed.
2. Make sure you choose the department that represents the first department post shipping. This is defined in ShopPAK | Options on the Jobs tab:
|