
ShopPAK Material Card
Adding a New Material Usage Transaction
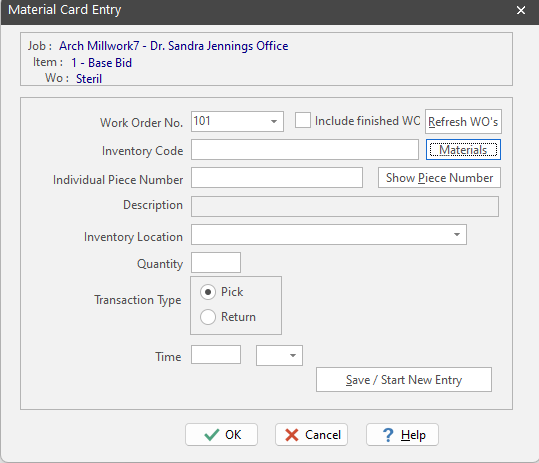
1. Right mouse click the material grid. Select “New” from the pop up menu. This displays the “Material Card Entry” dialog box.
|
Field
|
Purpose
|
|
Job
|
Identifies the work order’s Job (read only).
|
|
Item
|
Identifies the work order’s Job Item (read only).
|
|
Wo
|
Work Order description (read only).
|
|
Field
|
Purpose
|
|
Work Order Number
|
You must identify the work order the material was used on. Either pick from the pull down list, or key the work order number. As you type a number, the next work order that matches is displayed.
|
|
Include finished WOs
|
The list of work orders normally contains “Released” work orders. If you need to add materials to a work order that is now “Shipped” or “Completed”, place a check into the checkbox. This refreshes the list so it includes all work order status values.
|
|
Material Code
|
If the inventory item is not managed “by the piece”, type the inventory item code, or click the “Materials” button to select the inventory item code.
|
|
Individual Piece #
|
If the inventory item is managed “by the piece”, enter the piece number that corresponds with the particular inventory item piece the employee used.
|
|
Material Description
|
Inventory item description. Automatically filled in by ShopPAK when you provide an inventory item code or an inventory item piece identifier.
|
|
Inventory Location
|
ShopPAK automatically fills in Inventory Location if you type the ‘Individual Piece Number’, or you type the Inventory Item Code and the inventory item is stored in only one location. However, if a non-piece inventory item is stored in multiple locations, you must select the correct location from the location drop-down list.
|
|
Quantity
|
Quantity of the inventory item that was used or returned.
|
|
Transaction Type
|
Choose ‘Pick’ if the material was pulled from inventory. Choose ‘Return’ if some material is returned because it wasn’t needed.
|
|
Time
|
Shows when the employee ‘picked’ or ‘returned’ an inventory item. Optional.
|
|
Refresh WO List
|
Refreshes the work order list with any new non-pending work orders.
|
2. Click “OK”. This returns you to the “Material Card” grid. The new entry is displayed in the grid.
Press “Save / Start New Entry” if you want to add multiple inventory material card transactions for the current employee.
Modifying a Material Usage Transaction
1. Select the inventory material transaction you want to change by clicking it with your mouse.
2. Right mouse click the “Material Card” grid. Select “Modify” from the pop up menu. This displays the “Material Card Entry” dialog box. Make changes and click OK.
Deleting a Material Usage Transaction
1. Select the row you wish to remove by clicking it with your mouse.
2. Right mouse click the “Material Card” grid. Select “Delete” from the pop up menu.
3. This displays a warning message. Select “Yes” to delete the material usage transaction. Click “No” to cancel the deletion.
Open Work Order
1. Select the row with the work order you wish to open.
2. Right mouse click the “Material Card” grid. Select “Open Work Order” from the pop up menu.
3. ShopPAK navigates to the Jobs tab and opens the requested work order.
Open Inventory Item
1. Select the row with the inventory item you wish to open.
2. Right mouse click the “Material Card” grid. Select “Open Inventory Item” from the pop up menu.
3. ShopPAK navigates to the Inventory tab and opens the requested inventory item.