
Ship Item Grid Pop Up Menu Commands
Right mouse click the ‘Ship Item’ grid to display the Ship Item pop up menu:
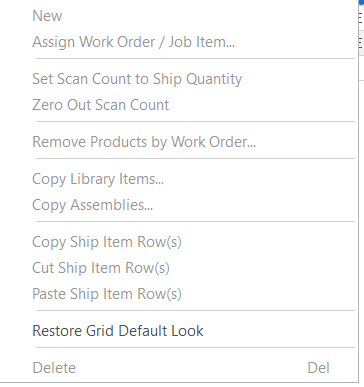
New
Creates a new ship item row so you can manually add a new ship item. Position your cursor on the row where you want the new row created. ShopPAK creates the row underneath the selected row.
Assign Work Order / Job Item
Every ship item needs to have a reference to a Work Order in order to do job costing. (If you drag at the work order level from the job tree over to the ship item grid, ShopPAK automatically updates both Work Order number and Job Item description). If you drag inventory on to the ship grid, you'll need to explicitly assign the ship item to a work order / job item using this menu item.
Set Scan Count to Ship Quantity
Automatically sets ‘Pieces Scanned’ to ‘Ship Qty’ for all ship item grid rows. This causes ShopPAK to color all ‘red’ rows ‘black’ when the Ship Ticket status is set to ‘Check Load’.
Zero out Scan Count
Automatically sets ‘Scan Count’ to 0. This is useful when you want to re-verify a shipping ticket.
Remove Product by Work Order
Automatically removes all ship item rows for the selected work order.
Copy Library Items
Creates a new ship item row(s) based on a ProjectPAK library item(s). Position your cursor on the row where you want the new row(s) created. Select one or more library items from the Library Item Selection dialog box. ShopPAK copies selected library items underneath the selected row.
Copy Assemblies
Creates a new ship item row(s) based on a ProjectPAK assembly(s). Position your cursor on the row where you want the new row(s) created. Select one or more assemblies from the Assembly Selection dialog box. ShopPAK copies selected assembly row(s) underneath the selected row.
Choose the correct filter so ShopPAK knows which assembly rows to copy into the ship item grid.
Copy Ship Item Row(s)
You can copy and paste one or more ship item rows within the grid or between different ship item grids. Select the ship item(s) you want to copy by clicking the ship item row buttons (located on the far left of the grid) or by holding down your left mouse button and dragging across several ship item row buttons. If you want to copy non-contiguous rows, hold down the CTRL button so you don’t lose previous row selections. To paste the rows, see ‘Paste Ship Item Row(s)’.
Cut Ship Item Row(s)
You can cut and paste one or more ship item rows within the grid or between different ship item grids. Select the ship item(s) you want to cut by clicking the ship item row buttons (located on the far left of the grid) or by holding down your left mouse button and dragging across several ship item row buttons. If you want to cut non-contiguous rows, hold down the CTRL button so you don’t lose previous row selections. To paste the rows, see ‘Paste Product Row(s)’.
Paste Ship Item Row(s)
Pastes either copied or cut ship item rows underneath the selected ship item grid row.
Restore Grid Default Look
Automatically restores the default column positions in the grid.
Delete
Select the product(s) you want to delete by clicking the product row buttons (located on the far left of the grid) or by holding down your left mouse button and dragging across several product row buttons. If you want to delete non-contiguous rows, hold down the CTRL button so you don’t lose previous row selections. Choose “Delete” from the menu. ShopPAK warns you if you want to continue with the deletion request. Choose “Yes” to delete the selected rows. Choose “No” to cancel the delete request.
Column Moving
The Ship Item grid supports column moving. If you want to change the position of one or more columns, simply select the column you want to move by clicking your left mouse button in the header portion of the column. Selected columns are colored blue. Move your mouse into the column header of the selected column, and holding down your left mouse button, slide the column left or right and release your left mouse button when it is at the new position.
You can select multiple columns so you can move them in one operation. To select several columns, simply press the CTRL (control) key while you click on a column header. This keeps all selected columns highlighted. To move, simply move your mouse to one of the highlighted columns and hold down your left mouse button. Slide the columns to the new position and release your left mouse button.
ShopPAK remembers new column positions between sessions for individual users.
Row Moving
You can reposition a ship item row by selecting it via its row button, and then using the  and
and  buttons, move it up or down. With each move request, ShopPAK repaints the grid with the row in its new position.
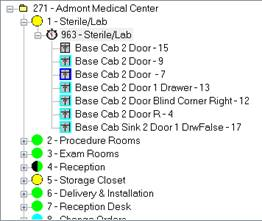
Filtering Job Tree Products
If you want to remove some of the products under a Work Order so you can drag a subset over to the Ship Ticket Item grid, right mouse click the Job Tree panel and select 'Filter Products' from the popup menu. This displays the product filtering dialog box.
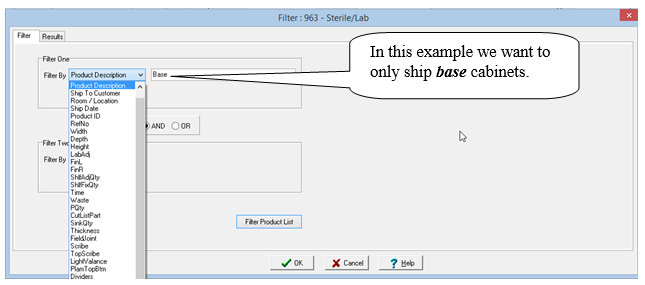
ShopPAK provides two filters, each giving you a number of filtering options, many of which are user definable. For example, let’s say we want to filter the products contained on the work order by product type. Specifically, we only want to ship products with a product type of “Base”.
Once you’ve defined your filtering request, click the “Filter Product List” button. ShopPAK filters the products based on your instructions. In our example, only products with a product type of ‘Base’ are displayed.
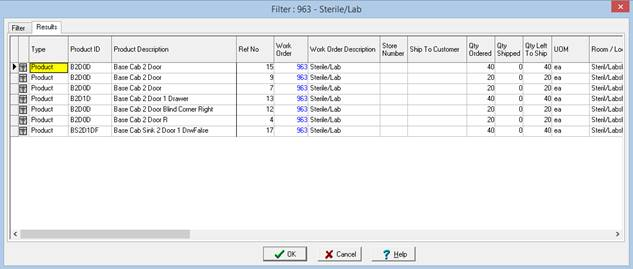
Clicking OK tells ShopPAK to updates the list of products in the job tree accordingly.
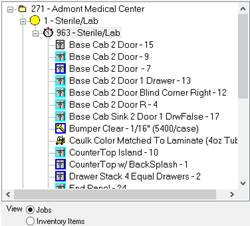
Before Filtering After Filtering
Saving Ship Ticket Changes
1. To save changes you’ve made to a ship ticket, make sure the ship ticket you want to save is selected in the “Ship Ticket” grid (located in the top left part of the form). Select File | Save from the ShopPAK menu or click the save record icon  from the speed bar. This saves any changes you’ve made to the ShopPAK database.
|
Note: ShopPAK automatically saves ship ticket changes as you click different Ship Tickets rows in the “Ship Ticket” grid. If you forget to save and you close ShopPAK, it will ask if you want to save outstanding changes.
|
Closing a Ship Ticket
1. Select the Ship Ticket you want to remove from the “Ship Ticket” grid.
2. Select File | Close from the ShopPAK menu or click the close record icon  from the speed bar. This removes the ship ticket from the “Ship Ticket” grid.
Closing All Ship Tickets
1. Select File | Close All from the ShopPAK menu or click the close record icon  from the speed bar. This removes all ship tickets from the “Ship Ticket” grid.
Deleting a Ship Ticket Record
1. Select the ship ticket you want to physically delete from the database by clicking it in the “Ship Ticket” grid.
2. Select File | Delete from the ShopPAK menu. This displays a warning message. Click “Yes” to delete the ship ticket from the database. Click “No” to cancel the deletion.
Opening a Ship Ticket’s Job
1. Select the ship ticket by clicking it in the Ship Ticket grid.
2. Right mouse click the Ship Ticket grid and select “Open Job” from pop-up menu.
Opening a Ship Ticket’s Invoice
1. Select the ship ticket by clicking it in the Ship Ticket grid.
2. Right mouse click the Ship Ticket grid and select “Open Invoice” from pop-up menu.
Opening a Ship Ticket
1. Select File | Open from the ShopPAK menu or click the Open Record icon  from the speed bar. Note: Clicking the down arrow shows recently opened ship tickets. Selecting a ship ticket from the list opens the ship ticket. Clicking the open folder icon displays the following dialog box:
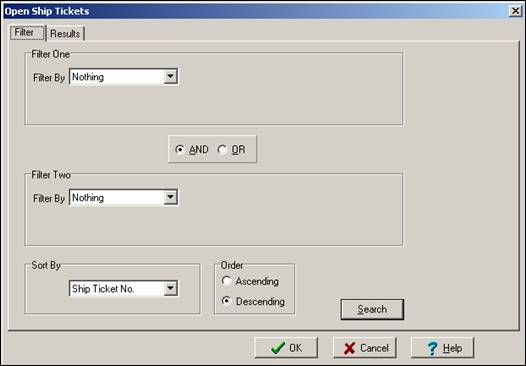
2. Use “Filter One” and/or “Filter Two” to pinpoint the kinds of ship tickets you want ShopPAK to find. If you use both filters, make sure you select the right matching value. Use “AND” if you want to limit the list of ship tickets returned from the database. Use “OR” if you want to expand the list of ship ticket returned from the database.
For example, let’s say you want to search by ‘Ship Date Range’ AND Customer - “ABC Company”. The list of ship tickets returned from the database would be the intersection of the selected ship date range and “ABC Company”. In other words, you’d see a list of ship tickets that were shipped on or between the shipping date range for “ABC Company”.
On the other hand, if you search by Ship Date Range OR Customer - “ABC Company”, you’ll get a much longer list of ship tickets. The list will contain ALL ship tickets that were shipped during the shipping date range (regardless of customer) and ALL ship tickets for customer “ABC Company (regardless of date shipped).
Filter Purpose
Nothing No filtering. Returns all ship tickets.
Ship Ticket No. Filters by the unique, system generated Ship Ticket Number.
Job Id Filters on Job ID. Partial Id’s are allowed.
Job Description Filters on Job Description. Partial descriptions are allowed.
Bill To Customer Filters on the actual Customer that we’ll invoice.
Ship Date Filters on the “Date Shipped” field on the Ship Ticket form.
Customer PO No. Filters by the job’s customer’s PO Number.
Ship To Customer Customer site that the shipment is destined for.
Ship Ticket Status Pending, Check Load, Shipped, Shipped Incomplete
3. Choose “Sort By” value. This tells ShopPAK how you want the shippers listed.
Sort By Purpose
Shipper No. Presents list by Shipping Number.
Job Id Presents list by Job ID.
Job Description Presents list by Job Description.
Customer Presents list by Customer.
Ship Date Presents list by “Date Shipped”.
4. Press “Enter” or click the “Search” button. ShopPAK retrieves the ship tickets that match your filtering criteria, and displays the list on the “Results” tab.
5. If you want to open ALL of the ship tickets in the list, press “Enter” or click the “OK” button. However, if you want to select just one ship ticket from the list, or some smaller subset of ship tickets, click the row buttons of the ship ticket(s) you wish to open. Press “Enter” or click the “OK” button.
|
TIP: If you’re selecting several rows by clicking them with your mouse, hold down the control key so previously selected rows remain selected.
|
6. The ship ticket(s) you selected display in the “Ship Ticket” grid. Click the ship ticket you want to browse or update.