
Creating a New Ship Ticket
There are two ways to create a new ship ticket.
If you are shipping a custom product(s ) that’s ready to ship, you’ll create a packing slip by dragging products from under the job over to the ship item grid. However, if you are shipping a finished product from inventory, you’ll create a packing slip by dragging finished goods inventory items over to the ship item grid.
Before creating Ship Tickets, decide what level of the job tree constitutes a ship ticket line item. We recommend that you work at the ‘Product’ level. ShopPAK remembers dragging preferences for each user across sessions, so you only have to do this once.
Right mouse click the job tree area at the far left of the form and select “Dragging Preferences” from the pop up menu. This displays the “Tree Node Drag Preferences” dialog box.
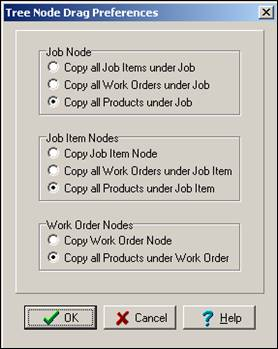
In our example, we’re working at the ‘Product’ level. No matter what job tree node we drag, we’ll create one or more ship item grid rows based on the products defined under the dragged node.