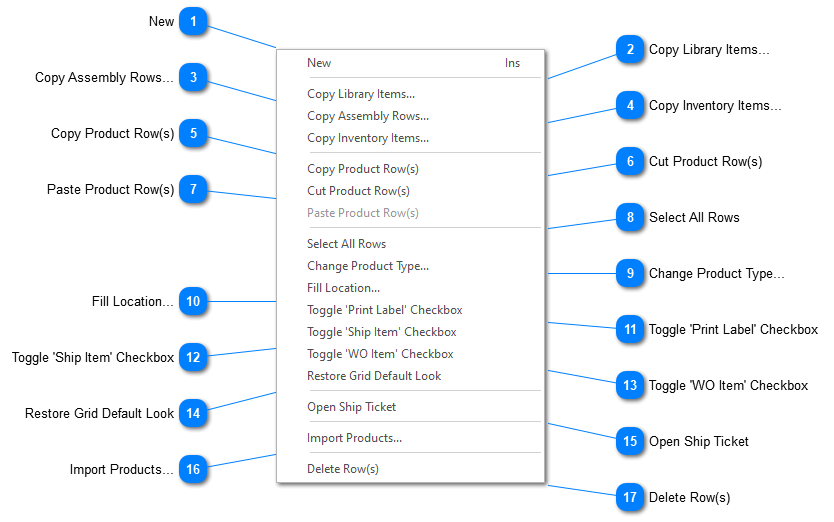
Right mouse click the ‘Products’ grid to display the product grid’s pop up menu:
New
Creates a new product row so you can manually add a new product. Position your cursor on the row where you want the new row created. ShopPAK creates the row underneath the selected row.
Creates a new product row(s) based on a ProjectPAK library item(s). Position your cursor on the row where you want the new row(s) created. Select one or more library items from the Library Item Selection dialog box. ShopPAK copies selected library items underneath the selected row.
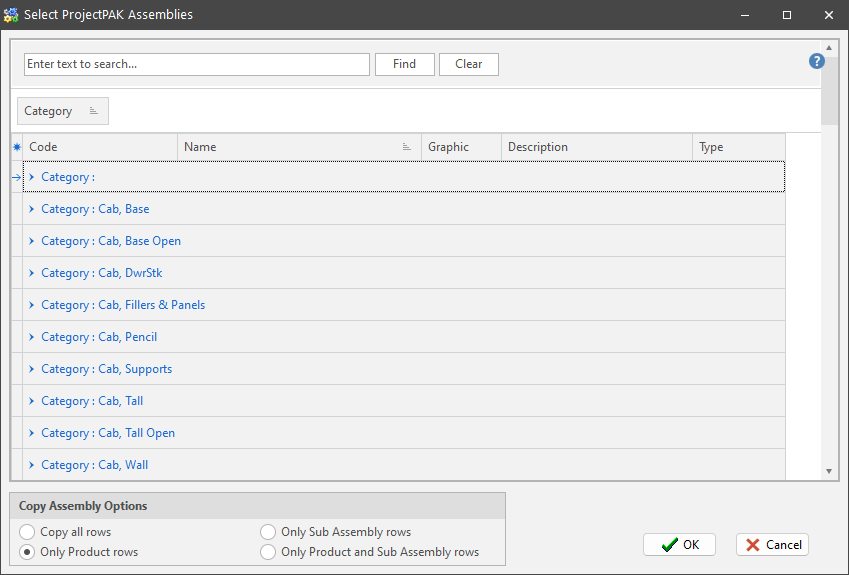
Creates a new product row(s) based on a ProjectPAK assembly(s). Position your cursor on the row where you want the new row(s) created. Select one or more assemblies from the Assembly Selection dialog box. ShopPAK places the assembly row(s) underneath the previously selected row.
Choose the correct copy option so ShopPAK knows which assembly rows to copy into the Product grid.
Creates a new product row(s) based on ShopPAK inventory item(s). Position your cursor on the row where you want the new row(s) created. Select one or more inventory items from the Inventory Item Selection dialog box. ShopPAK copies selections underneath the selected row.
You can copy and paste one or more product rows within the work order’s product grid or between different work order product grids. Select the product(s) you want to copy by clicking the product row buttons (located on the far left of the grid) or by holding down your left mouse button and dragging across several product row buttons. If you want to copy non-contiguous rows, hold down the CTRL button to keep previous selections. To copy rows, see ‘Paste Product Row(s)’.
You can cut and paste one or more product rows within the work order’s product grid or between different work order product grids. Select the product(s) you want to cut by clicking the product row buttons (located on the far left of the grid) or by holding down your left mouse button and dragging across several product row buttons. If you want to cut non-contiguous rows, hold down the CTRL button to keep previous row selections. To cut rows, see ‘Paste Product Row(s)’.
Pastes either copied or cut product rows underneath the selected product grid row. If maintaining sell price at the Product level, ShopPAK automatically ‘bubbles up’ and recalculates sell price through the entire job tree hierarchy.
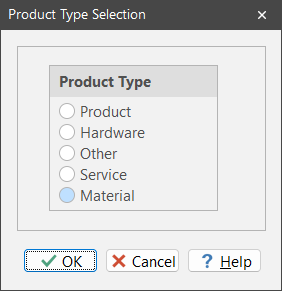
Select the product(s) you want to change ‘Product Type’ on by clicking the product row buttons (located on the far left of the grid) or by holding down your left mouse button and dragging across several product row buttons. If you want to change non-contiguous rows, hold down the CTRL button so you don’t lose previous row selections. Choose “Change Product Type” from the menu and select the new product type. ShopPAK updates all selected rows accordingly.
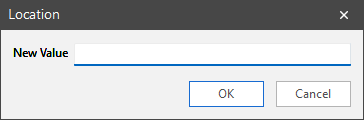
Select the product(s) you want to change location on by clicking the product row buttons (located on the far left of the grid) or by holding down your left mouse button and dragging across several product row buttons. If you want to change non-contiguous rows, hold down the CTRL button so you don’t lose previous row selections. Choose “Fill Location” from the menu and type in the new location value. ShopPAK updates all selected rows accordingly.
Select the product(s) you want to toggle ‘Print Label’ checkbox(es) by clicking the product row buttons (located on the far left of the grid) or by holding down your left mouse button and dragging across several product row buttons. If you want to toggle non-contiguous rows, hold down the CTRL button so you keep previously selected rows. Choose ‘Toggle Print Label’ from the menu. ShopPAK updates all selected rows accordingly.
Select the product(s) you want to toggle ‘Ship Item’ checkbox(es) by clicking the product row buttons (located on the far left of the grid) or by holding down your left mouse button and dragging across several product row buttons. If you want to toggle non-contiguous rows, hold down the CTRL button so you keep previously selected rows. Choose ‘Toggle Ship Item’ from the menu. ShopPAK updates all selected rows accordingly.
Select the product(s) you want to toggle ‘WO Item’ checkbox(es) by clicking the product row buttons (located on the far left of the grid) or by holding down your left mouse button and dragging across several product row buttons. If you want to toggle non-contiguous rows, hold down the CTRL button so you keep previously selected rows. Choose ‘Toggle WO Item’ from the menu. ShopPAK updates all selected rows accordingly.
A handy feature is automatically opening a product’s Ship Ticket. Right mouse click the Purchase Order grid and select “Open Ship Ticket” from the popup menu. ShopPAK navigates to the Shipping tab and opens the requested ship ticket.
If you want to import products from a file created by another program, position the mouse on the row where you want to add products and select “Import Products” from the menu. For more information on importing products, please refer to Chapter 23 – Product and Material Import in the User’s Guide.
Select the product(s) you want to delete by clicking the product row buttons (located on the far left of the grid) or by holding down your left mouse button and dragging across several product row buttons. If you want to delete non-contiguous rows, hold down the CTRL button so you don’t lose previous row selections. Choose “Delete Row(s)” from the menu. ShopPAK warns you if you want to continue with the deletion request. Choose “Yes” to delete the selected rows. Choose “No” to cancel the delete request.