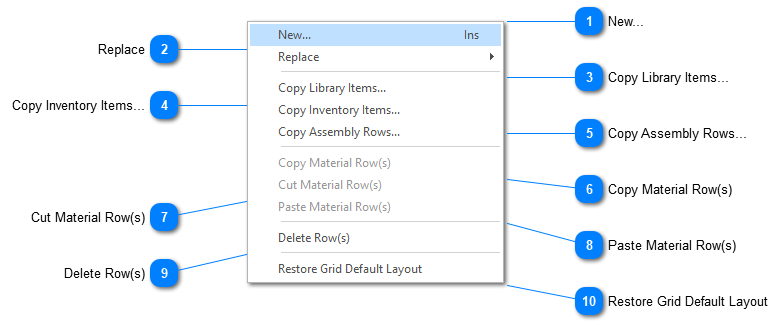
Right mouse click the ‘Materials’ grid to display the material grid’s pop up menu:
New...
Creates a new material row so you can manually add a new material. Position your cursor on the row where you want the new row created. ShopPAK creates the row underneath the selected row.
Lets you replace the current material with another material from the ProjectPAK Library or ShopPAK Inventory. The original item’s ProjectPAK quantity and unit price are left intact, so job cost variance reporting properly reflects budgeted quantity and amount. Use Replace when you need to swap out ‘bid’ materials with ‘engineering’ materials.
Creates a new material row(s) based on a ProjectPAK Library item(s). Position your cursor on the row where you want the new row(s) created. Select one or more library items from the Library Item Selection dialog box. ShopPAK copies selected library items underneath the selected row.
Creates a new material row(s) based on a ShopPAK Inventory item(s). Position your cursor on the row where you want the new row(s) created. Select one or more inventory items from the Inventory Item Selection dialog box. ShopPAK copies selected inventory items underneath the selected row.
Creates a new material row(s) based on a ProjectPAK Assembly(s). Position your cursor on the row where you want the new row(s) created. Select one or more assemblies from the Assembly Selection dialog box. ShopPAK copies selected assembly row(s) underneath the selected row.
You can copy and paste one or more material rows within the product’s material grid or between different product material grids. Select the material(s) you want to copy by clicking the material row buttons (located on the far left of the grid) or by holding down your left mouse button and dragging across several material row buttons. If you want to copy non-contiguous rows, hold down the CTRL button so you don’t lose previous row selections. To actually copy rows, see Paste Material Row(s).
You can cut and paste one or more material rows within the product’s material grid or between different product material grids. Select the material(s) you want to cut by clicking the material row buttons (located on the far left of the grid) or by holding down your left mouse button and dragging across several material row buttons. If you want to cut non-contiguous rows, hold down the CTRL button so you don’t lose previous row selections. To actually cut rows, see Paste Material Row(s).
Select the material(s) you want to delete by clicking the material row buttons (located on the far left of the grid) or by holding down your left mouse button and dragging across several material row buttons. If you want to delete non-contiguous rows, hold down the CTRL button so you don’t lose previous row selections. Choose Delete Row(s) from the menu. ShopPAK warns you if you want to continue with the deletion request. Choose Yes to delete the selected rows. Choose No to cancel the delete request.