
Adding Materials to a Purchase Order
To add a material(s) to a purchase order, drag the material (or Vendor, Job, Job Item, or Work Order) tree node over to the Purchase Order window. This creates a new PO Item(s) on the purchase order. The material description becomes the PO Item description.
Note: To drag a material, position the mouse over the material and click and hold your left mouse button down. As you start to drag, your mouse pointer changes to a “No Drop” icon. Once you reach the PO Item area of the Purchase Order window, it changes into a “Drop” icon, indicating it is time to let go of your left mouse button, and add the material to the PO.
|
Purchase Order Vendor
There are three ways to pick the vendor for the new Purchase Order:
Vendors Window
Suppliers listed in the vendor window normally drive vendor assignment. PO Builder displays the vendors that supply the current material. Vendors come from two places:
1) ProjectPAK library item supplier grid
2) ShopPAK inventory supplier grid
The default supplier is automatically selected, however, you can choose another supplier if you wish prior to dragging the material. If a material is not a library item or inventory item, or if you wish to buy from a supplier not listed , you need to use one of the other two approaches explained below.
Job Information Grid
You can drive vendor selection from the work order material requisition tab, provided you select a Job Item or Work Order from the material tree and you've identified the supplier on the work order material requisition tab.
Note: PO Builder ONLY populates work order vendor, stock number, requested by, requisition date, and material notes when you select a Job Item or Work Order from the material tree. If you select a higher level node, you will not see vendor information.
|
If you select a Job Item or a Work Order material tree node, you'll see vendor information from the work order's material requisition sheet.

When dragging a material over to the PO Area, if there are Vendor window suppliers and the supplier in the job grid doesn’t match the currently selected vendor, PO Builder asks if you want to override the currently selected supplier with the work order's supplier:
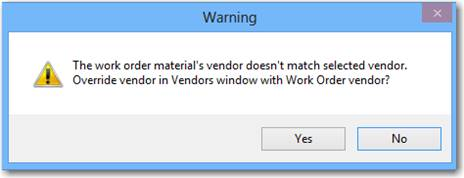
Click 'Yes' if you want to buy the material from the work order material vendor, or 'No' if you want to purchase from the currently selected supplier in the Vendor window.
If you've selected a Job Item from the material tree, PO Builder lists ALL the work orders under the Job Item. Thus, it is possible that different work orders have different vendor assignments. You can only override a Vendor window supplier if ALL work orders have the same vendor assignment. Note, if different work orders have different vendor assignments and you still want to drive supplier from the work orders, you will need to drag material at the work order level.
Remember, vendor information flows in from the Work Order's material requisition grid. Make sure work order material rows have vendor assignements prior to bringing up PO Builder and filling the material tree, if you want to drive supplier selection from the Work Order material requisition sheet.
Vendor Button on Purchase Order Panel.
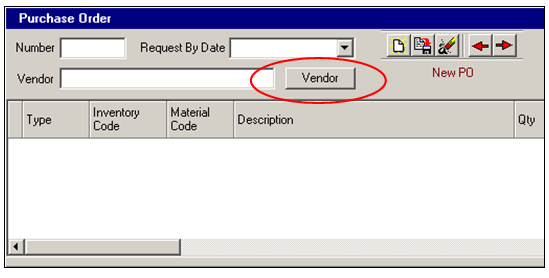
If you drag a material over to a new purchase order that doesn’t have any vendors (in other words, the material isn’t a ProjectPAK library item that has a vendor assignment), ShopPAK prevents the drag / drop operation. You must first choose a vendor by clicking the “Vendor” button in the PO window and select the supplier from the pop up dialog box.
Request By Date
This is a required field on the PO Builder form. This is the date that you want your shipment delivered by. ShopPAK uses this date to flag late shipments and to analyze how well your vendors meet requested delivery dates. Use ‘Material Due Date’ as a guideline for picking the right ‘Request By Date’.
PO Item Quantity / Job Assignments
PO Item quantity depends on how you’ve sequenced the materials tree and which materials tree node you drag over to the purchase order window pane. Dragging higher in the tree usually encompasses more of the job, and thus, means greater quantity. Dragging lower in the tree usually limits the context of the purchase, and thus, lowers quantity. For example, if you drag at the “Job” level, you will get ALL of the materials for the job. If you drag at a lower level, lets say at the “Work Order” level, PO Item quantity will be less since you are only purchasing for a work order which is usually only a subset of the job. Similarly, the PO job assignment quantity depends on the level that you drag at.
Dragging a Node From the Materials Tree
In the following example, we want to purchase “Birch ¼ 4 X 8 VC A-4” for all three jobs that currently need it (3003, 3005, 3017). The total estimated quantity for all three jobs calls for 10.54 sheets but ShopPAK rounds this up to 11 sheets for purchasing. To create a new PO, drag “Birch ¼ 4 X 8 VC A-4” over to the purchase order window pane and drop it.
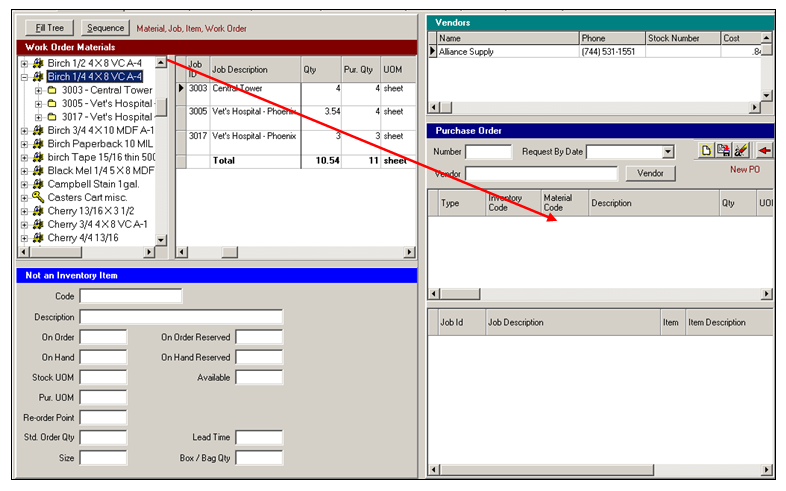
ShopPAK automatically fills in the purchase order window pane.
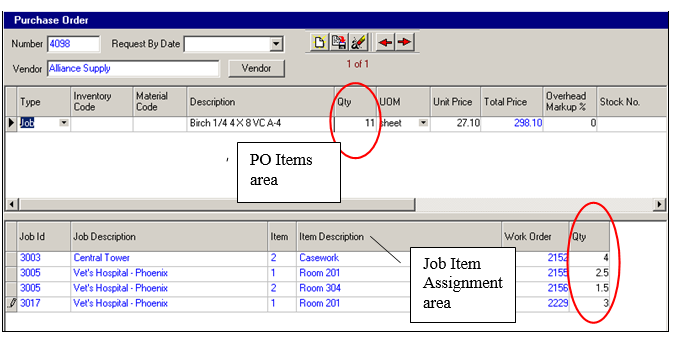
ShopPAK fills in the vendor based on the currently selected material’s vendor. In our example, the material is purchased from just one vendor --> ‘Alliance Supply’.
ShopPAK creates a new purchase order, #4098 (this is the next available PO number in the database).
ShopPAK creates one PO Item based on the material that was dragged over to the purchase order window pane. Notice the purchase quantity is 11 sheets. Since this is a direct material purchase, as opposed to a stock purchase, ShopPAK automatically fills in PO Item Type as ‘Job’.
It also distributes purchased quantities across all the Jobs that are in need of “Birch ¼ 4 X 8 8 VC A-4”. It identifies the Job, Job Item, and Work Order. Accurately allocating PO Item quantity across the job assignments is important so ShopPAK can automatically handle job costing and material status tracking.
Editing the Purchase Order
You can edit any grid cell with black font (e.g. PO Item Type, PO Item Quantity, Job Assignment Quantity, etc.). However, this usually isn’t necessary.
Flagging Materials That Have Been Dragged to a Purchase Order
After dragging a node over to the purchasing window pane, ShopPAK colors the job information grid cells red, indicating their material needs have been addressed on a purchase order. This makes it easier to see which materials you’ve already purchased as you click through the materials tree. After building several purchase orders, it is a good idea to click the “Build Tree” button. This will only show materials that have not yet been purchased, making it easier to navigate through the remaining materials that need to be purchased.
Adding New Materials to a Purchase Order
You can drag as many materials on to a purchase order as you wish. Simply navigate to the purchase order you want to add items to via the navigational buttons  and drag over the new material (or a Vendor, Job, Job Item, or Work Order icon). For example, on the next page we dragged over “CoreBoard ¾ 4 X 8 SF” and created a second PO Item on purchase order #4098.
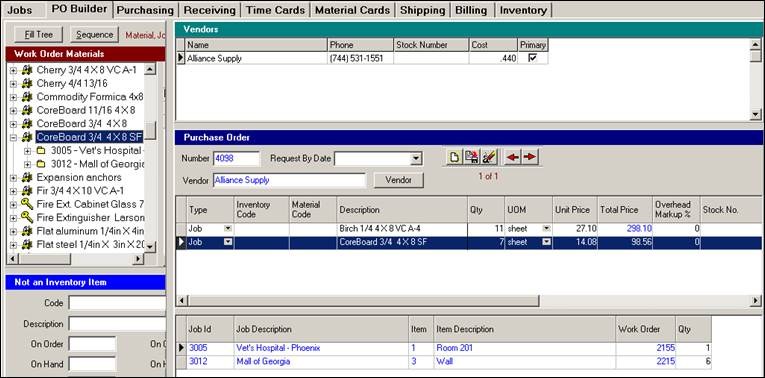
ShopPAK automatically adds “CoreBoard ¾ 4 X 8 SF” as a new PO Item and correctly distributes job allocation quantity across the jobs calling for the material.
Backing Out a PO Item
If you mistakenly drag the wrong material over to the purchase order window pane, follow these steps.
1. Select the PO Item you want to remove by clicking it with your left mouse button. This highlights the row.
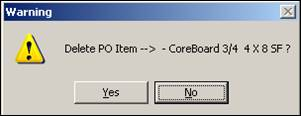
2. Right mouse click the PO Item grid and select “Delete” from the pop up menu.
3. ShopPAK asks you to confirm the deletion request. Click “Yes” to continue the deletion or choose “No” to cancel out.
If you say “Yes”, ShopPAK removes the PO Item from the purchase order and cleans out all references to the material with regard to the purchase order. It returns it to the materials tree so you can drag it to another purchase order at a later time.
Opening a Related Work Order
A handy feature is automatically opening the referenced work order from the Job Allocation grid.
1. Select the work order you want to open in the Job Allocation grid.
2. Right mouse click the grid to display the pop up menu.
3. Select “Open Work Order” from the menu.
4. ShopPAK navigates to the Jobs tab and opens the requested work order.