
WIP and COGS Reporting
A core function of ShopPAK is capturing and reporting job costs. Although ShopPAK is your primary tool for analyzing job costs, you still need a way of summarizing job costs and entering them into your financial accounting package so your income statement reflects actual expenses, and your balance sheet reflects current inventory value and WIP. This is typically done at month end. Three things are needed from ShopPAK: WIP (work in process), COGS (cost of goods sold), and ShopPAK Inventory asset valuation.
We define WIP as labor, material, sub-contractor, and other job costs that have been incurred during the month but not invoiced yet. We define COGS as labor, material, sub-contractor, and other job costs that have been incurred during the month and have been invoiced. Inventory asset valuation is simply the dollar value of your current inventory as of a particular date – usually the last day of the month. This chapter explains 2 approaches for determining WIP and COGS. It also shows how to obtain Inventory asset valuation.
WIP / Billing Analysis Report
The first method for calculating WIP and COGS is using the Job WIP / Billing Analysis Report. This report shows all of your WIP and COGS costs broken out by job up to a specific cut-off date. It also provides a grand total across all jobs at the bottom of the report. This method is the simplest since it does not require any special job setup, however, it needs all jobs to have estimated labor, material, sub-contractor and other costs in order to make accurate WIP calculations.
To run the report, select Reports | Jobs | Job WIP / Billing Analysis… from the menu.

This displays the Job Billing Analysis dialog box:
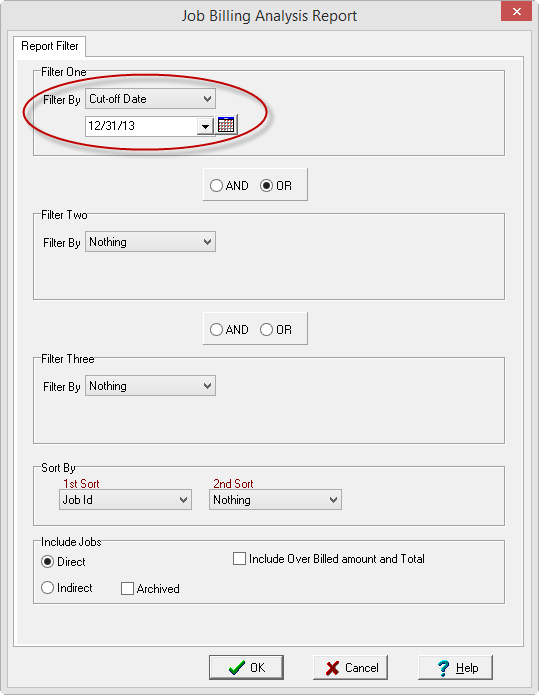
Change the first filter drop-down to Cut-off Date and select the last day of the month that you are working with. If you wish to look at a subset of jobs, use the other 2 filters. If not, leave the other filters set at ‘Nothing’ and click OK.
The report gives you a breakout of COGS by job, as well as, the calculated WIP amount as of the end of the month (supplied cut-off date):
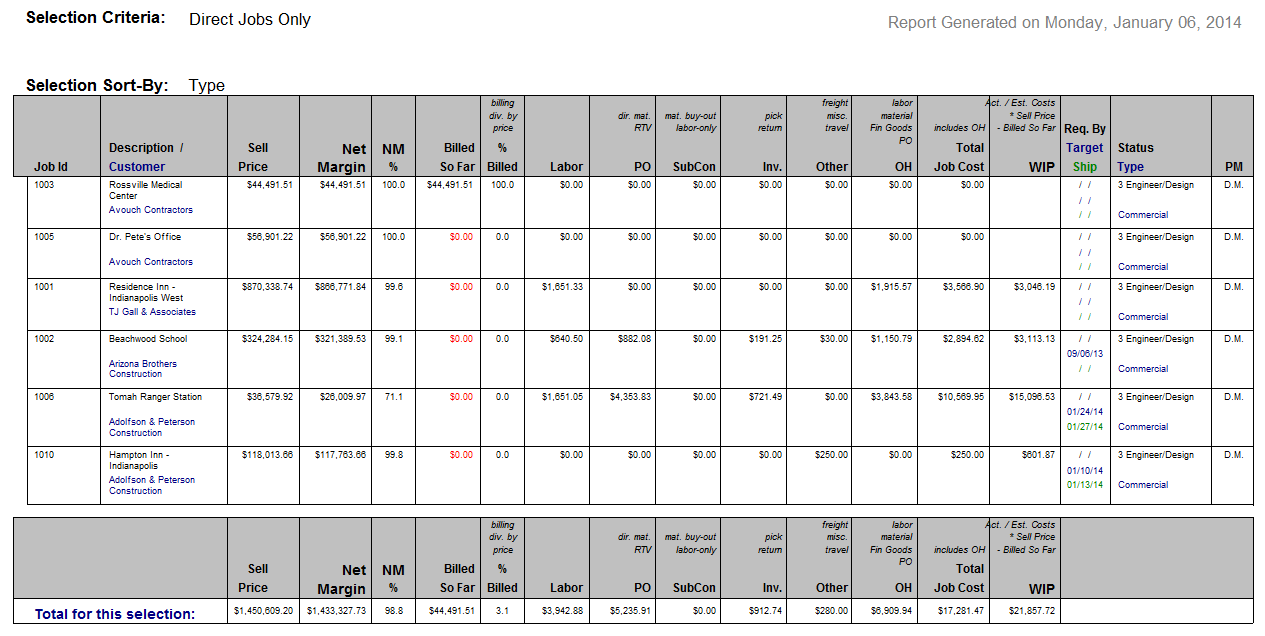
If you export information from ShopPAK to your accounting package via one of our accounting links, some of the information from the report may already in your accounting package. For example, material and sub-contractor job costs can be transferred to an accounting package after reconciling vendor invoices. Also, if you export payroll data based on labor job actuals, as opposed to, time and attendance transactions, you will have labor job costs as well. However, even if you export these costs to your accounting package, you won’t necessarily know if a transaction should be reported under COGS or WIP. The report helps you determine what amount of cost is COGS or WIP so you can make offsetting journal entries if needed.
Determining a Specific Month’s COGS and WIP
Since the report includes ALL transactions up to including the cut-off date, you need to save off each month’s report so you can manually calculate the actual month end COGS and WIP. We recommend saving the report as a PDF to a specified folder so you can easily find prior month’s reports.
1. Run the current month’s report as explained above.
2. Find and open the prior month’s report PDF.
3. For each COGS amount (labor, PO SubCon, etc.) subtract the prior month’s amount from the current month’s amount. This value is used as the current month’s COGS and can be entered into your accounting package. (A negative number means no COGS for that category of cost).
4. Since WIP is calculated from the cut-off date and is a function of Actual Costs / Estimated Costs, the new month end WIP amount comes from the current month’s WIP value. However, you should always back out the prior month’s WIP amount via a journal entry in your accounting package so you don’t overstate WIP, prior to entering the new WIP amount via a journal entry.
5. Save the current month’s report as a PDF so you can use it next month when calculating the next month’s COGS and WIP.
COGS General Ledger Codes and Reporting
This method is definitely more powerful than the WIP Billing / Analysis report method, however, it requires additional set up and requires more planning when organizing and building your ShopPAK job tree. It allows you to break COGS and WIP reports into any number of specific cost codes (GL Accounts), and has the added advantage of automatically calculating a specific accounting month since the report is organized by date range….not cut-off date.
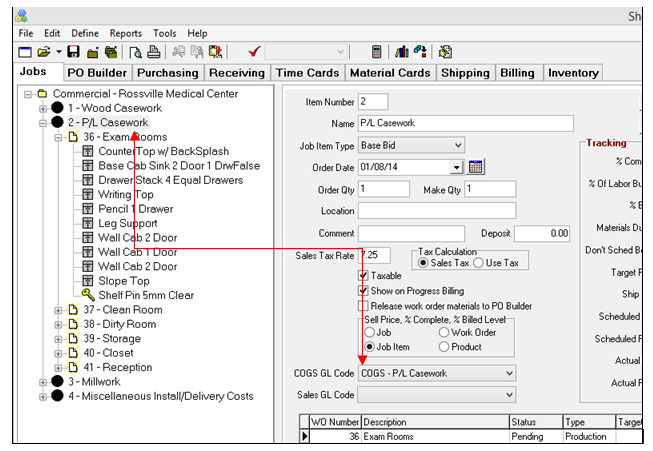
To use this method you must assign a COGS GL Account to each Job Item or Work Order depending on the level you wish to break things out on the COGS / WIP accounting reports. We recommend working at the work order level for greatest flexibility and granularity. But Job Item works as well.
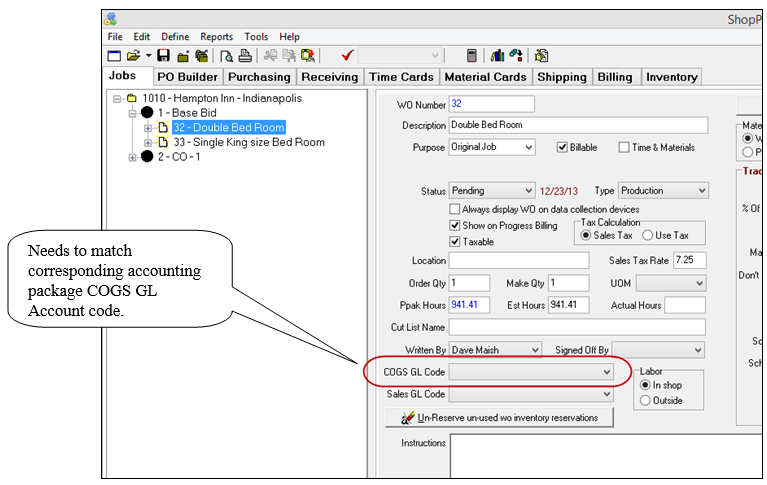
Note: The COGS GL Code can be manually entered inside ShopPAK after conversion from ProjectPAK, or it can be assigned inside ProjectPAK before conversion. Either way it MUST be assigned to every Job Item and/or Work Order in order for the reports to be 100% accurate.
|
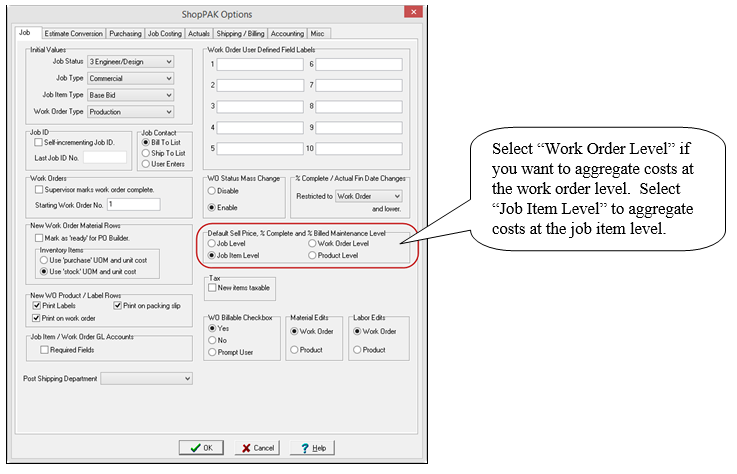
Since we are now relying on Job Items or Work Orders for billing purposes you will need to make sure these items are set up properly by default. Go to Define | ShopPAK Options… | Jobs tab and make sure you set the Default Sell Price/Maintenance Level/Billing Level to the appropriate level to correlate with your tree.
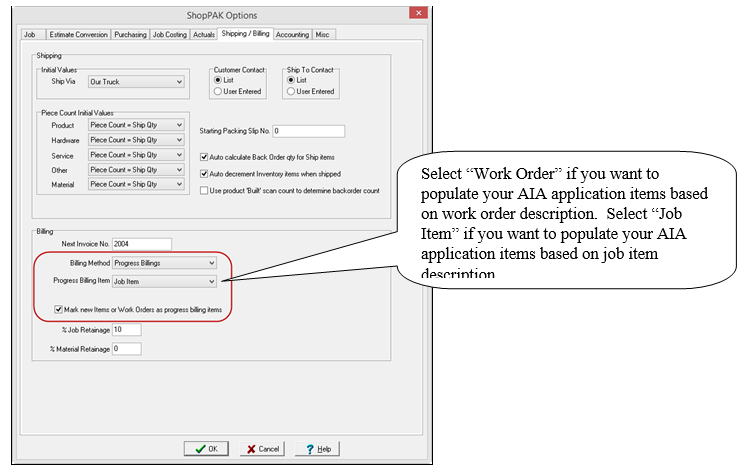
Next go to the Shipping/Billing tab and make sure your billing method is set to Progress Billing, the appropriate billing item is selected, and the checkbox is checked for Mark new items as billing items.
ProjectPAK Estimate Conversion
Depending on how you estimate in ProjectPAK, you may need to add a few more steps to your conversion process in order to create a new ShopPAK job that properly supports COGS GL Account reporting. Specifically, you need to make sure that each Job Item or Work Order COGS / WIP GL Account code correlates to a corresponding accounting package COGS / WIP GL Account codes.
For example, let’s say you break out COGS in your accounting package into three GL Account buckets – based on 3 product groups:
Product Group GL Account Code
Wood Casework COGS - Wood Casework
P Lam Casework COGS – P/L Casework
Millwork COGS - Millwork
To drive the ShopPAK COGS accounting reports, you need to organize your Job Tree accordingly. The easiest way is to create 3 Job Items – each Job Item mapped to one of the GL Accounts above. Each Job Item correlates to a corresponding accounting package COGS GL Account code for purposes of billing and capturing COGS / WIP monthly amounts.
In theory you could create one production Work Order under each Job Item, but in practice, it is rare that you would manage work orders in the same way that you plan on invoicing customers. Thus, you typically need to create multiple work orders under a given ‘billing’ Job Item that reflect how you want to combine products for efficient batching of ‘like’ work and capturing of job costs. For example, you might create multiple work orders that are batched by room number so you can track and job cost by room number.
Note: Creating your ShopPAK job tree is always a trade-off between production / job costing and billing. You need to organize work orders into logical ‘chunks’ of work to facilitate job costing and tracking. At the same time, you need to address customer billings.
|
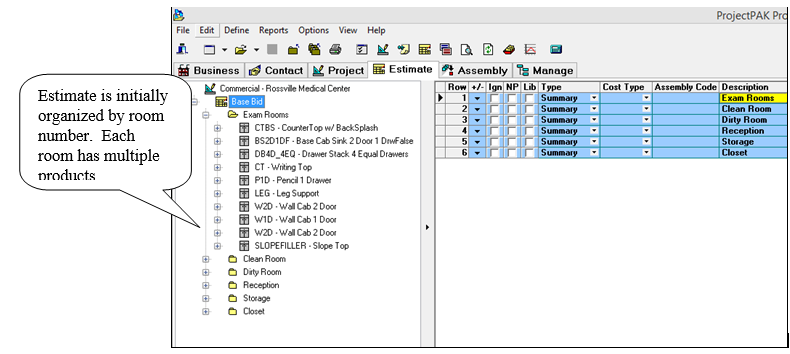
In this example, the ProjectPAK estimate was organized into rooms – each room organized into a summary node with all products included within the context of a given summary node.
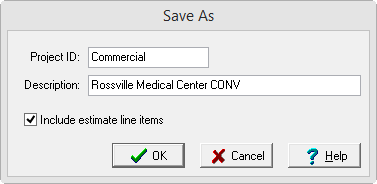
In its current state, there is no way to use the conversion utility and convert the estimate into a ShopPAK job that addresses our billing needs. Thus, we need to first create a ‘Conversion’ estimate and reorganize it prior to actually running the estimate conversion utility:
Now we re-organize the estimate to suit our conversion needs:
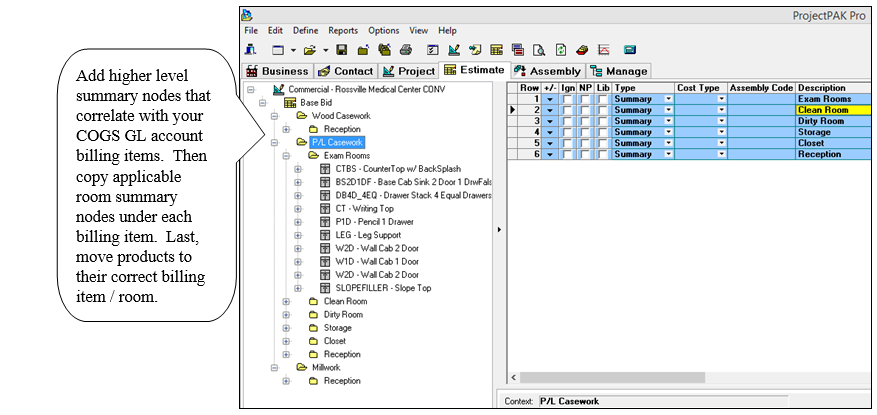
Once the estimate is re-organized and checked, you are ready to convert it into a first-cut ShopPAK job. The tree reflects the changes we made in ProjectPAK. It has a hierarchy of billing item GL Account code (Job Item) with Work Orders organized by room within each Job Item.
GL Accounting Reports
By ensuring that Job Items and/or Work Orders have the correct COGS GL Account code, captured costs (labor, material, sub-contractor, etc.) can be re-grouped accordingly for easy entry into your accounting package. And by tying customer billings back to these same COGS GL Account codes, ShopPAK determines if a captured cost should be considered COGS or WIP. The last benefit is we use a date range when creating the accounting reports so only costs and billings that have taken place in a specified accounting period – normally a particular month – are included on the reports.
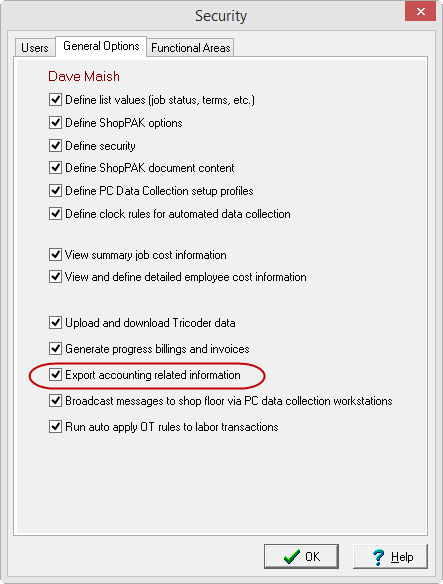
To run the ShopPAK GL accounting reports, a user must have ‘Export accounting related information’ security privilege.
To generate the COGS and WIP reports, go to Reports | Accounting | General Ledger - Batch…
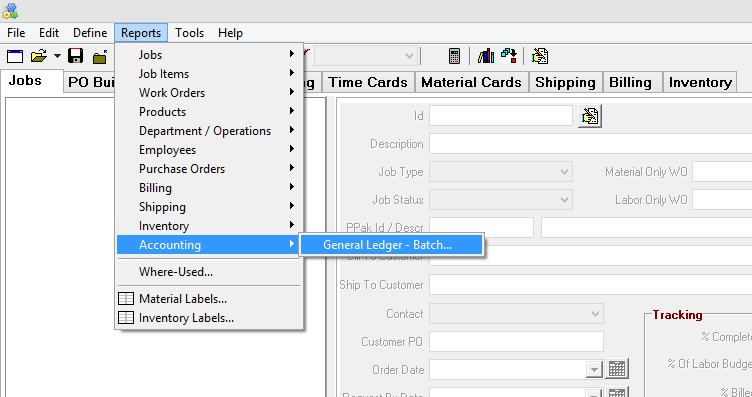
This brings up the GL Accounting Reports window:
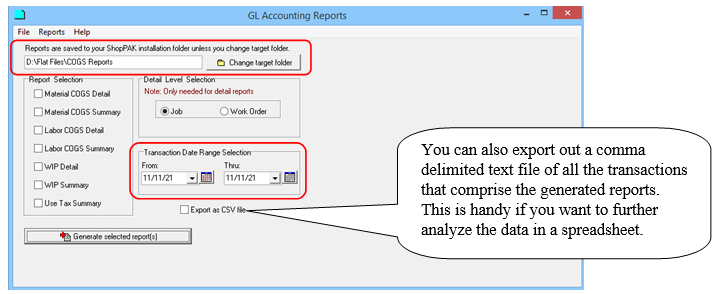
Selected reports are generated and automatically saved as PDF files in a user-selected destination folder. The default destination folder is the ProjectPAK / ShopPAK installation folder.
To change the destination folder, choose ‘Change default folder’. The standard Windows folder selection dialog will display:
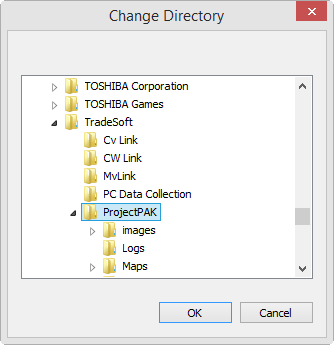
The current file save destination path is displayed in the upper left of the dialog window:
The target report folder is remembered between sessions.
All standard GL Accounting and Use Tax reports are available for selection. Users may select one or multiple reports within the same request session.
The Transaction Date Range Selection will be applied to all report files generated during the session. If reports require different date range selections, the User will need to generate each in a separate session, varying the date range as needed. Users will need to allow each GL Accounting Batch to complete prior to selecting subsequent requests.
Select the ‘Generate selected report(s)’ button to begin the process.
Note: Users can select any number of GL Accounting reports and immediately return to ShopPAK as the report application continues in the background. To see examples of the generated COGS and WIP reports, refer to Chapter 21 page 35.
|
Inventory Asset Valuation Reporting
Closing out an accounting month requires a journal entry to back out the prior month’s inventory balance and a journal entry to enter the new asset value.
Select Reports | Inventory | Item List… from the menu. This displays the Inventory Report parameters dialog box:

Since you want the total value of inventory, you don’t want to filter by anything – you want all inventory items included. Also, place a check in “Include Financial information” and “Exclude Items with zero balance”.
Notice that this report doesn’t have any date range selection capability. It reports inventory asset valuation at the point in time that the report is run. For that reason, you should run the report on the last day of the month towards the end of the business day. Save the report as a PDF so you can easily retrieve it when you want to create accounting journal entries. Since you probably can’t close an accounting month until 5 - 10 days into the next month, running and saving off the report at month end is the only way to guarantee an accurate end of month valuation.
The report shows inventory valuation for each inventory item, as well as, a total of all items at the bottom of the report. Typically, you’ll use the total from the bottom of the report for your accounting journal entry.
