
Overview
ShopPAK integrates several core business functions into a seamless and comprehensive shop management control system. ShopPAK coordinates the interaction of people, materials, and machinery ensuring products are efficiently produced and delivered on schedule.
Core functions that ShopPAK automates include:
-
Converting ProjectPAK estimates into ShopPAK jobs
-
Creating and managing jobs, job items, work orders and products
-
Scheduling (optional)
-
Project Management
-
Automated Shop Floor Data Collection (optional)
-
Job Costing
-
Job Tracking
-
Inventory Control
-
Production Control
-
Vendor Quote Requests
-
Purchasing
-
Product and Material Labels
-
Shipping
-
Receiving
-
Billing / Invoicing (Includes AIA Progress Billing)
-
Accounting Interfaces (optional)
-
Other Interfaces to Manufacturing Software / Spreadsheets (optional)
-
Transmittal and RFI creation and tracking
-
Alerts, Action Items, and Milestones
-
Sub Contractor Management
-
Document Management
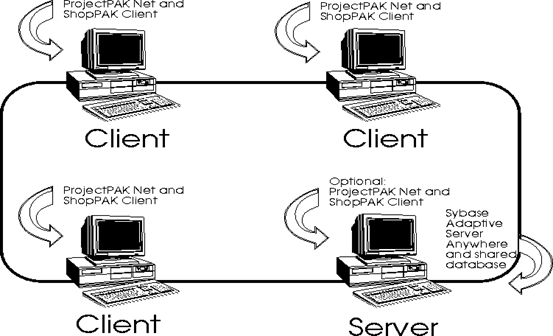
Client / Server Architecture
ShopPAK is a client/server application. This type of software architecture splits processing between several PCs referred to as "clients," and a database server referred to as the “server”. The client PC provides the user interface, in other words, the ShopPAK windows, dialog boxes and reports that the user interacts with when using ShopPAK. The database server, on the other hand, does its job transparently in the background. ShopPAK users don’t deal directly with the database server. It simply ‘serves up’ any client request for reading and writing data.
Local Area Network (LAN) Hardware and Software
To run ShopPAK you'll need PCs that can communicate over a network and an operating system and router that supports networked computers. Each PC that accesses the network must have a properly configured network adapter card and/or wireless network capability. ShopPAK works in the following environments:
Microsoft Windows 10, 8, 7, XP, 2000 and Server 2019, 2016, 2012, 2008, 2003 (32 or 64 bit)
ShopPAK uses TCP/IP to communicate across a network.
You should confirm that other software requiring network communications is working properly before running ShopPAK. For example, if you are sharing resources such as files and printers, make sure that different PCs can access resources across the network.
SQL Anywhere Database Software
TradeSoft licenses network database software from SAP for running ShopPAK. This software is distributed on the ShopPAK and ProjectPAK installation CD. The SAP database software is called SQL Anywhere -- a powerful and sophisticated midrange relational database management system.
Relationship with ProjectPAK
ShopPAK is tightly integrated with ProjectPAK. The shared ProjectPAK / ShopPAK database is installed on one PC or Server, and any number of client PCs that have ProjectPAK and/or ShopPAK client software are able to concurrently access and update information in the shared database.
Since ShopPAK is fully integrated with ProjectPAK, you need to first install the ProjectPAK server software and database, and make sure it is working properly, before you can install the ShopPAK database table extensions. (This is only needed when adding ShopPAK to an existing ProjectPAK site. If purchasing both ProjectPAK and ShopPAK, we send an initial database that has both the ProjectPAK and ShopPAK schema).
Moreover, you need to install ProjectPAK client software on each PC that you wish to run ShopPAK upon, prior to installing the ShopPAK client software. ShopPAK uses some of the ProjectPAK client files, and thus, they need to be on the PC.
System Date and Time
PCs have an internal clock that keeps track of the date and time. They use a battery when the power is turned off to maintain accurate date and time between sessions. ShopPAK uses the internal clock to time-stamp information in its database. To ensure that the ShopPAK database works properly, you should check that your system clock is working and adjust it if necessary. Do this prior to installing ShopPAK.
Starting ShopPAK
To start a ShopPAK client, select Start | Programs | ShopPAK | ShopPAK.
You’ll be presented with a logon window. Type your ProjectPAK logon and optional password. ShopPAK requires the same logon as ProjectPAK uses.
Note: Before you can log on to ShopPAK, your ShopPAK system administrator must first set up your logon privileges and security settings. See Security for more information.
|
Defective Installation CD
Although rare, it is possible that the installation file has become corrupted during dowload. If during installation you receive one of these error messages, you have a defective installer:
"General failure error reading drive...”
"CRC error ... "
"Bad sector ... "
"Unrecoverable read error...”
"Address mark not found ... "
To request another installer download, call Support Help desk at (770) 579-1922.
Backing up the Database
Database Location
The default location of the database for the network version is C:\PpakSrvr17. This would be on the computer that you installed the SAP Database Server on.
Backup Utility
You’ll find our backup utility in the SQL Anywhere Server 17 Program Files folder in the Start menu on the server. Just because you are backing up your server on a nightly basis doesn’t mean you are getting a backup of your database. If you run the SQL Anywhere Server 24/7, it places a lock on the database files and they WON’T be included in an automated tape backup. To solve this problem, run our backup utility prior to running your automated backup. The backup utility copies a mirror image of the shared database to C:\PPAKSRVR17\BACKUP\ENGINE.DB. The backup database is then ready to be picked up by your nightly backup utility.
Scheduling the Backup Utility
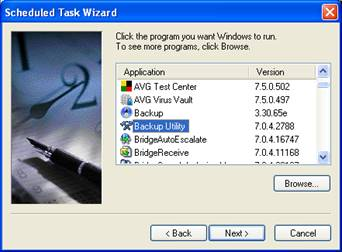
Create a scheduled task that runs our backup utility before running your system backup. Go to Start | All Programs | Accessories | System Tools | Scheduled Tasks | Add Scheduled Task. Choose Backup Utility from the list of programs. Click Next.
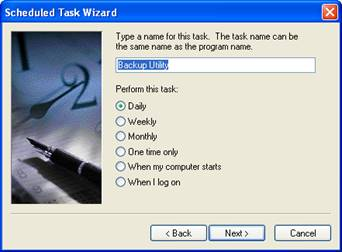
Choose to run the Backup Utility daily. Click Next.
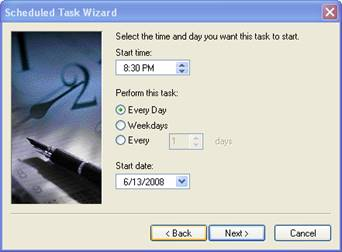
Specify a time that you want this task to run. Choose a time that is 45 minutes before your normal system backup is scheduled to run.
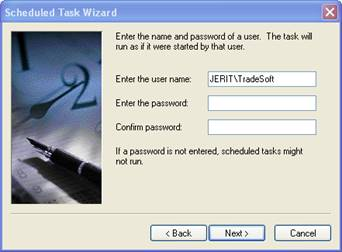
Enter the proper user name and password if your user name requires a password to log into Windows. If you don’t have administrative privileges on the server, then you will need to get someone who does to enter this information for you.
Finally, click Finish and you’re done. To make sure that everything is correctly configured, go ahead and run the scheduled task. You should see a copy of the TradeSoft database :
Engine.db in the C:\PPAKSRVR17\BACKUP\ENGINE.DB.
Note: The backup database retains the same date and time that the database was started. This can be a little confusing since you’d expect a newly created file to have the current date and time. Don’t worry. If the backup utility runs, it is creating a new copy of the database regardless of the date and time on the ENGINE.DB file.
To test this, delete the backup ENGINE.DB and re-run the scheduled backup task. You’ll see that it creates a copy of ENGINE.DB and places it in C:\PPAKSRVR17\BACKUP.
Restoring The Database
In the event that you lose your ProjectPAK database or it becomes corrupt and stops working, you can restore it from the most recent backup you’ve taken. Locate Engine.DB in your system wide backup. It should be in C:\PPAKSRVR17\BACKUP\ENGINE.DB. Copy ENGINE.DB to your SAP 17 installation folder. If you took our defaults this should be C:\PpakSrvr17. If you see a file called ENGINE.LOG in the SAP 17 installation folder, make sure you delete it. Whenever you start up the SAP Database Server, it should automatically create a new engine.log file to go with the database file.
Resetting Server Logoff Time for Idle Client PCs
1. If running on a 64 bit Windows operating system you'll find SERVER.TXT in:
C:\Program Files (X86)\SQL Anywhere 17\BIN32
If running on a 32 bit Windows operating system you'll find SERVER.TXT in:
C:\Program Files\SQL Anywhere 17\BIN32.
Open SERVER.TXT using a text editor like NotePad.
The text within the file should look something like this:
-x TCPIP
-n TradeSoft c:\ppaksrvr17\engine.db
Add the statement below to the bottom of your parameter list.
-ti 480
Make sure the ti character is lower case & preceded by a - (negative sign).
In this example, the SAP Server will logoff any Client PC after 480 minutes, 8 hours of inactivity.
You can set this number as high as you feel is realistic. -i 4800 would log users out after 80 hours inactivity. Be advised that inactivity from the perspective of the database server is not requesting data or updating data.
2. Save the Server.txt file after making the change.
TIP: If you already have a line beginning with -ti, add to the number beside it to increase the time. The value you enter will represent the number of minutes the server waits before logging off an inactive client.
|
The changes will be activated the next time the server is restarted & will affect all Client PCs.
Starting SQL Server Anywhere Automatically After Start-up/Re-boot
In the event the PC running the Adaptive Server Anywhere application loses power or needs to be restarted for any reason, you can have the SQL Server start automatically by following the procedure below.
Add the following statement to a batch file, (Server.bat perhaps is a good name), and have it executed on start-up or re-boot of the server running Adaptive Server Anywhere.
C:\PpakSrvr17\dbsrv17.exe @server.txt
The above statement assumes that you have installed Adaptive Server Anywhere in the default C:\ drive of the Server PC. If you have modified the default path for your Adaptive Server Anywhere database you will need to adjust this statement accordingly.
Place the new Server.bat file into the C:\Documents and Settings\All Users\Start Menu\Programs\Startup folder on the server PC running Adaptive Server Anywhere. You should also move the batch file to Start | Programs | Startup .
Running the SQL Server Anywhere Database as a Service
To avoid having to log on to the server in order to start the Adaptive Server Anywhere shared database application, you can run it as a service in the background. Contact technical support at 770-579-1922 for instructions and help.
Monitor Resolution
Set your monitor to a minimum resolution of 1024 x 768 pixels. We recommend even higher resolutions so you can see more fields on a ShopPAK form, however, we’ve designed our forms to work well at 1024 x 768.
Note: Lower resolutions can cause ShopPAK forms and dialog boxes to not display all of their controls. Make sure you run at a minimum of 1024 x 768 to see every ShopPAK window and dialog box in its entirety.
|