
Alert Definition
Select Define | Alerts from the ShopPAK menu to display Alert Setup. Define user specific alert default behavior, and most importantly, choose and configure alerts for users.
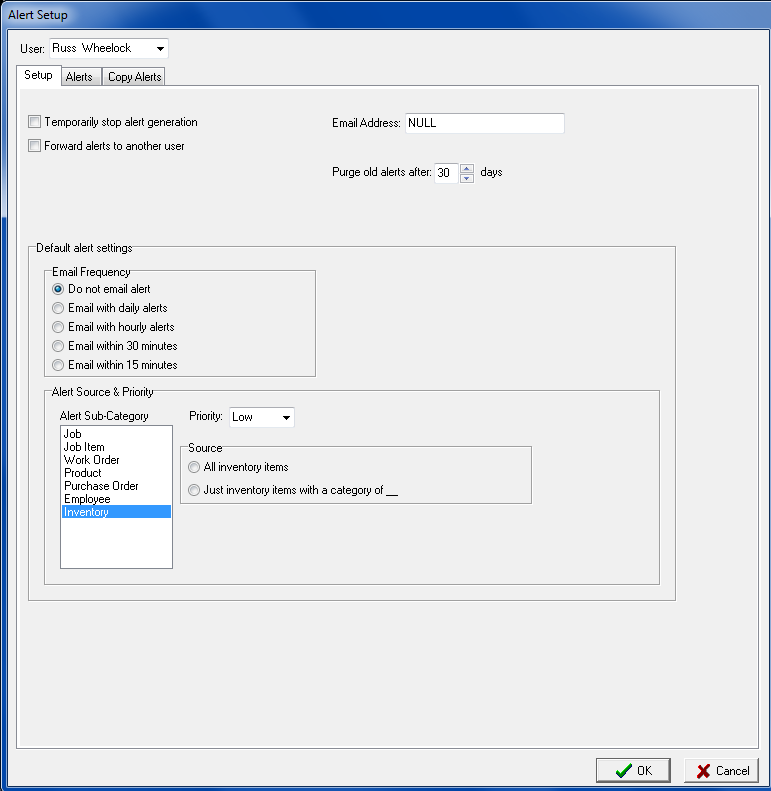
Alerts Setup Tab
User
Lists ShopPAK users that have security permission to create alerts. Select the user you want to work with. All subsequent activity while the and define alerts for.
Temporary Stop Alert Generation
Stops alerts from being generated for the user.
Forward Alerts To Another User
Forwards user’s generated alerts to another ShopPAK user. If you select this option, select the user you want to forward alerts to from the list of ShopPAK alert users.
Email Address
If the user wants email notification, enter their email. The Alert Generator uses this email when creating email notifications for the user.
Purge Old Alerts After So Many Days
Number of days before ShopPAK automatically purges the user’s alerts.
The remaining controls on the Alerts Setup tab define defaults that flow into a new alert request. Using defaults speed alert creation and promotes consistency. (Note: Alert requests are created on the Alerts tab).
Email Frequency
When setting up a new alert request, email frequency flows into the new alert’s email frequency property.
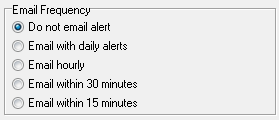
Select the option that will most often be the case when creating a new alert request. Note: Defaults can be easily overridden on the Alerts tab.
|
Option
|
Purpose
|
|
Do not email alert
|
Alert will not be emailed. It will only display in the user’s alert browser window.
|
|
Email with daily alerts
|
Generated alert will be emailed when the Alert Generator runs its daily batch cycle. This is done once a day and is when date oriented alerts are generated.
|
|
Email hourly
|
A generated alert will be emailed at the top of the hour.
|
|
Email within 30 minutes
|
A generated alert will be emailed within a ½ hour of its creation.
|
|
Email within 15 minutes
|
A generated alert will be emailed within 15 minutes of its creation.
|
Alert Source
A very important part of defining alerts is identifying which job, work order, or purchase order a user wants ShopPAK to monitor and generate alerts for. Instead of requiring users to manually identify the jobs, work orders, purchase orders, etc. they want monitored (which would place quite a burden on users), we automatically identify target ShopPAK records via proxy options.
Job Alerts
1. Where I’m the project manager of the job:
The user receives job alerts for any job where they are the project manager.
2. Where XXXX is the project manager of the job:
Selecting this option displays a list of ShopPAK users. Choose one or more names. The user receives job alerts for any job that has one of the selected employees identified as the project manager.
3. All jobs:
The user receives job alerts for every active job in the system.
Job Item Alerts
1. Where I’m the project manager of the job:
The user receives job item alerts for any job where they are the project manager.
2. Where XXXX is the project manager of the job:
Selecting this option displays a list of ShopPAK users. Choose one or more names. The user receives job item alerts for any job that has one of the selected employees identified as the project manager.
3. All jobs:
The user receives job item alerts for every active job in the system.
Work Order Alerts
1. Where I’m the project manager of the job:
The user receives work order alerts for any job where they are the project manager.
2. Where I’m the work order ‘written by’ person:
The user receives work order alerts for any work order where they are the ‘Written By’ person.
3. Where XXXX is the project manager of the job:
Selecting this option displays a list of ShopPAK users. Choose one or more names. The user receives work order alerts for any job that has one of the selected employees identified as the project manager.
4. Where XXXX is the work order ‘written by’ person:
Selecting this option displays a list of ShopPAK users. Choose one or more names. The user receives work order alerts for any work order that has one of the selected employees identified as the ‘written by’ person.
5. All jobs:
The user receives work order alerts for every active job in the system.
Product Alerts
1. Where I’m the project manager of the job:
The user receives product alerts for any job where they are the project manager.
2. Where I’m the work order ‘written by’ person:
The user receives product alerts for any work order where they are the ‘Written By’ person.
3. Where XXXX is the project manager of the job:
Selecting this option displays a list of ShopPAK users. Choose one or more names. The user receives product alerts for any job that has one of the selected employees identified as the project manager.
4. Where XXXX is the work order ‘written by’ person:
Selecting this option displays a list of ShopPAK users. Choose one or more names. The user receives product alerts for any work order that has one of the selected employees identified as the ‘written by’ person.
5. All jobs:
The user receives product alerts for every active job in the system.
Purchase Order Alerts
1. Where I’m the ‘buyer’ of the PO:
The user receives PO alerts for any purchase order where they are the buyer.
2. Where I’m the ‘requestor’ of the PO:
The user receives PO alerts for any purchase order where they are the requester.
3. Where I’m the project manager of a job referenced by PO:
The user receives PO alerts for any job referenced by the PO where they are the project manager.
4. Where I’m the ‘written by’ person of a work order referenced by PO:
The user receives PO alerts for any work order referenced by the PO where they are the ‘written by’ person.
5. Where XXXX is the buyer of the PO:
Selecting this option displays a list of ShopPAK users. Choose one or more names. The user receives PO alerts for any purchase order that has one of the selected employees identified as the buyer.
6. All purchase orders:
The user receives PO alerts for every purchase order in the system.
Employee Alerts
1. All employees:
The user receives employee alerts for every employee in the system.
2. Just employees with a primary department of XXXX:
Selecting this option displays a list of departments. Choose one or more departments. The user receives employee alerts for any employee with a primary department that matches one of the selected departments.
Inventory Alerts
1. All inventory items:
The user receives inventory alerts for every inventory item in the system.
2. Just inventory items with a category of XXXX:
Selecting this option displays a list of inventory categories. Choose one or more categories. The user receives inventory alerts for any inventory item that has a category that matches one of the selected categories.
Alert Priority
For each alert sub-category (Job, Job Item, Work Order, Product, Purchase Order, Employee, Inventory Item), identify the sub-category’s default alert priority:
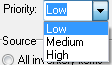
You can set different priorities for different sub-categories. Priority is used as a filter on the Alert Browser window and is a great way to separate alerts with different priorities. And if you have alerts emailed, they are organized into different sections according to priority.
Alert Request Tab
This tab is used to create and configure alerts. There are lots of candidate alerts to choose from. They are organized into 5 broad categories -> Events, Material, Labor, Billing and ProjectPAK:
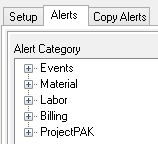
TIP: We encourage users to take some time and review all candidate alerts so they are familiar with all the possibilities.
|
Each alert category is further broken down into sub-categories:
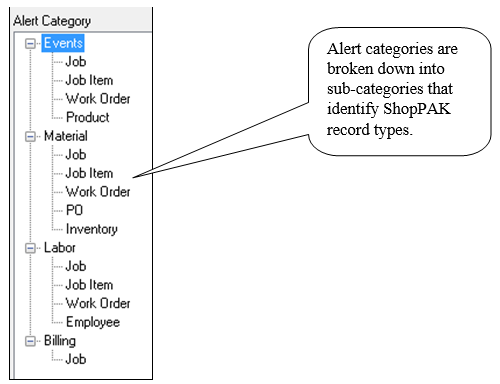
Clicking a category displays all the possible alerts defined for that category. Similarly, clicking a sub-category displays the subset of alerts for that sub-category.
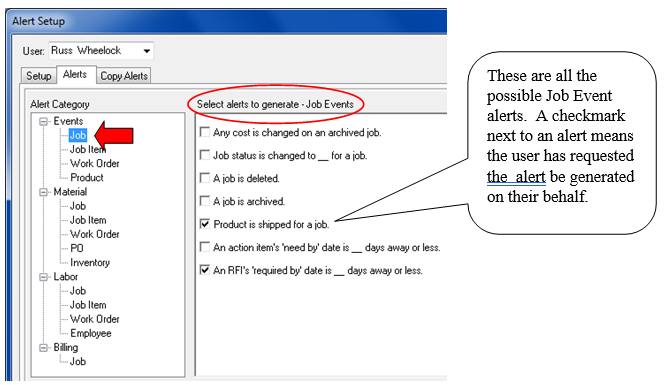
Adding a New Alert
1. Place a check into the checkbox adjacent to the alert.
2. Alert defaults that exist for the alert’s sub-category automatically populate alert details.
3. Adjust email frequency, priority, or source if needed.
4. If the alert needs a threshold value, supply 1 or more threshold values.

In the above example, the alert will be generated if the user is the job’s project manager and job status changes to either “3Engineer/Design” or “5 Production”. The alert will not be emailed. It will be given a priority of low.
Modifying an Existing Alert
1. Select the alert by clicking on it.
2. Edit details and/or threshold values as needed.
Removing an Alert
1. Uncheck the alert checkbox. This removes the alert from the user’s requested alerts.
Copy Alerts Tab
To speed alert creation and definition, use the Copy Alerts tab. This tab enables you to use another user’s alerts as a template for the current user’s alerts.
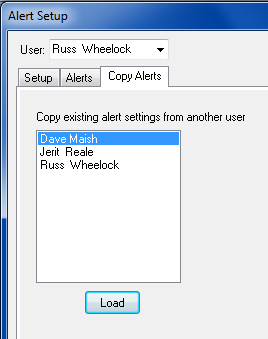
1. Select the user in the list that has similar alerts defined and set up.
2. Click the Load button. This reads every alert the selected user has created and creates a copy of each alert and assigns them to the target user.