
Adding Materials to a Quote request
To add a material(s) to a quote request, drag the material (or Vendor, Job, Job Item, or Work Order) tree node over to the Quote request window. This creates a new quote request item on the quote request grid. The material description becomes the quote request Item description.
Note: To drag a material, position the mouse over the material and click and hold your left mouse button down. As you start to drag, your mouse pointer changes to a “no drop” icon. Once you reach the Quote Request grid of the Quote Request window, it changes into a “drop” icon, indicating it is time to let go of your left mouse button and adds the material to the grid.
|

Quote Request Item Grid
You can change material code, description, extended description 1, extended description 2, quantity, and unit of measure. However, it would be unusual to change any of this information. Note…..unit price and extended price are protected. ShopPAK automatically updates these cells when you choose the vendor you want to be the supplier. This is done via the Quote Request Vendor Grid located below the Quote Request grid.
Quote Request Vendor Grid
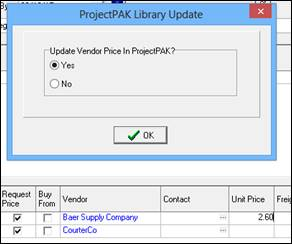
If there is a vendor (or vendors) associated with the material you drag on to the Quote Request grid, ShopPAK adds the vendors to the vendor area below the Quote Request grid. In the example above, the material had two suppliers: Baer Supply Company and CourterCo. They are added to the Quote Request Vendor Grid.

By default, ShopPAK turns on 'Request Price' for added vendors. If you don't want a quote from a vendor, uncheck the checkbox.
To add additional vendors that are not already associated with the dragged material, position your mouse on the vendor grid and right mouse click it. This brings up a menu.
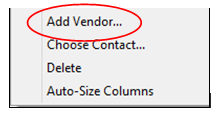
Choose 'Add Vendor'. A dialog box will appear that you use to find the vendor you wish to add.
Seq Number
System generated vendor sequence number.
Request Price
If you want ShopPAK to include the vendor when generating a quote request, place a check in the checkbox.
Buy From
After you get the quote requests back from vendors, place a check into the checkbox of the supplier you want to purchase the material from. Note, you can only select one vendor to be the supplier. ShopPAK automatically fills in the item's unit price and extended price when you select the vendor you wish to purchase the material from.
Vendor
Name of the vendor.
Contact
Vendor contact. To choose a vendor contact, highlight the vendor row and right mouse click the grid. This brings up a list of vendor contacts defined in the ProjectPAK vendor record. Select the contact you want to use. Note: selecting the contact is primarily used to get the correct email when emailing the vendor quote request.
Unit Price
Initially we leave this cell blank, even if we have a vendor price for the material. After you get the vendor quote requests back, you should enter the new unit price into this cell. ShopPAK will ask if you want to update the ProjectPAK Library. In most cases you'll want to do this so the new price is available when you actually create the Purchase Order in a subsequent step.
Freight
Used to record the freight charge for the material.
Date Received Date
Used to record the date that the vendor returned their price quote for the material.
Stock Number
Vendor stock number of the material. If you update the stock number, ShopPAK asks if you want to update the ProjectPAK library with the change. This is a good idea so the stock number is available in the future.