
ProjectPAK Department and Operation Codes
ProjectPAK and ShopPAK are tightly integrated because they both read and write to the same physical database. ShopPAK can access records created and maintained by ProjectPAK such as Business, Project, Contact, Library Item, Department, and Operation Code. You can also create these same records from directly within ShopPAK itself.
The most important aspect of ProjectPAK and ShopPAK integration is ShopPAK’s ability to automatically convert a ProjectPAK estimate into a first-cut ShopPAK job. To make the most of the conversion utility’s capabilities, you should create ProjectPAK estimates that have labor line items defined with the correct Department and Operation Code.
Department
ShopPAK uses “Department” for job costing and scheduling purposes. A department is best described as a work center within your shop. You need to define the different departments that jobs flow through. Each department should have at least one operation code (op code), however, you can define as many operations per department as needed.
If you don’t break your shop into distinct departments, define one department called “Shop”.
Defining Departments
Choose Define | Misc | Departments from the Ribbon menu. This displays the "Department List" dialog box.
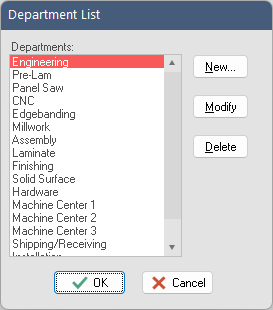
Use the “New”, “Modify”, and “Delete” buttons to manage department values. Each department name can be up to 22 characters in length.
Clicking the “New” or “Modify” buttons displays the “Department Values” dialog box:
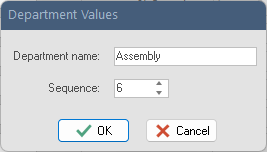
Dept Name
Name of the department.
Sequence
The sequence that jobs flow through departments.
Note: The department list dialog box is sorted by department sequence. Make sure you assign the correct positional sequence, since the ShopPAK scheduler uses this information when scheduling jobs.
|
Operation Code
ShopPAK uses “Operation Code” for job costing at the labor operation (op code) level. Although capturing labor at the op code level requires a little more time operationally, as well as, administratively, the additional information about productivity and profitability can help you make sound business decisions.
Defining Operation Codes
Choose Define | Misc | Operation Code from the Ribbon menu. This displays the "Operation Code List" dialog box.

Select the department you wish to add, modify, or delete operational codes for.
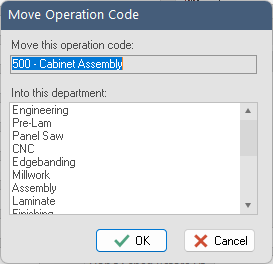
Use the “New”, “Modify”, and “Delete” and “Move” buttons to manipulate department values. Each operation code has a 1-3 character code and up to a 22 character op code description.
Clicking the “Move” button to move an operation that is currently associated with one department to another department.
Clicking the “New” or “Modify” buttons displays the “Op Code Values” dialog box.
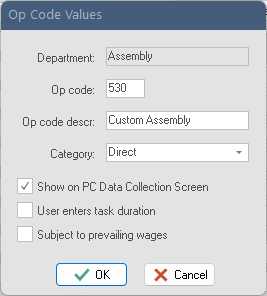
Dept
The name of the department that this op code is associated with. Read only.
Op Code
3 character, numeric op code number. It must be unique.
TIP: When defining op codes, list them all first on paper and assign numbers that are logically related. For example, make all the op codes that are associated with a particular department start in the same range (e.g. 305, 309, 315, etc.). Leave extra numbers available in case you add new op codes later (e.g. don’t create op codes 301, 302, 303...instead, create op codes 301, 305, 310, etc.). If you want to capture indirect labor hours, don’t forget indirect op codes for maintenance, cleanup, meetings, etc.
Remember – Op Code Values Must Be Unique.
|
Op Code Description
22 character description.
Category
Type of op code. 3 choices are available:
1. Setup - Machine set up and/or fixed labor operation for a particular job.
2. Direct - Direct labor logged against a particular job.
3. Indirect - Indirect labor not attributed to any particular job.
TIP: Use ‘Indirect’ if you want to capture indirect hours in ShopPAK (meetings, clean up, maintenance, etc). Create a ‘dummy’ department called “Indirect” and define the indirect op codes you wish to track. Make sure the dummy “Indirect” department is placed LAST in department sequence. This is necessary if you are going to use the ShopPAK Scheduler program.
|
Show on PC Data Collection Screen
PC Data Collection users should place a check in this box if this operation should be included in the selection list displayed on shop floor data collection workstations.
User enters task duration
Leave blank if you want ShopPAK’s Shop Floor Data Collection system to automatically time-stamp and calculate employee time spent doing tasks. However, if you have a task (for example, installation) that occurs outside the shop, place a check into the checkbox. ShopPAK displays an additional screen so employees can enter the amount of time spent on the outside operation.
Subject to prevailing wages
Future feature not yet implemented.
Adding Department and Operation Code to Library Items
You should add department and operation codes to labor-oriented line items in the Library / Price Book. ProjectPAK automatically copies the proper department and operation code into an estimate or assembly when building an estimate or assembly from library items.
When you convert a ProjectPAK estimate into a ShopPAK job, ShopPAK reads the department and operation code from labor estimate line items and creates corresponding ShopPAK records. This assignment will speed the process of turning a new estimate you’ve won into a ShopPAK job.
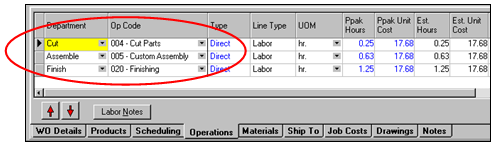
Their records are available under the sub-tab ‘Operations’ for each Work Order under the converted parent job.
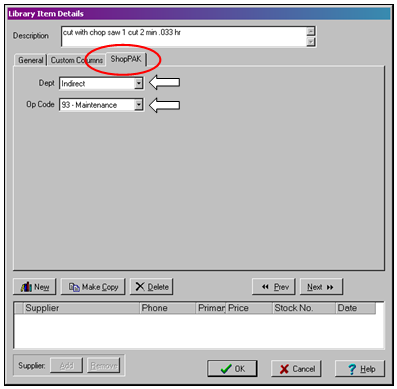
To assign a default department/operation to any Library Item, open the library item in ProjectPAK.
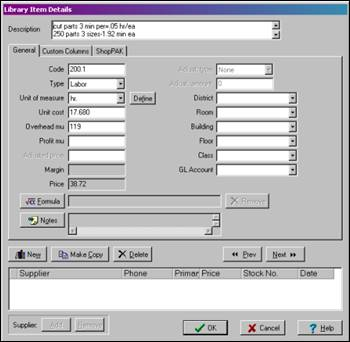
Select the ShopPAK sub-tab. Choose the correct Department and Op Code from the corresponding pick list controls.
Assigning Dept. and Op Codes to Estimate and Assembly Line Items
You can add department and operation codes to estimate and assembly line items by highlighting the rows you wish to update, and selecting Edit | Assign | Dept / Op Code from the menu (or alternatively, press Ctrl+O). This displays the “Assign Department / Op Code” dialog box.
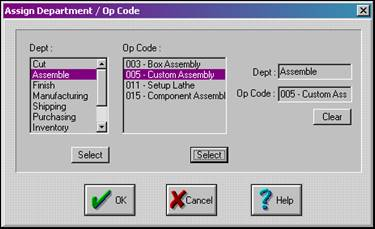
Selecting a Department
Click the department you wish to assign with your mouse and click the Dept. Select button. The value selected will appear in the Dept. selection box.
Selecting an Op Code
Make sure you’ve first selected a department. Click the op code you wish to assign with your mouse and click the Op Code Select button. The value selected will appear in the Op Code selection box.
Click the “OK” button to return the selected values to the estimate or assembly window. In the example that follows, we’ve just assigned the department and operation code to the “Labor” row on line 6.

Removing Department and Op Code Values From an Estimate
Remove department and op code values from an estimate or assembly line item by:
1. Highlighting the rows that have the department and op codes you wish to remove
2. Selecting Edit | Remove | Dept / Op Code from the menu.